Unlocking the Power of visionOS Particles: A Detailed Tutorial
Medium Header
XRealityZone is a community of creators focused on the XR space, and our goal is to make XR development easier!
This article was first published in xreality.zone , a Chinese version of this article is available here.

Write at the beginning
Imagine sitting comfortably in your room, yet being transported to a world where cherry blossoms dance freely across the sky, or where you stand aboard a pirate ship battling fierce storms, or wander through vast sandy deserts in search of legendary treasures. Such vivid scenes are brought to life with the aid of particles, whether it’s cherry blossoms, drifting papers, fallen leaves, raindrops, snowflakes, or the glint of fireworks and mesmerizing beams of light.

In this era of spatial computing, particle effects not only offer a heightened sense of realism but have also emerged as pivotal interface elements. Their significance rivals that of animations in 2D interactions. With the advent of Apple Vision Pro, a much-anticipated particle system, absent in earlier versions of RealityKit, has finally made its debut. As of now, there are primarily two methods to construct basic native particle effects:
- Using Reality Composer Pro – Adding a Particle Emitter Component to any given Entity.
- Using Xcode – Directly add a
ParticleEmitterComponentinto aModelEntitywithin theImmersiveView.
In the ensuing sections, we will guide you through utilizing particles on visionOS, complete with best practices. This article was created based on the wide community information, and we’d like to extend our gratitude to Yasuhito Nagotomo for helping us review the article.
We aim to help everyone, from beginners to experts who are well-acquainted with particle systems in platforms like Unity, UNREAL, and Blender. We will shed light on newly introduced terms. Keep an eye out for the 💡 icon for advanced insights. Additionally, terms in italics represent button labels within Reality Composer Pro. This article was originally written in Chinese, and all English translations have been manually reviewed after machine translation. If you come across any mistakes, your feedback is greatly appreciated.
Basic Concepts of Particles
Comparison with other software
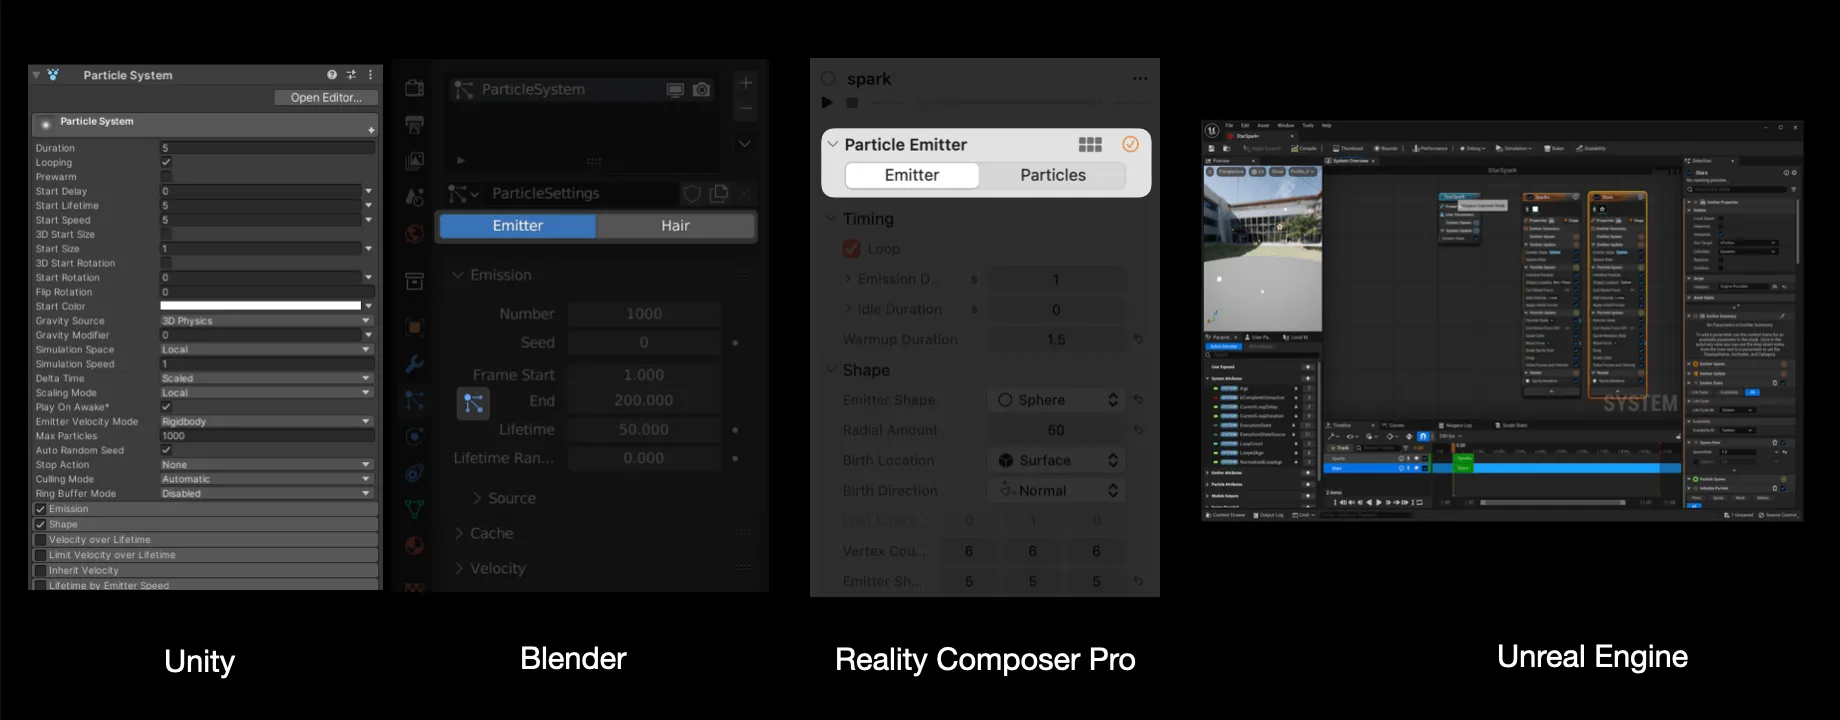
Particle systems in Unreal Engine (Cascade and Niagara):
- Cascade: This is Unreal’s legacy particle system. It allows users to create and modify visual effects primarily through its modular node-based system.
- Niagara: This is Unreal’s newer and more advanced particle system. Niagara offers more flexibility than Cascade, allowing for more complex interactions between particles and even interactions with other environmental elements.
- Features:
- GPU-Based: Efficient simulations for large amounts of particles.
- Data-Oriented: Allows for intricate customization of particle behavior.
- Integrated with other Unreal systems (e.g., audio, lights).
Particle systems in Unity (Shuriken and Visual Effect Graph):
There are two particle systems in Unity:
- Shuriken: Unity’s older particle system. It provides a component-based approach where users can create and modify particle effects using a series of modules.
- Visual Effect Graph (VEG): Unity’s newer particle system, designed for high-performance visual effects. It uses a node-based system similar to Shader Graph.
- Features:
- GPU-Based: Designed for large-scale effects.
- Flexible Node-Based System: Allows for complex custom effects.
- Integrated with other Unity systems and can be controlled through scripts.
Particle systems in Blender (Particles and Mantaflow):
There are also two particle system in Blender:
- Particles: Blender’s traditional particle system. It can handle a variety of tasks, including hair, fur, and basic simulations.
- Mantaflow: An integrated simulation framework in Blender used for creating more complex effects like smoke, fire, and liquids.
- Features:
- Versatility: Besides visual effects, it’s used for hair and instancing geometry.
- Physics-Based Simulations: Can work with Blender’s physics systems.
- Tightly Integrated with the rest of Blender: This makes it suitable for a range of tasks beyond just VFX.
In summary, Unreal is known for its high-quality cinematic capabilities, and with Niagara, it has raised the bar for in-engine real-time visual effects. Unity has been evolving rapidly, and with the Visual Effect Graph, it offers a competitive solution for high-end visual effects, especially for users who are already embedded in the Unity ecosystem. Blender, primarily a 3D modeling and animation software, provides a robust particle system. It may not be as real-time efficient as game engines, but it offers a comprehensive solution for pre-rendered visuals. So, what are the features of Apple’s native particle system that came with the release of Apple Vision Pro? Let’s find out together.
Create basic particle effects
To create a particle effect, we must first have an Entity. Start by opening Reality Composer Pro (hereinafter referred to as RCP). For demonstration purposes, let’s take a cube as an example. After creating the cube, you’ll find the option for Particle Emitter in the Add Component section at the bottom right. Once added, you’ll get a default particle emitter with its emission direction facing upwards along the positive Y-axis.
Emitter: Used to emit particles, some parameters can be configured.
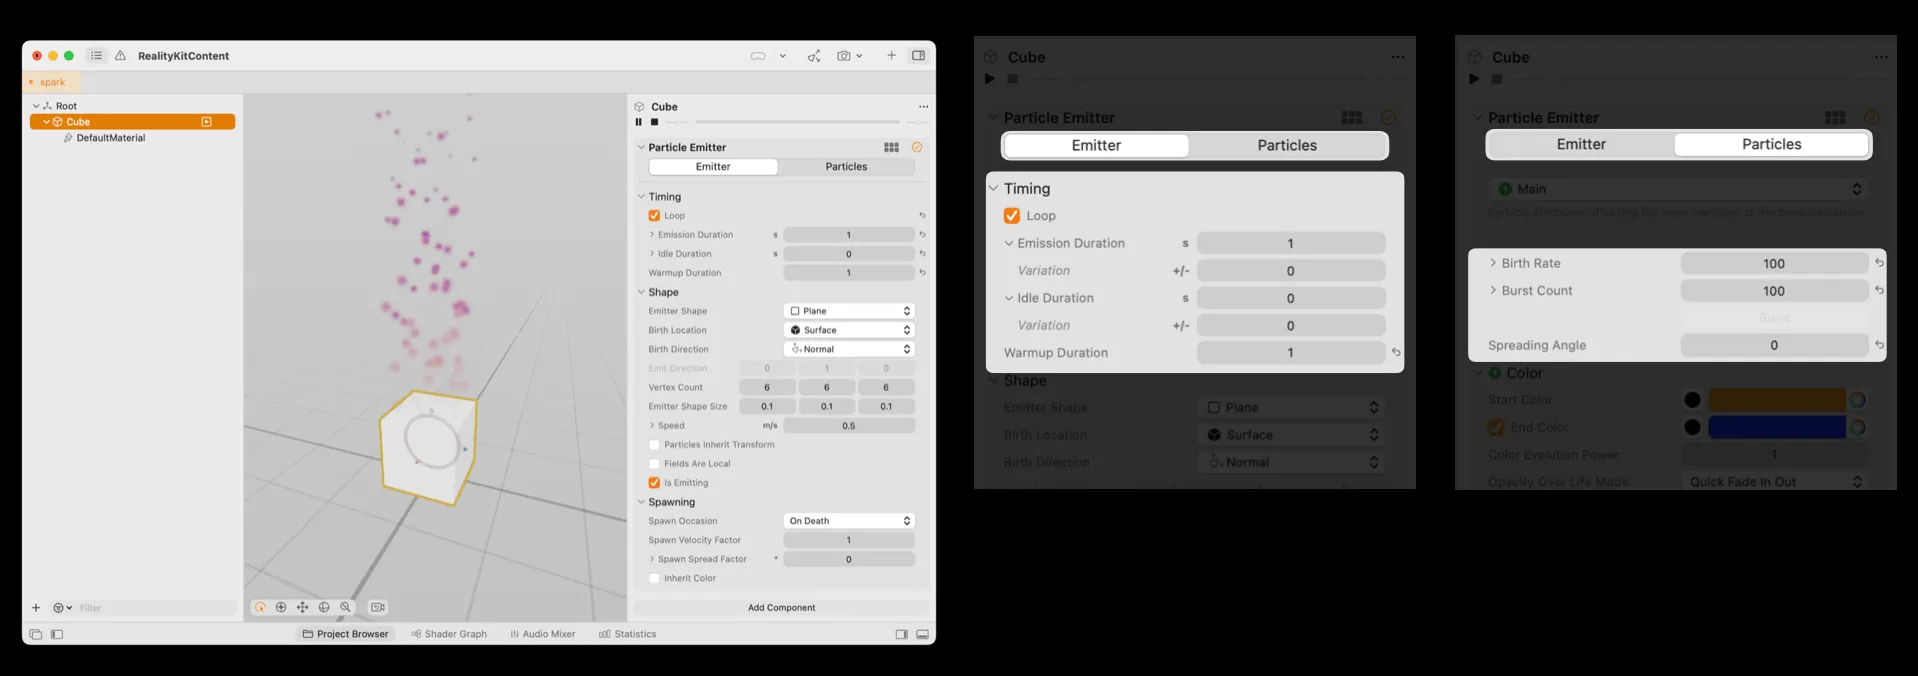
Correspondingly, there are panels for adjusting the properties of the emitter and particles on the right side of the RCP. We will explain them in the coming sections. First, the number of particles emitted by the emitter once at a time is controlled by the Birth Rate in Particles. To enhance the disorder of particles, there is a Variation parameter that randomly increases or decreases the Birth Rate. Burst Count refers to the number of particles emitted all at once, and there is a corresponding randomization parameter Variation, too. Of course, we can test the effect of bursting by clicking Burst during particle playback.
In addition, the emitter has a basic property, which is time. Whether it is cyclic emission, how long each emission lasts, if it is cyclic emission then whether there is an interval between two launches, and the waiting time before launch are all controlled by the Timing submodule in the Emitter. The Emission Duration controls the duration of one launch in seconds. Idle Duration Controls the interval time between two launches in seconds. Both of these properties have randomly changing Variation options, but random increments/decrements will not reduce the time to a negative number. In addition, Warmup Duration controls how long the first frame should appear before the first launch. The above effects are demonstrated as follows:
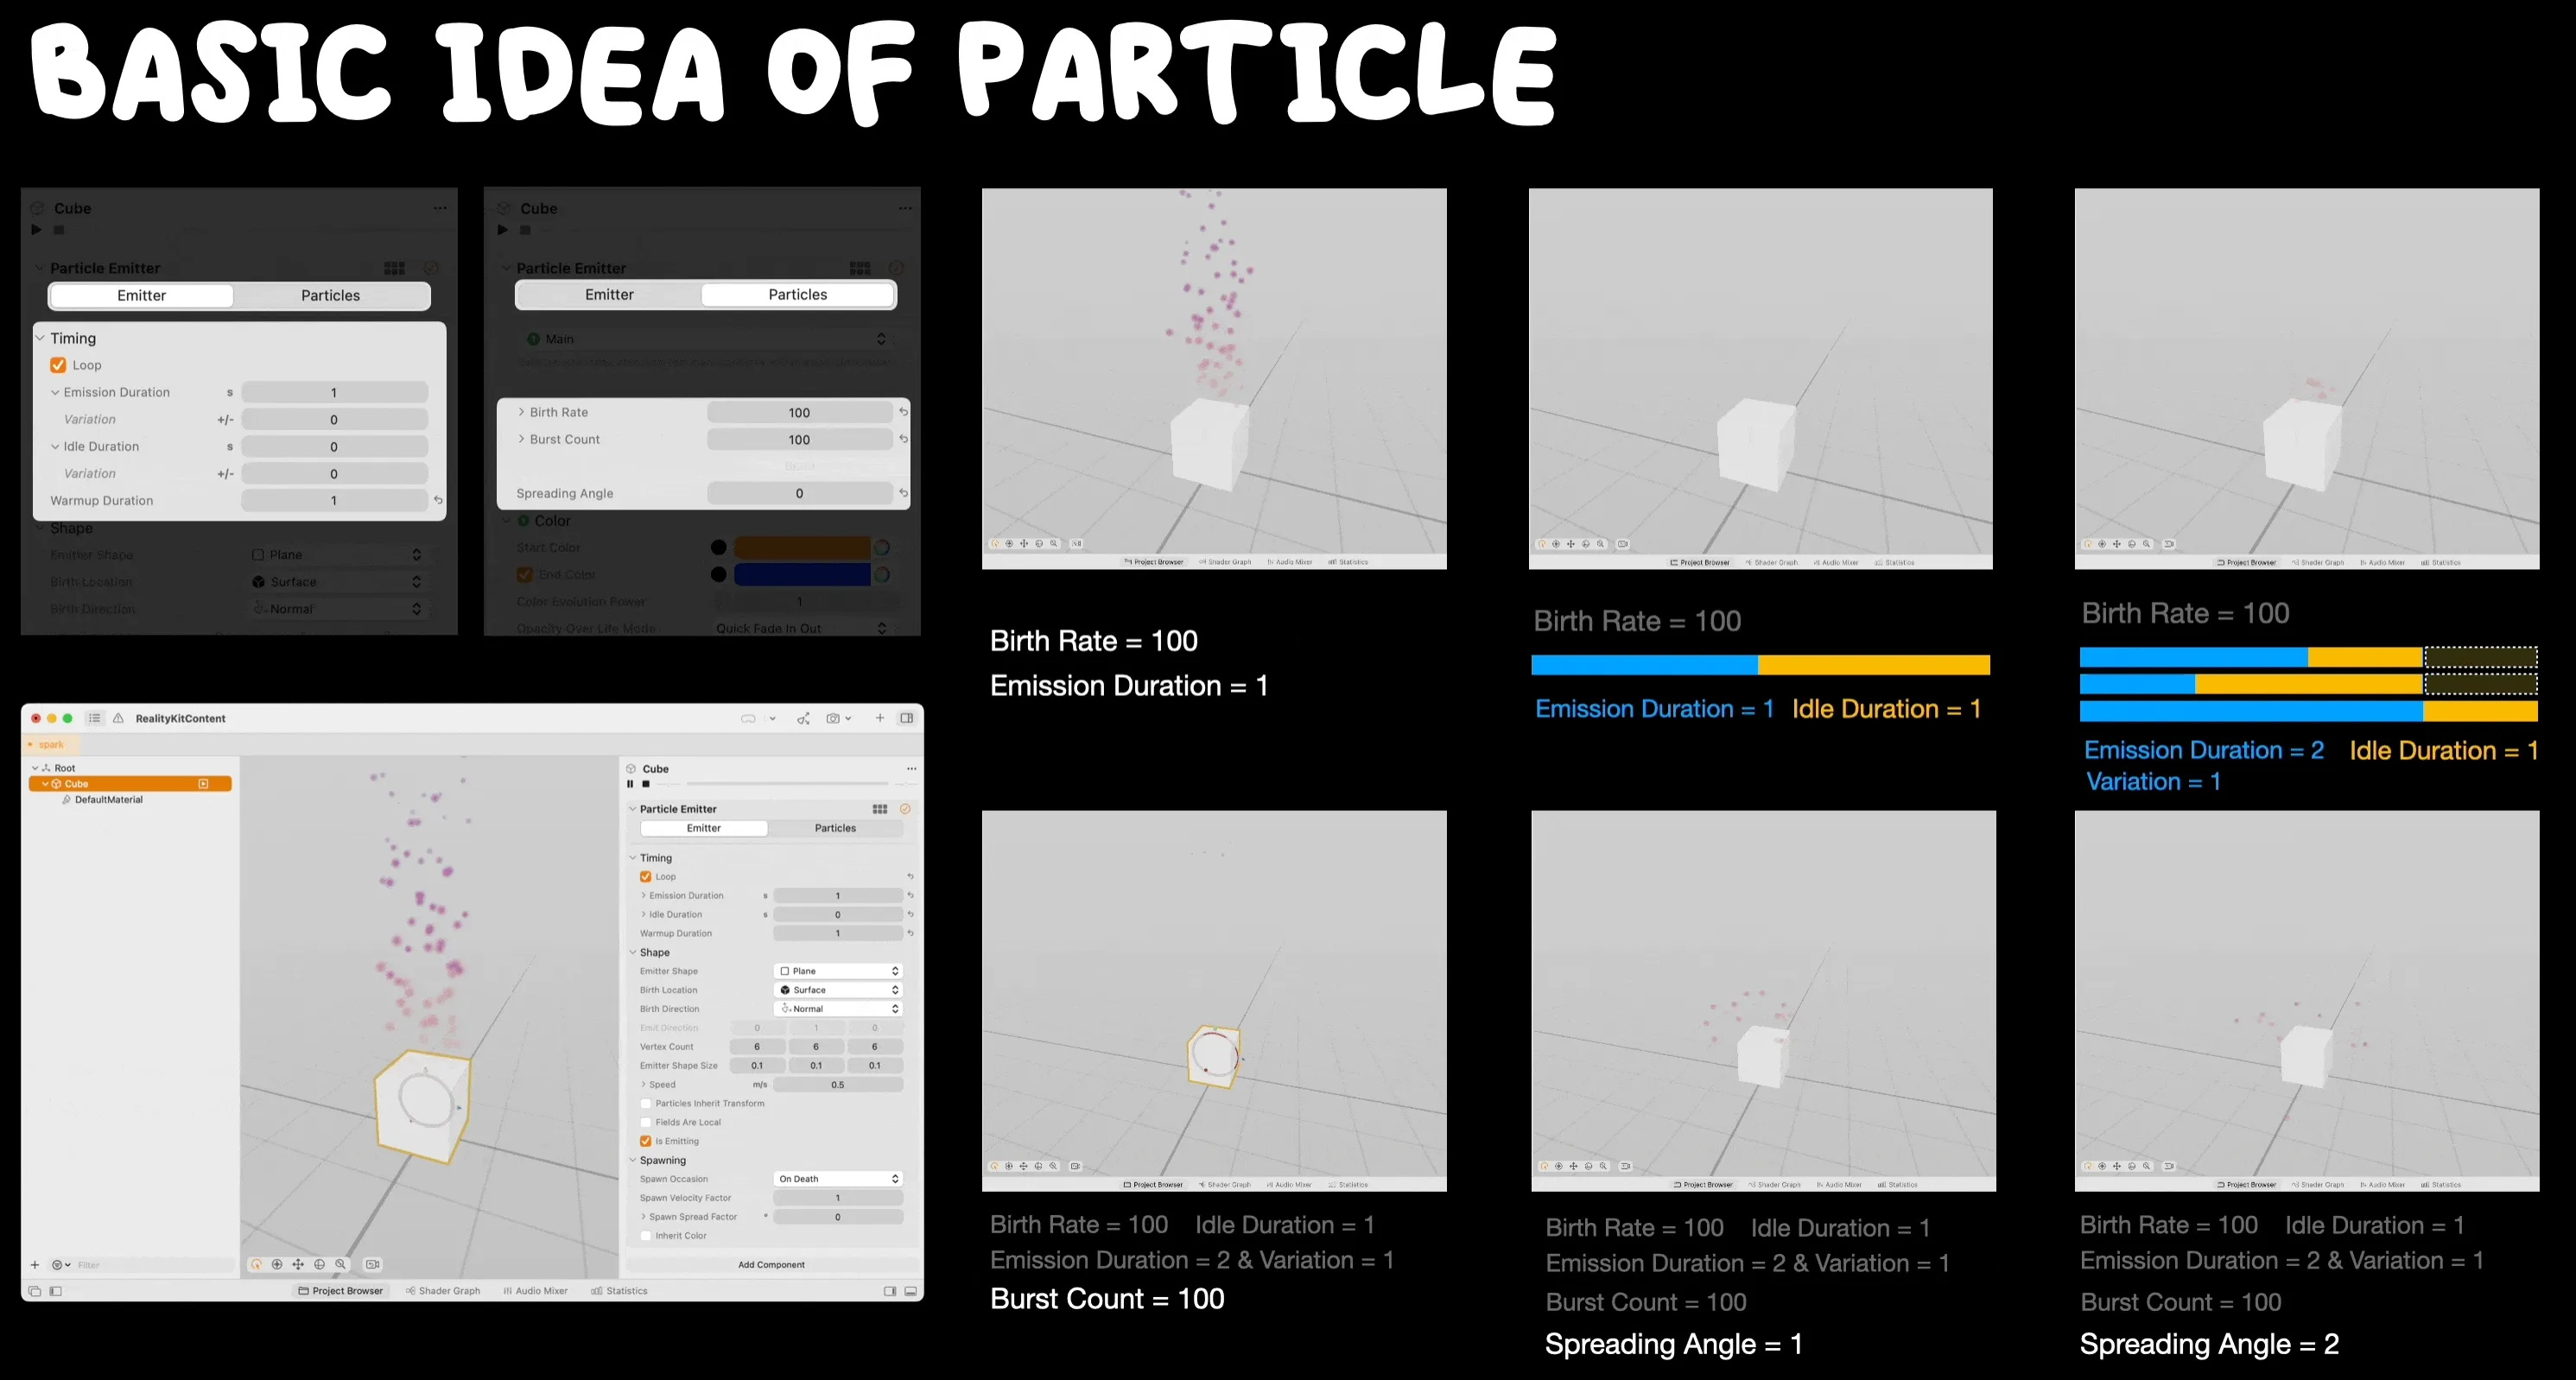
Above we also mentioned a Spreading Angle parameter of the emitter, which is adjusted in the Main Emitter of the particle. This parameter determines the scattering angle of the whole particle, in radians. In addition, the basic particle effect has several preset basic properties, such as the Color, which determines the color of the particle. There are two options: constant color and evolving color, with the default being a gradual change in color from orange to blue.
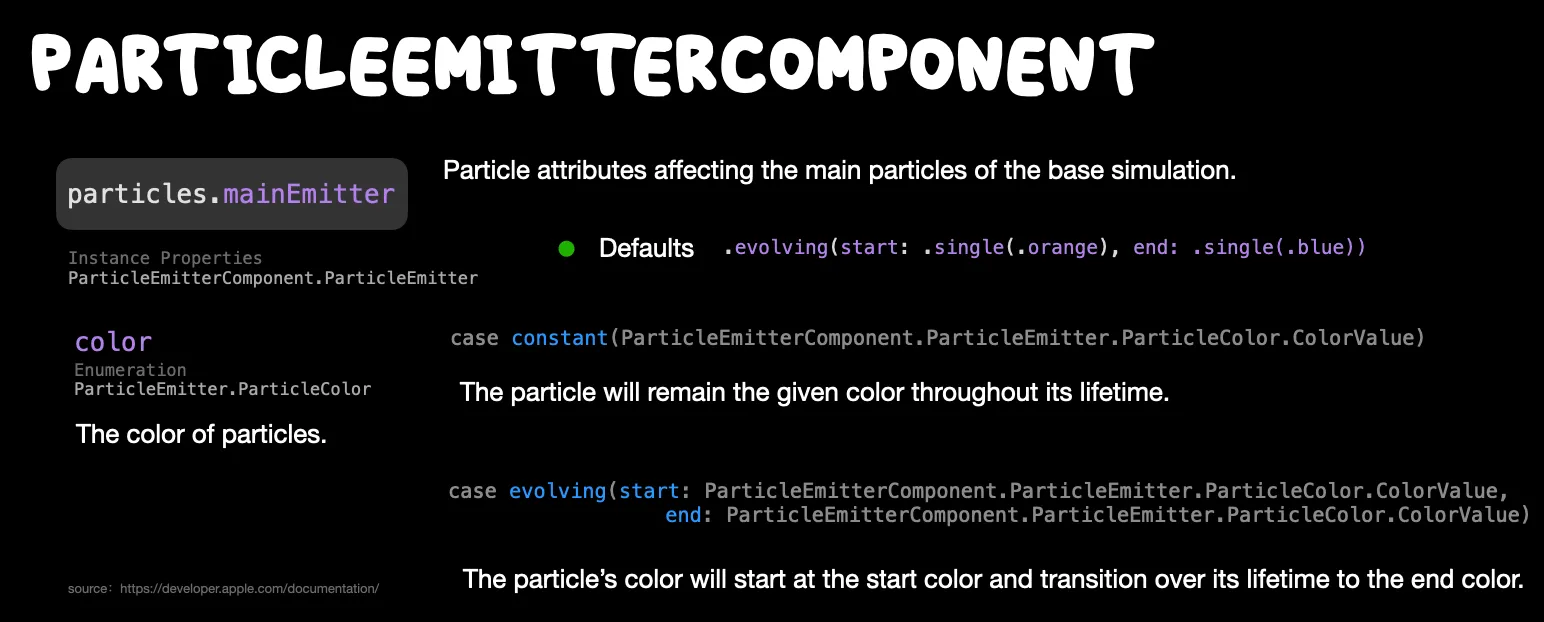
Worth mentioned that the Size controls the particle image’s rendering size (in the scene’s world coordinate space); the default value is 0.02 meters. Correspondingly, we can also create such an initial particle directly in Xcode:
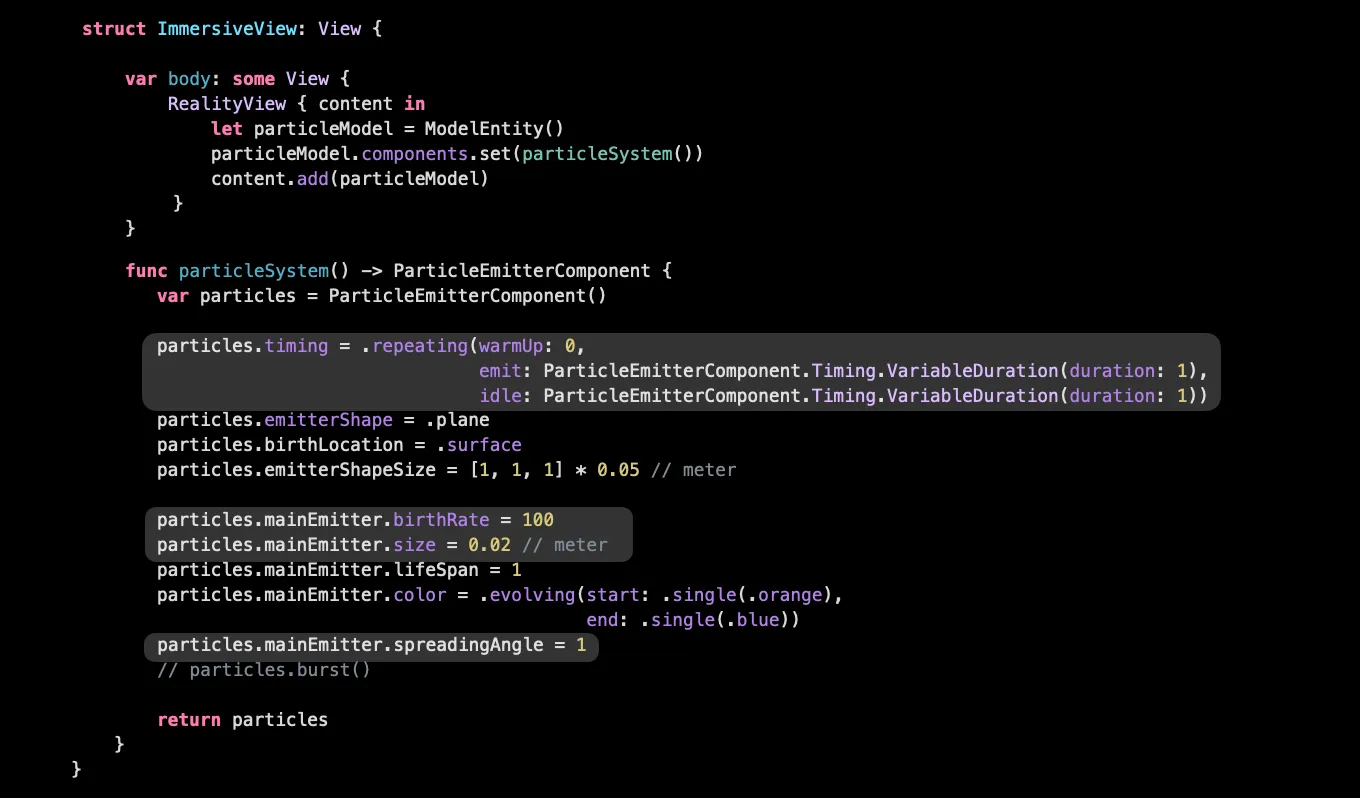
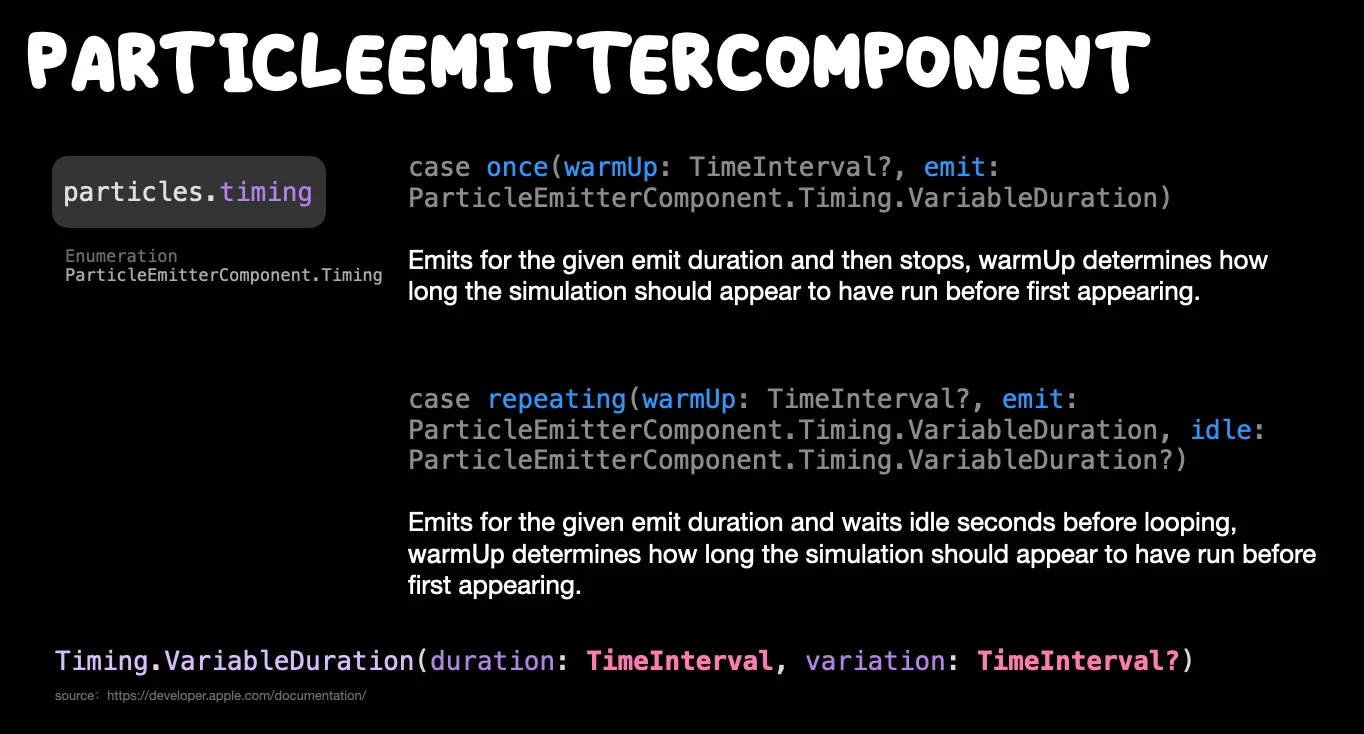
Whether the emission no longer continues cycling is controlled by a looping toggle in RCP, but in Xcode, it is controlled by the value of the particle’s timing. The difference between executing once and repeating is as follows:
Custom particle effects
Next, we will delve deeper into customizing basic particle effects. First, we need to understand what determines the size of the particle effect area. The ModelEntity, to which the particle emitter is attached, has a default shape, which we call the “Shape Primitive”. Correspondingly, the attached particle emitter also has a default shape. This shape can either match the ModelEntity’s shape or differ from it:
Shape Primitive: the original shape size of a ModelEntity.
Particle Primitive: the original shape size of a particle emitter.
The original size of the ModelEntity typically corresponds to the initial size of the particle effect area. Different shapes have their own default sizes:
- Point: A sphere with a radius of 1 centimeter.
- Box: A cube with a side length of 20 centimeters
- Plane: A square with a side length of 20 centimeters.
- Cone: With 20 centimeters of height and a base radius of 10 centimeters.
- Sphere: Radius is 15 centimeters.
- Cylinder: With 20 centimeters of height and a base radius of 10 centimeters.
- Torus: the outer radius of 10 centimeters and an inner radius of 15 centimeters.
When we adjust the size of the original shape (as depicted in the image as a Cube Primitive), the particle effect area’s size remains unchanged. To modify the size of the particle effect area separately, we’ll need to use the Emitter Shape Size attribute. Suppose we select the Particle Inherit Transform option. In that case, any changes made to the ModelEntity through the Scale within the Transformer will concurrently adjust both the entity and particle shape size. The specific relationship is illustrated in the image provided:
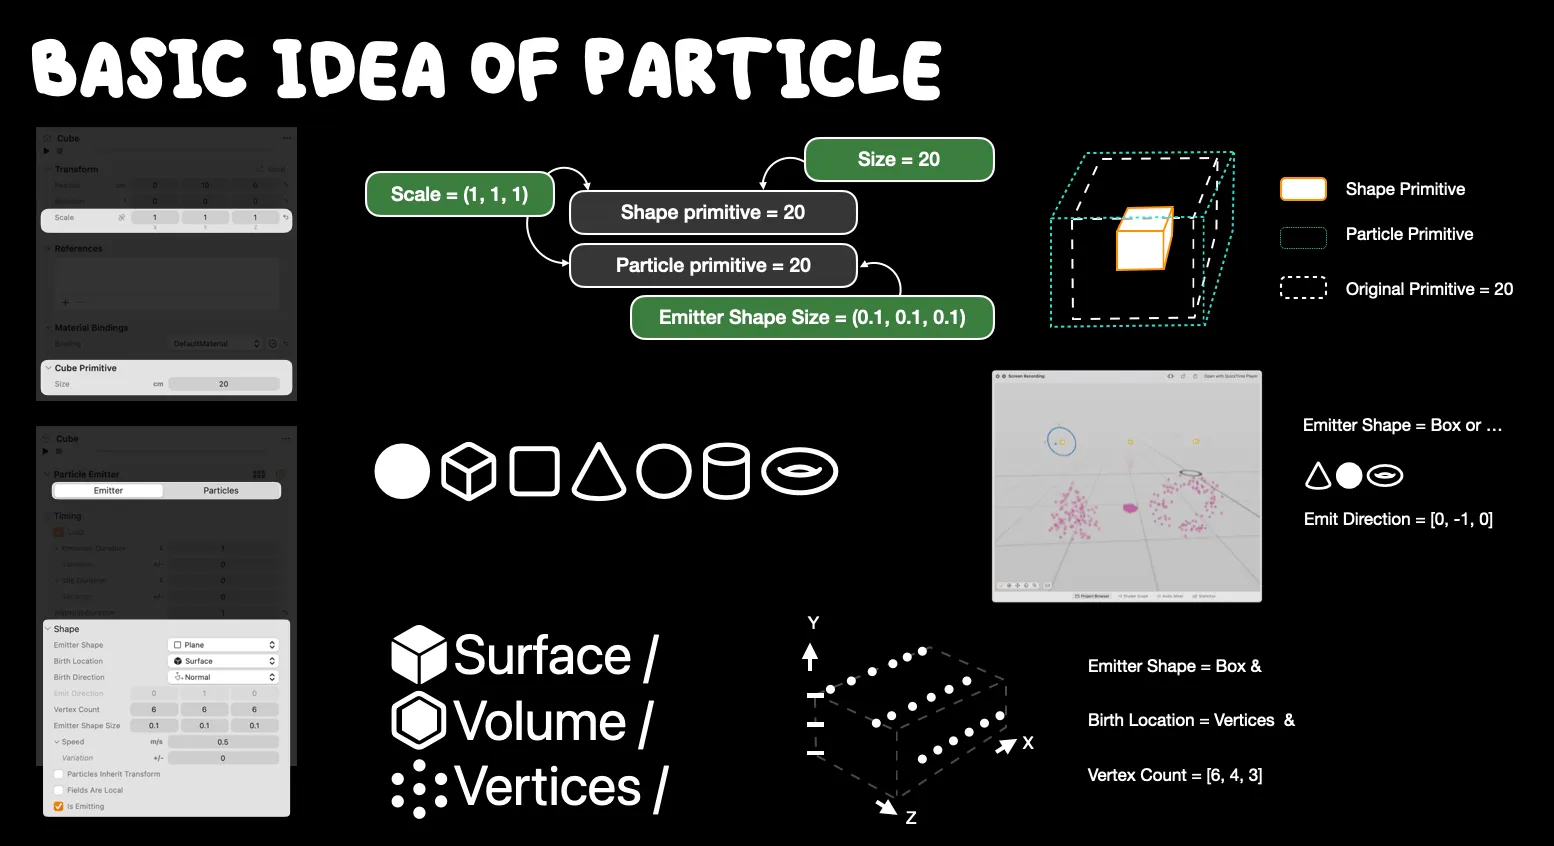
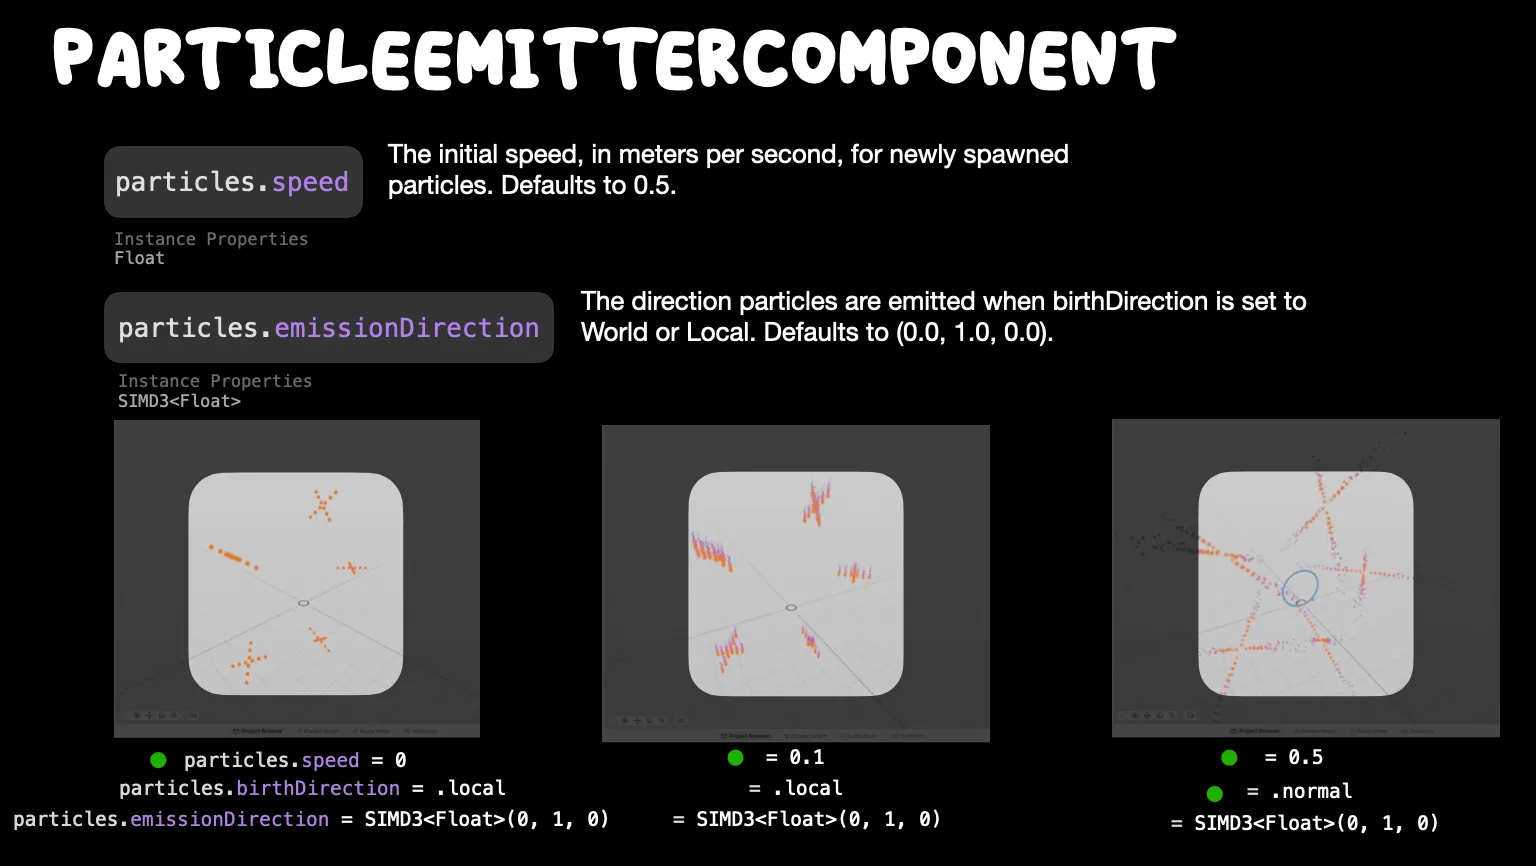
By default, there are seven types of particle effect area shapes that can be modified via the Emitter Shape. Additionally, the emission direction can be changed using the Emitter Direction. The default direction is related to the selected shape, as shown in the referenced image. It’s important to note that this parameter only determines the direction, so we can use unit value.
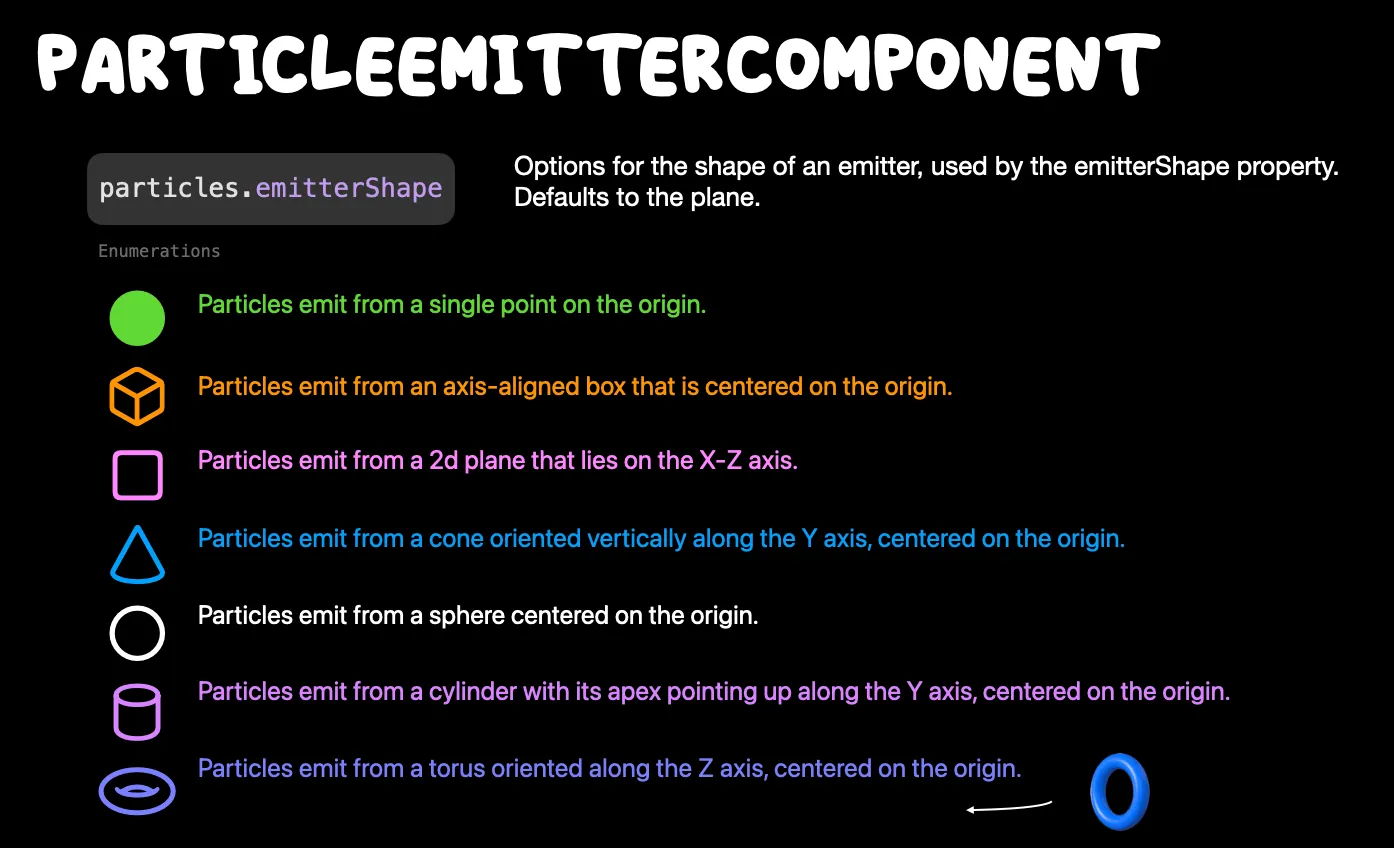
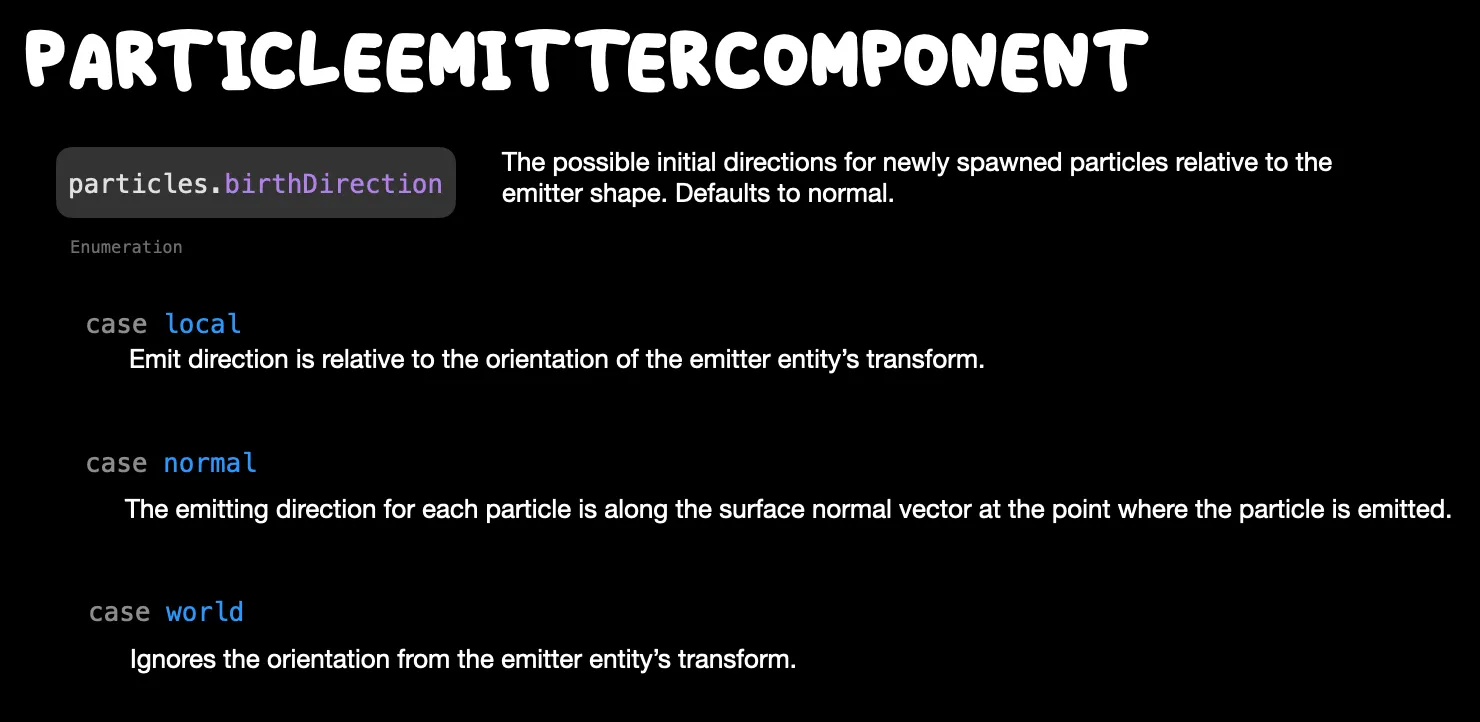
It’s also important to note that for the Emitter Direction to take effect, an appropriate Birth Direction must be set. Specifically, if you choose the normal as the Birth Direction, the Emitter Direction parameter will be rendered ineffective.
💡 When you want to determine the shape of the emitter or test some particle effects, we recommend using the Speed control parameter. By setting the emission speed to a sufficiently low value, we can observe the shape of the particles in a relatively stationary manner. At the same time, the particle’s Birth Rate must be sufficiently high to appear relatively static.
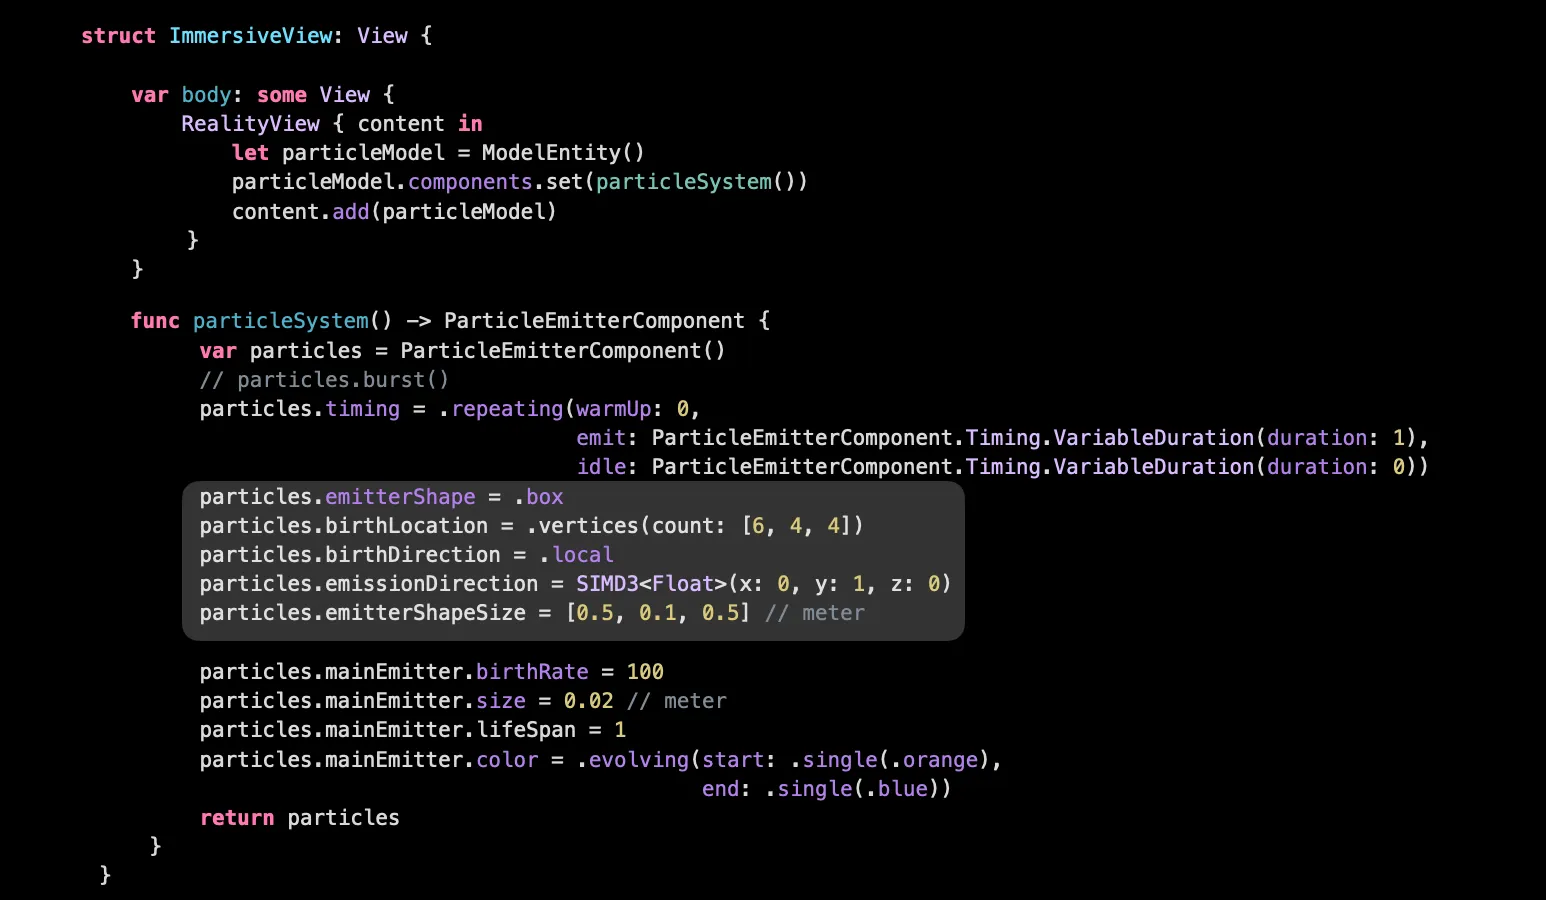
All the particle birth locations mentioned above are on the surface of the ModelEntity. Similar to Blender, we can also modify the Birth Location to choose to generate particles from within the ModelEntity or from its vertices.
Birth Location: the initial position where particles are generated.
Generating particles from vertices is relatively more complex compared to other methods. It’s not simply about generating particles from the shape’s vertices. Instead, it’s determined by a combination of the chosen shape parameters and the number of vertices parameters in each direction. We recommend that when designing particle effects, start from one axis and then gradually expand to the other two axes. Alternatively, one can learn through trial and error — practice makes perfect. By the way, when we choose spherical, cylindrical, conical, or toroidal emitters, we have an extra parameter, either RadialAmount or torusInnerRadius, to control the sweep angle or radius.
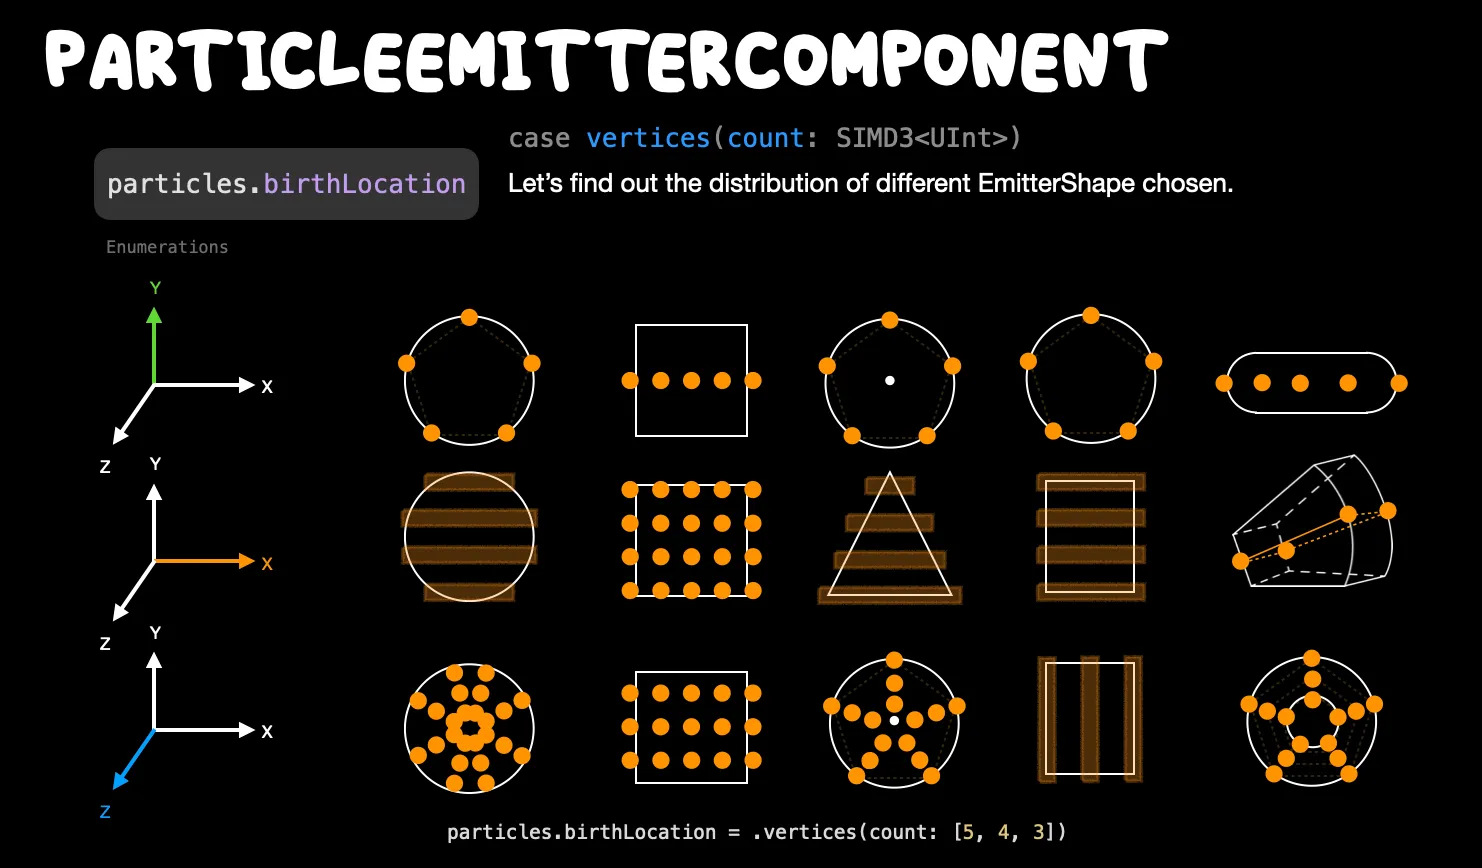
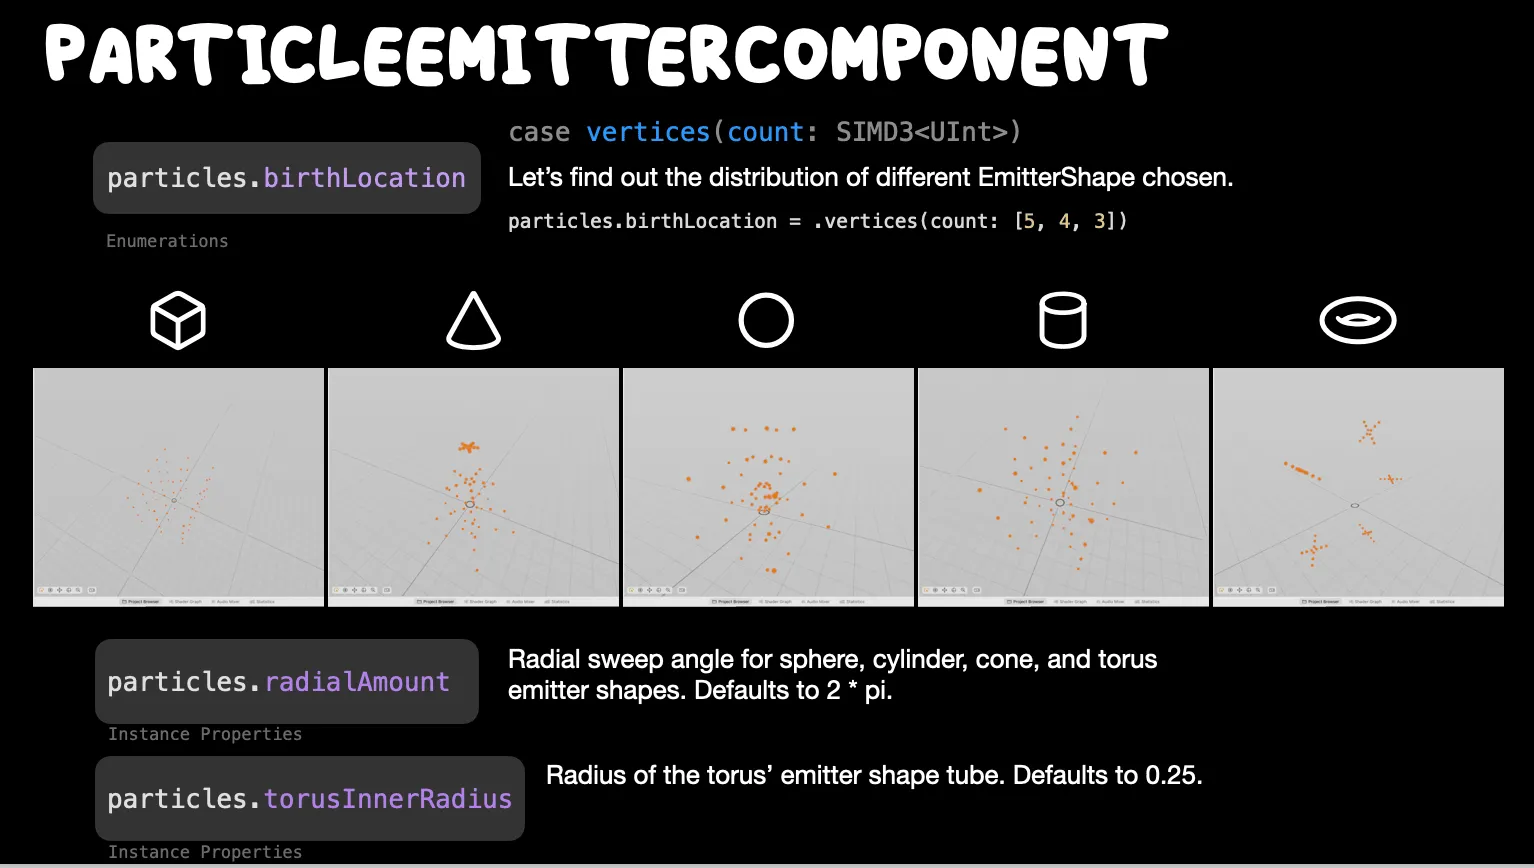
Implementing the aforementioned effects in Xcode is quite straightforward. One needs to be mindful that some member variables and GUI label names in RCP may not align perfectly. Additionally, one must account for unit conversions, as the unit in Xcode is metered, whereas it’s centimeters in RCP.
Diving Deeper into Particle Emitters
You should give yourself a round of applause by reading in here! You’ve already familiarized yourself with most of the particle configuration parameters. Before we illustrate specific particle effect examples, let’s wrap up the remaining settings. We’ll delve into some more detailed parameters within the emitter, as well as what we mentioned in our newsletter . The current particle emitter only supports up to connect two emitters: one is the mainEmitter, and the other is the secondaryEmitter. And when comes to the scenarios that require using the secondary emitter tend to be a bit more complex, such as determining how to switch between the two emitters.
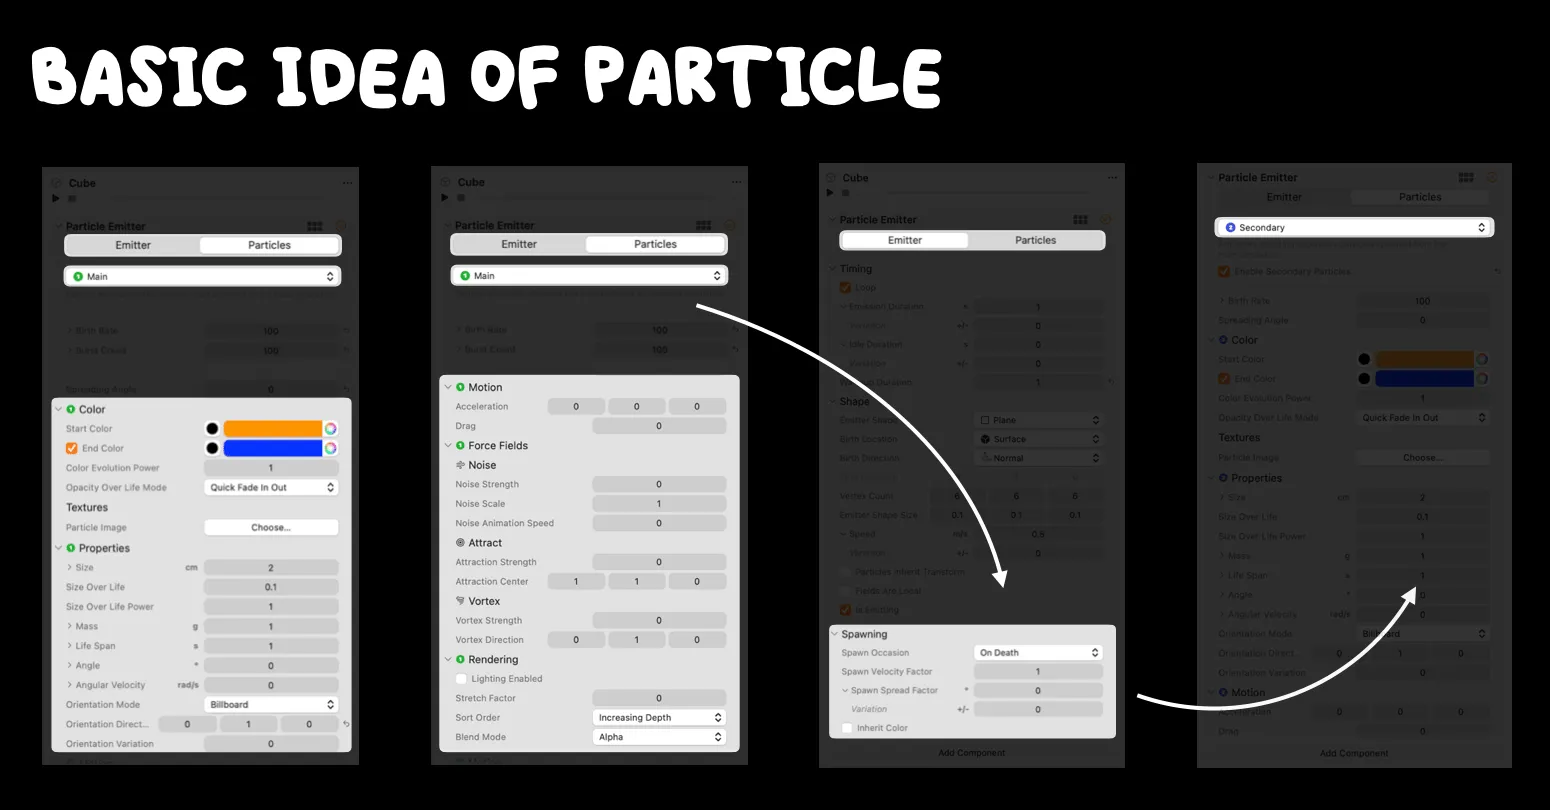
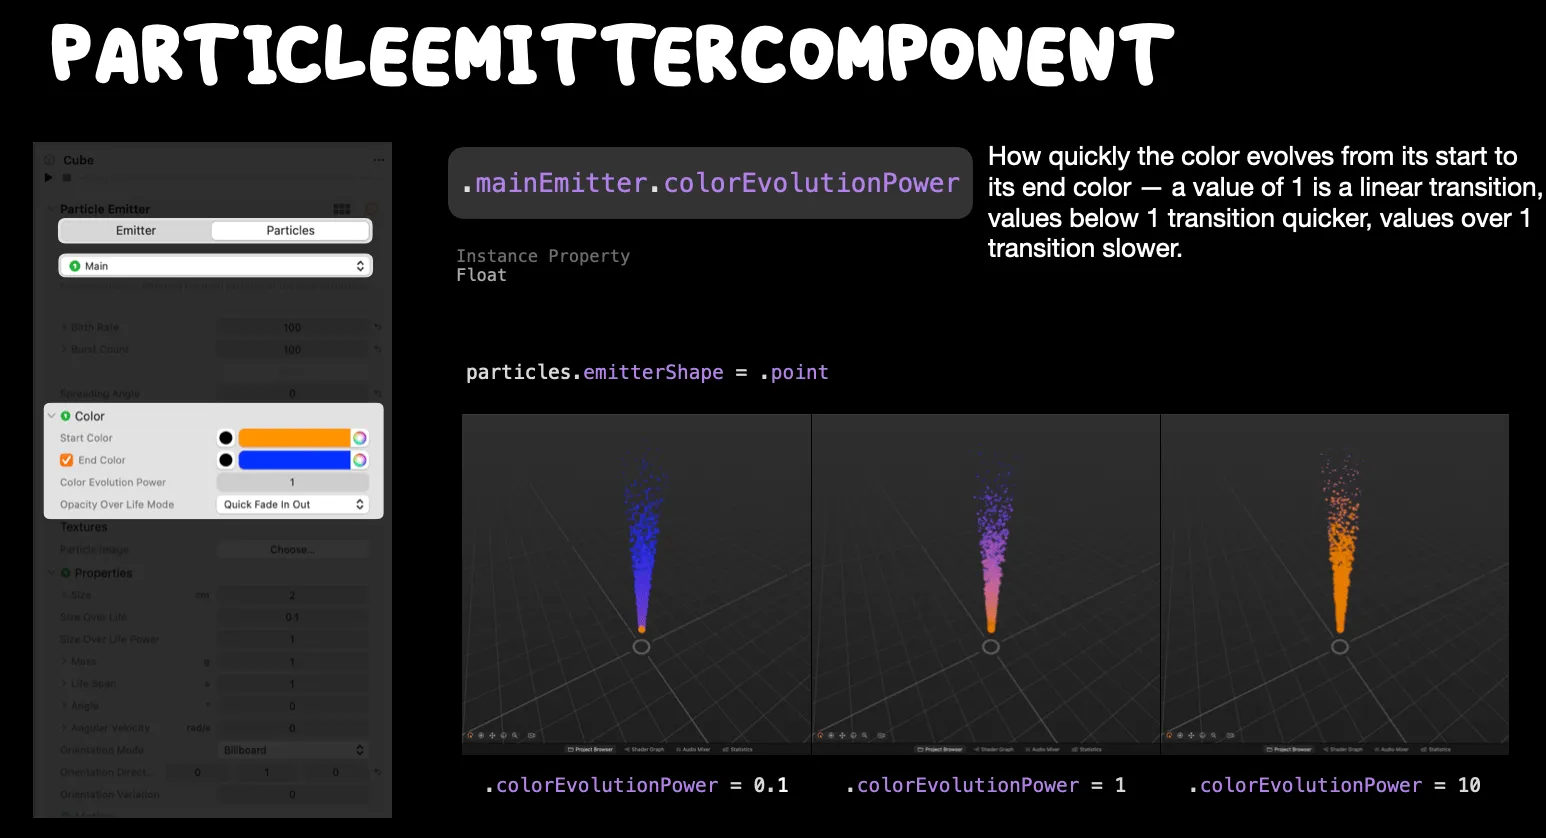
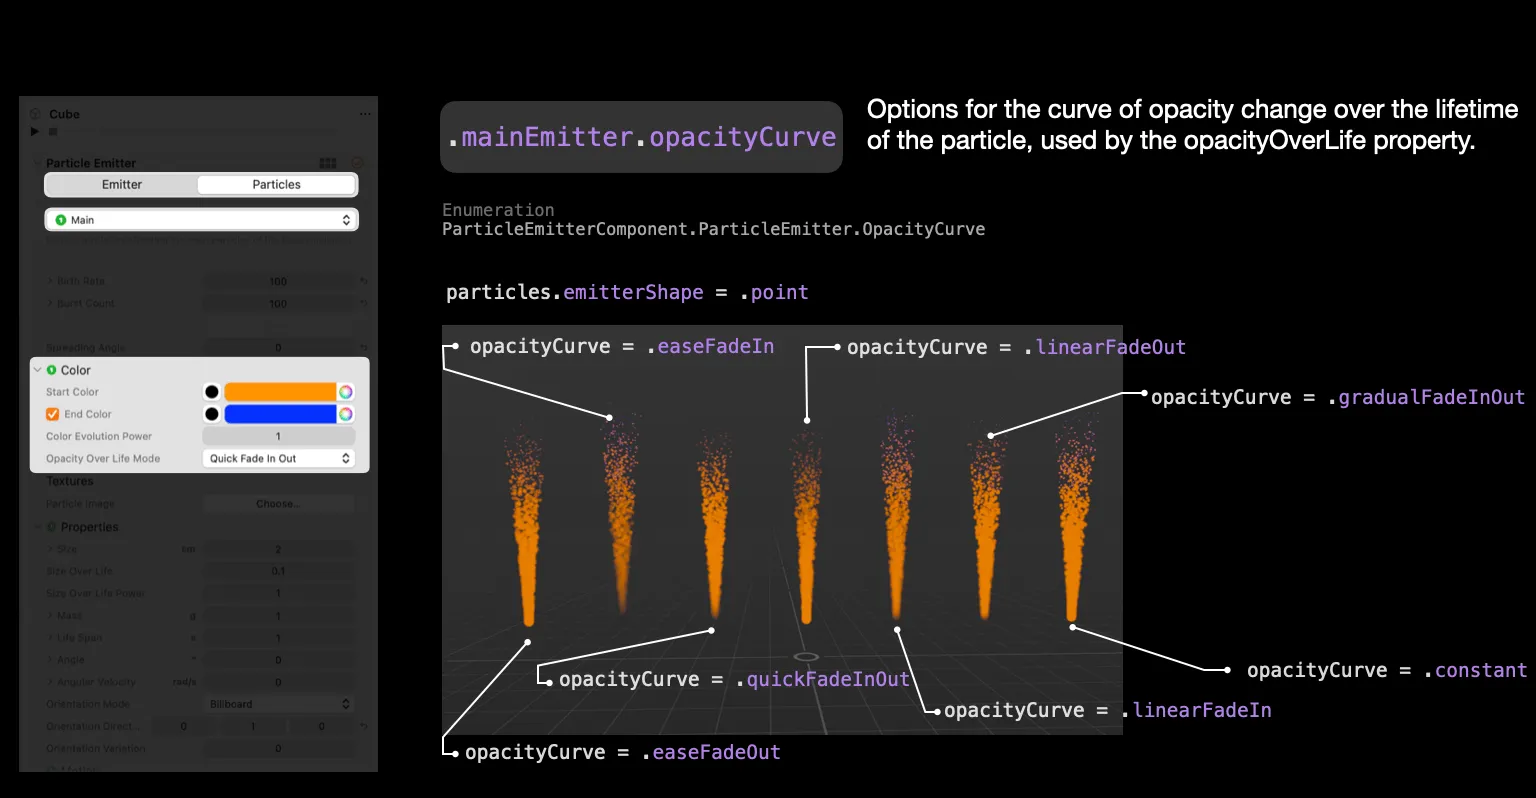
Although using two emitters sounds complex, once you grasp the configuration of one emitter, adjusting the other is just a matter of making some tweaks. During our discussion on basic particle effects, we touched on particle Color parameters. Now, we can make more intricate settings. For instance, the Color Evolution Power allows us to adjust the gradient color’s rate of change, while the Opacity Over Life Mode can be used for animating the particle’s emission and disappearance, such as the commonly seen easeFadeIn effect, among others.
In addition to color, we can also customize the appearance of the particles (referred to as “material” in RCP). The official particle samples provided by RCP use the .exr HDR image format, but PNG images can also be utilized. Beyond using a single material image (like the leaves shown below), we can place multiple particle states on a single image (this can be an arrangement with consistent rows and columns or one that’s irregular). After setting it to is Animated, specifying the arrangement of the material image using Row Count and Column Count will render the particle material in sequence. Of course, we can also opt to render only a subset of the material sequence. For instance, with the six colored hearts mentioned, we can use Initial Frame and Frame Rate to control whether the rendering begins with the red heart and dictate how many subsequent hearts to render.
💡 If you want to display the original color of the particle material, you need to set the particle color to solid white.
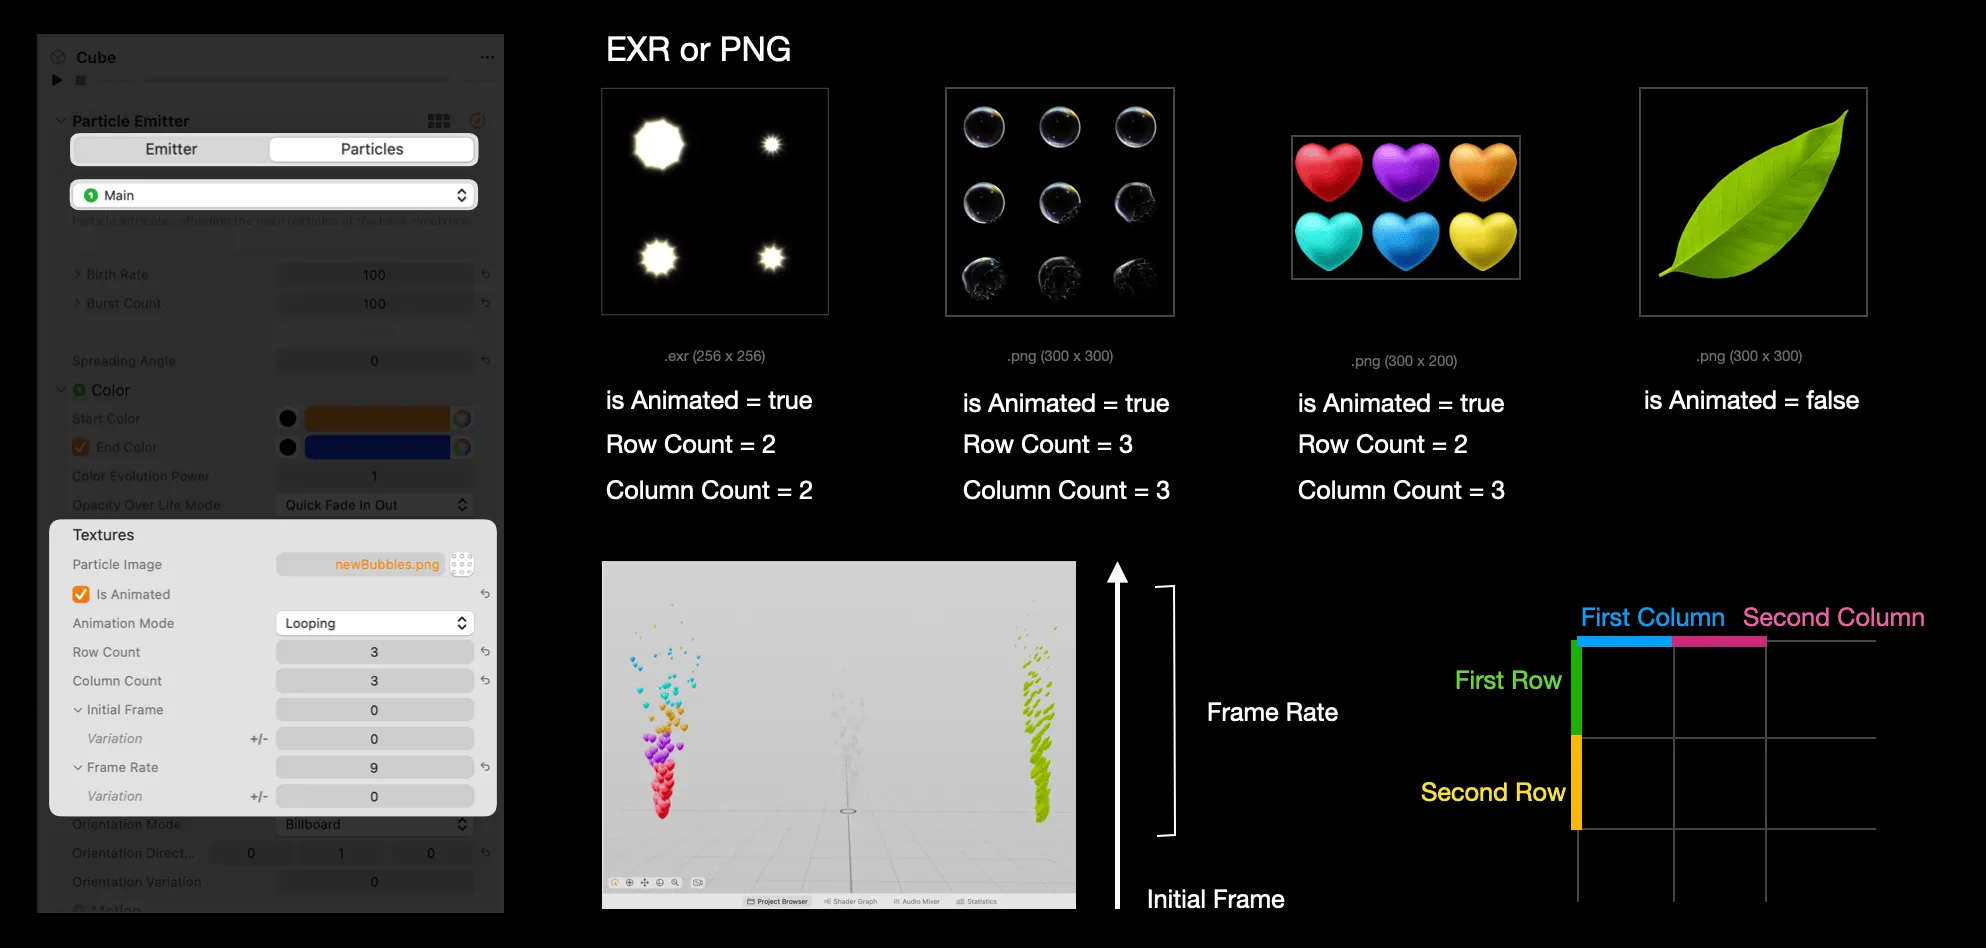
Moreover, the rendering effect of particle materials with multiple rows and columns can also be configured through the Animation Mode parameter. This allows you to determine whether the animation displays in a loop, in a reverse loop or plays just once.

It’s important to note that the material interpretation in RCP differs from engines like Unity. Using PNG images directly can lead to color decoding errors and the appearance of wired white edges.
💡 The reason for this chaos was first found by Yasuhito Nagotomo and WenBo, that Apple used a different blender mode to render the material:
- Premultiplied Alpha rendering mode: multiplies the RGB values in the image by its Alpha value. When viewed without considering the Alpha channel, such images may appear darker than expected because the RGB values have been multiplied by Alpha (as illustrated in the first row of the referenced diagram).
- For example: If the original RGB color is (R, G, B) and the alpha value is A (ranging from 0 to 1), then the stored value in this mode will be (R*A, G*A, B*A, A).; - Reason for Use: Often preferred in film and video production due to clearer blending and composition results. - Drawback: Modifying the Alpha value in post-production may prevent the original image color from being restored.- Non-premultiplied Alpha or Straight Alpha rendering mode: RGB values are stored as-is, without multiplying by Alpha. - Reason for Use: Commonly used in image editing applications and scenarios requiring separate operations on RGB and Alpha channels. - Drawback: Excessive storage of Alpha information; rendering errors may occur if the renderer only supports the premultiplied Alpha mode.
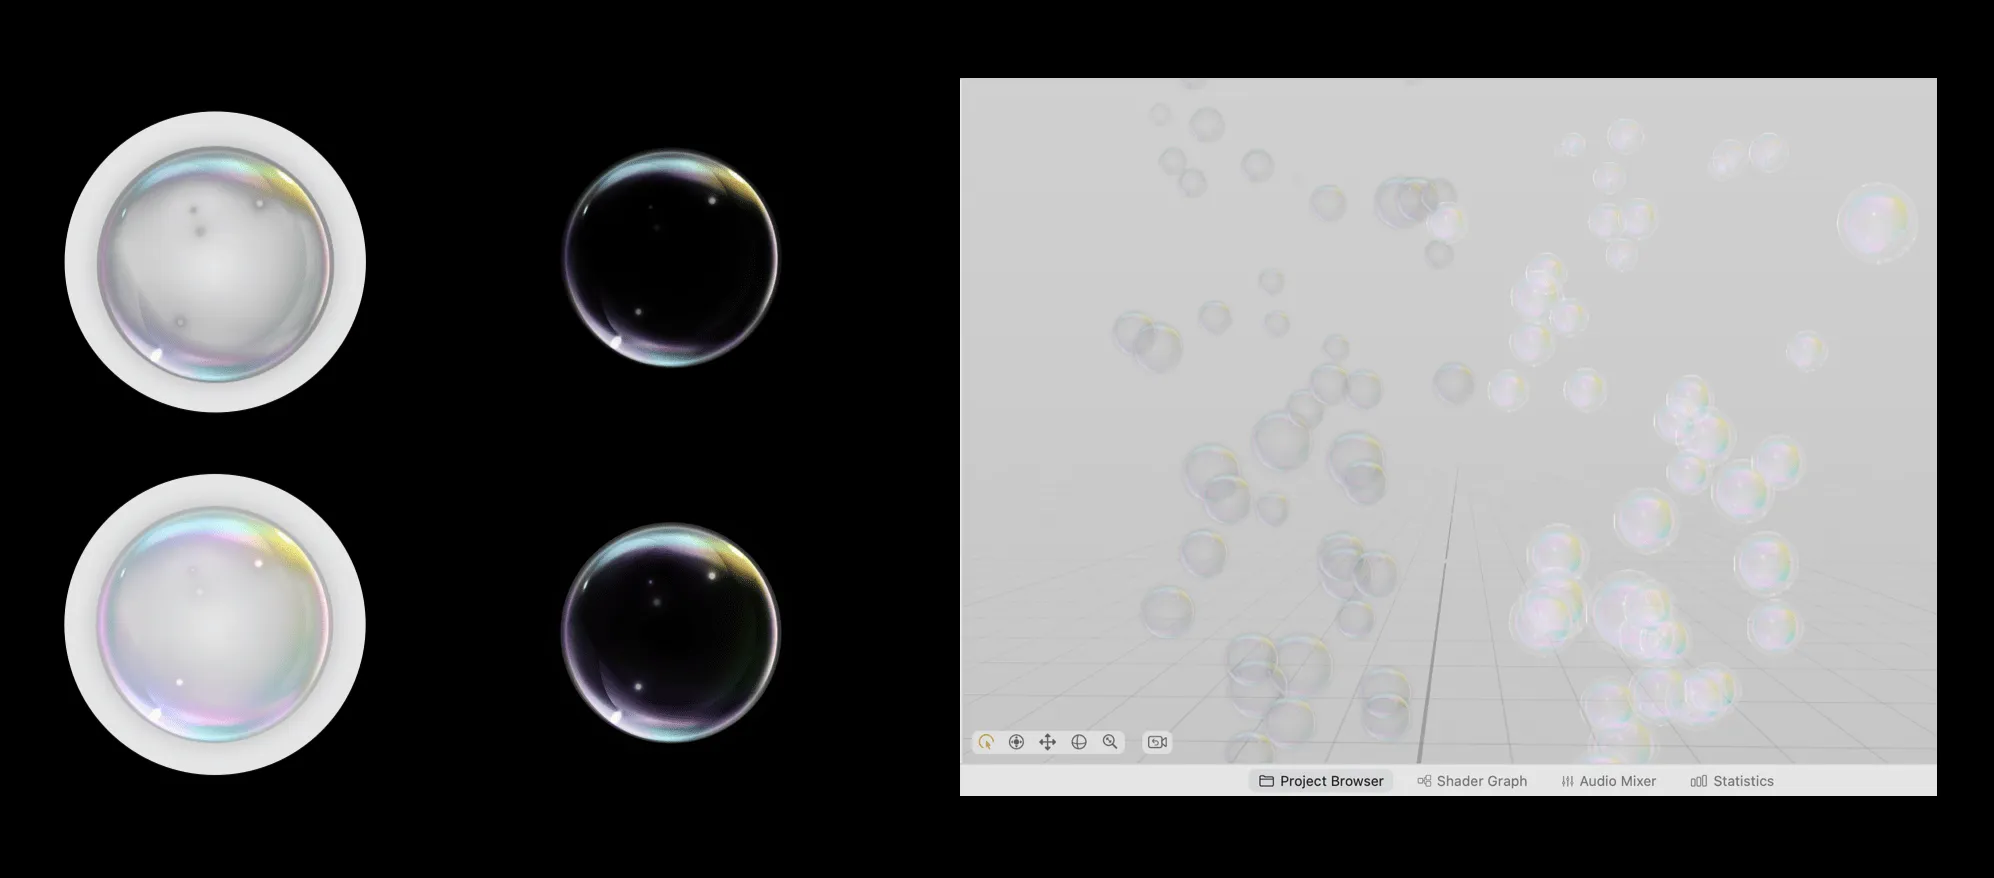
When we use PNG images as the particle material, a conversion is needed (either run a conversion program locally using Python or use the online conversion tool written by WenBo). All the discussions about the material can be directly implemented in Xcode through coding. However, compared to RCP, there are a few things to note:
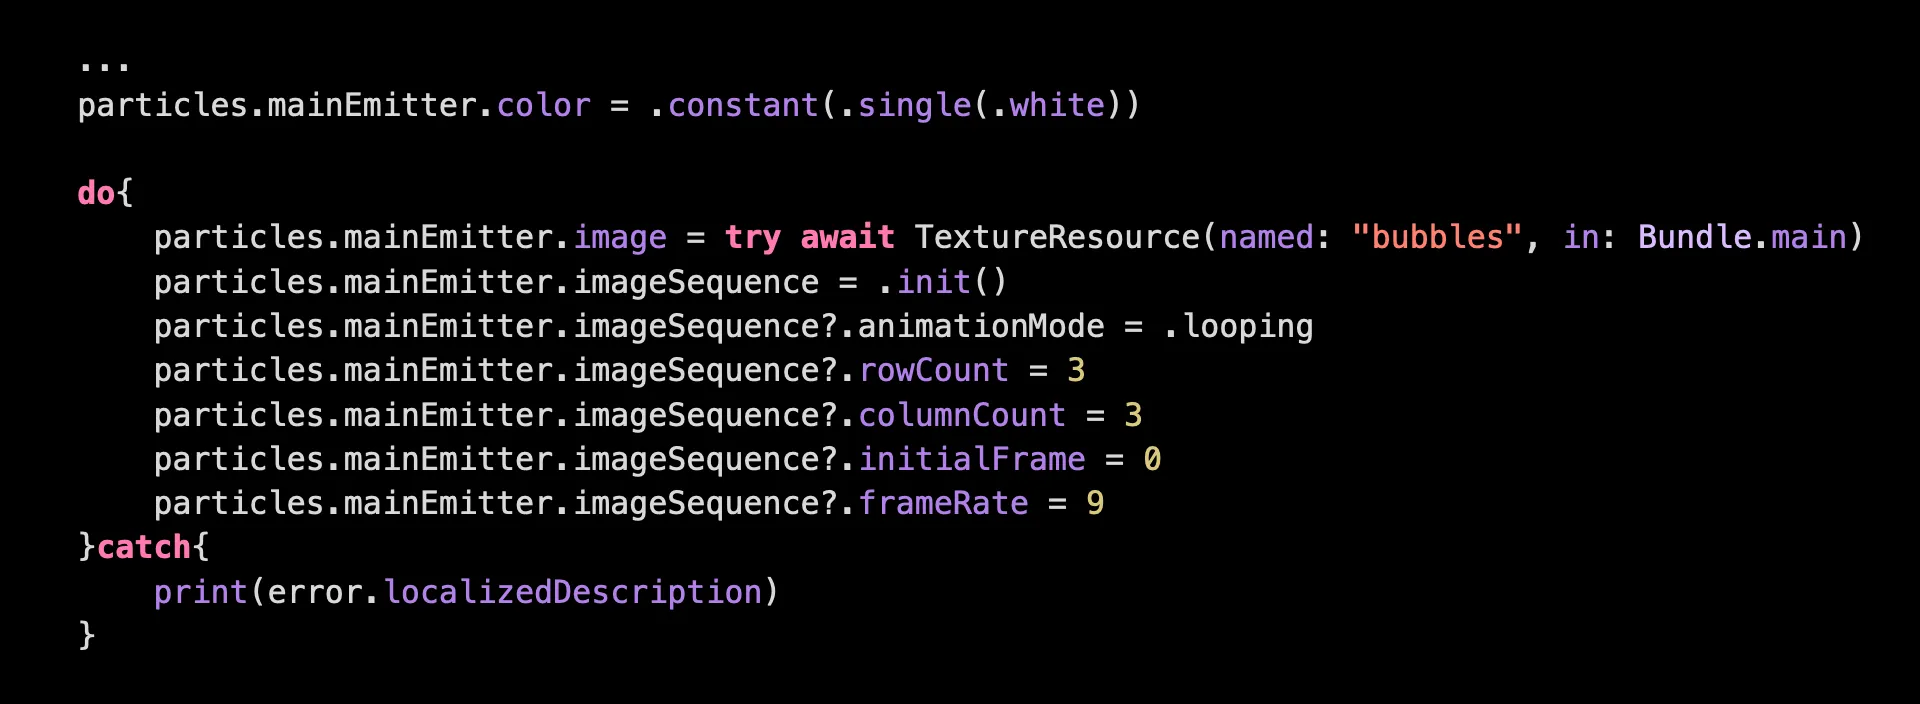
- Because reading the material (especially high-resolution and HDR materials) is a time-consuming operation, it is recommended to carry out the material reading process during the class member initialization in practice. The code below is just for demonstration purposes.
- Compared to RCP, there is no is Animation option in the code. Correspondingly, only after the
imageSequenceinstance property is initialized, the subsequent parameter settings (such asrowCount, etc.) will take effect.
Continuing our discussion on the attribute configuration of individual particles. Apart from the particle size that we previously discussed, we can set more detailed configurations for the appearance of individual particles. For instance, the attribute size over life controls the shrinking ratio of the particle from its appearance to its disappearance, with a default value of 0.1. On the other hand, size over life power controls the speed of this shrinking transition. When the parameter is set to 1, the change is linear. When it’s less than 1, the change is faster, and when it’s more than 1, the change is slower.
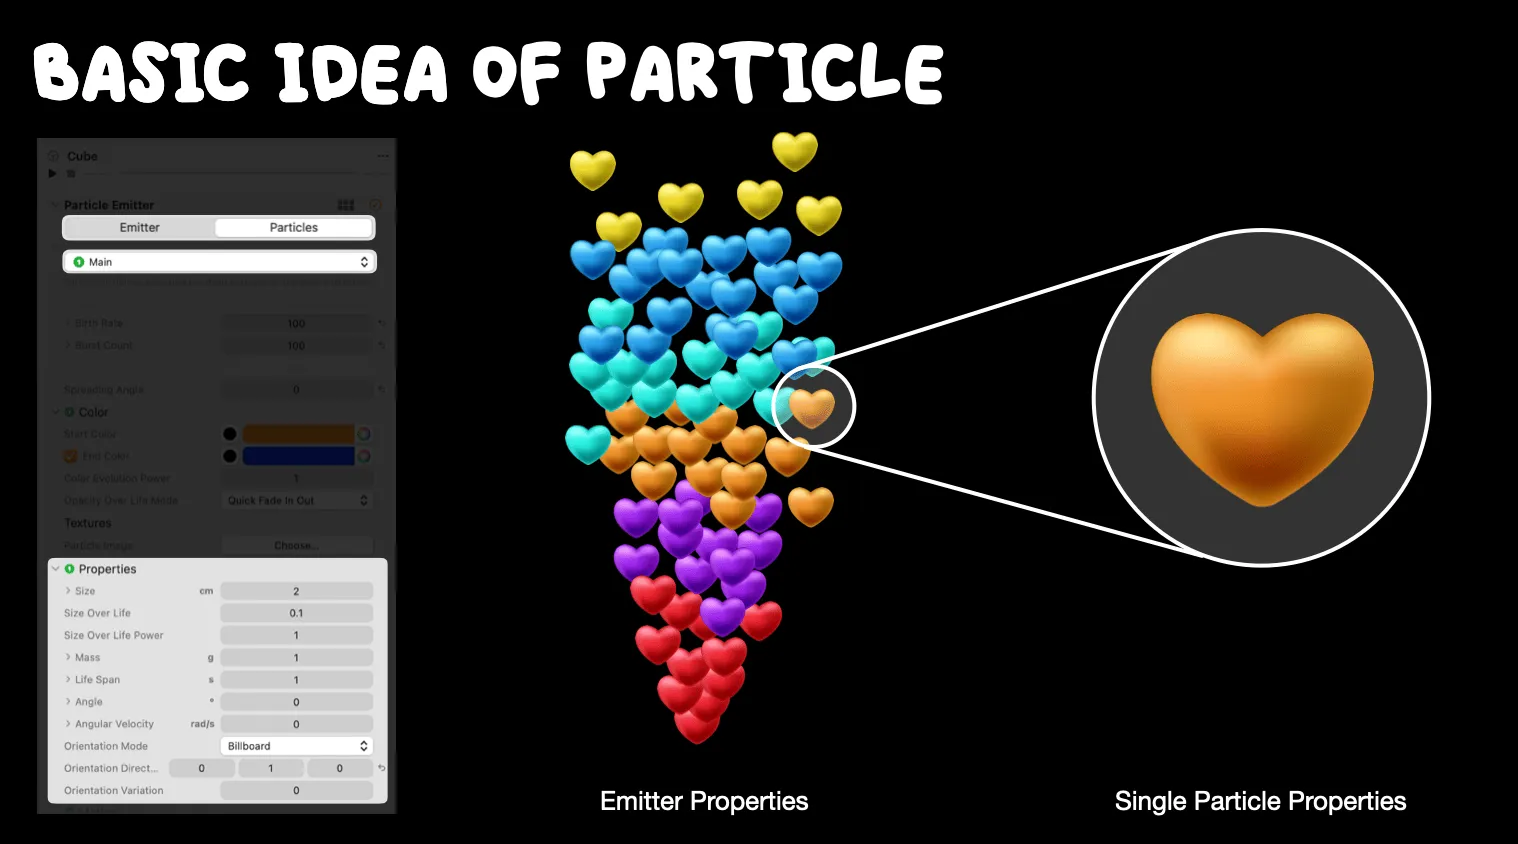
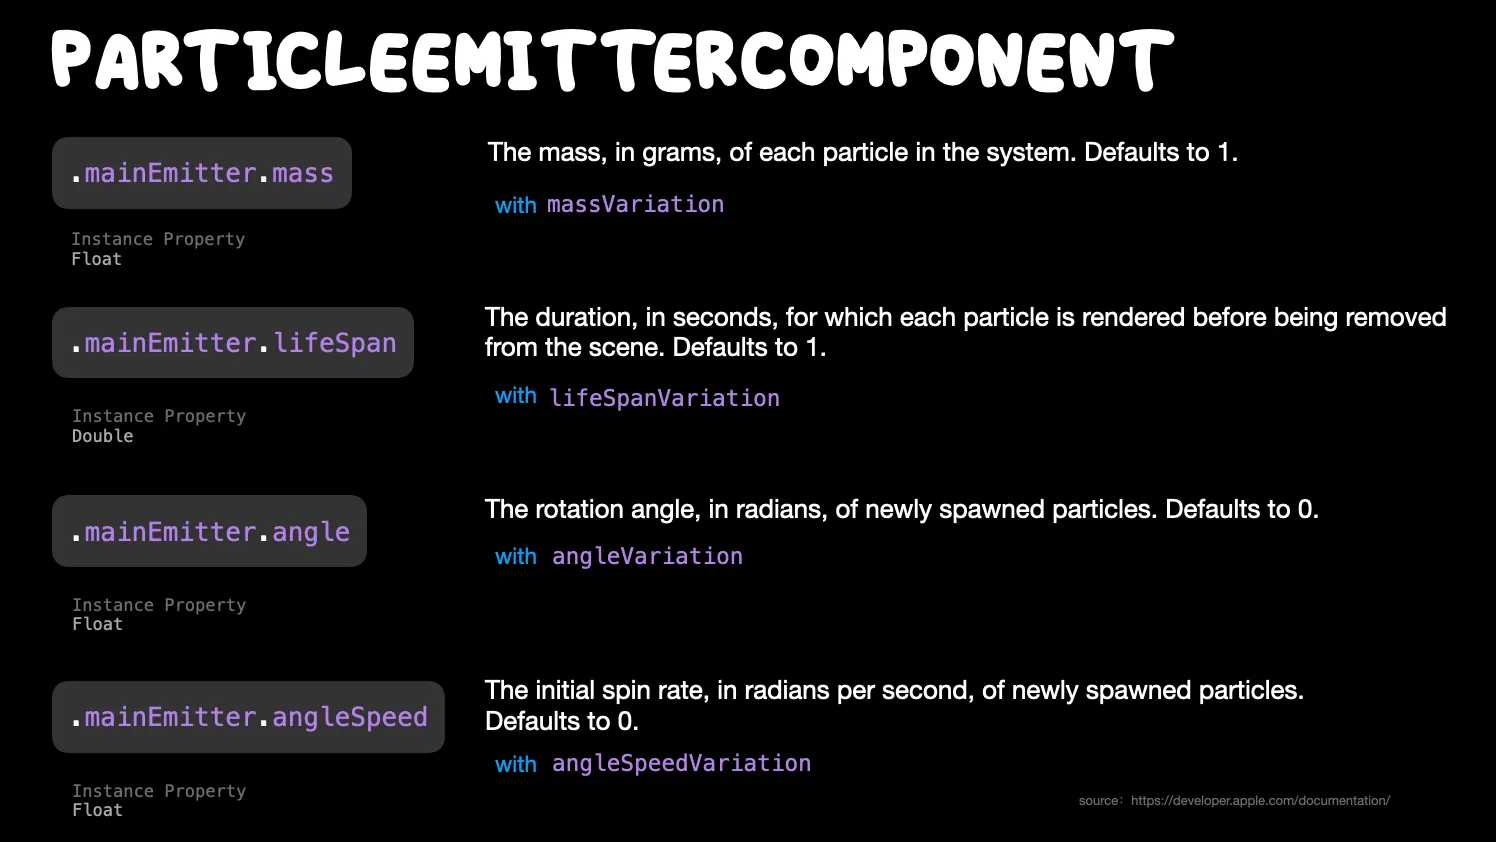
Additionally, there are parameters like Mass, Life Span, Angle, and Angular velocity. Their functionalities are illustrated in the figure below.
The final parameter in Properties is Orientation Mode, which controls whether and how the particles are oriented toward the camera. The current particle system provides three options: billboard, billboardYAligned, and free:
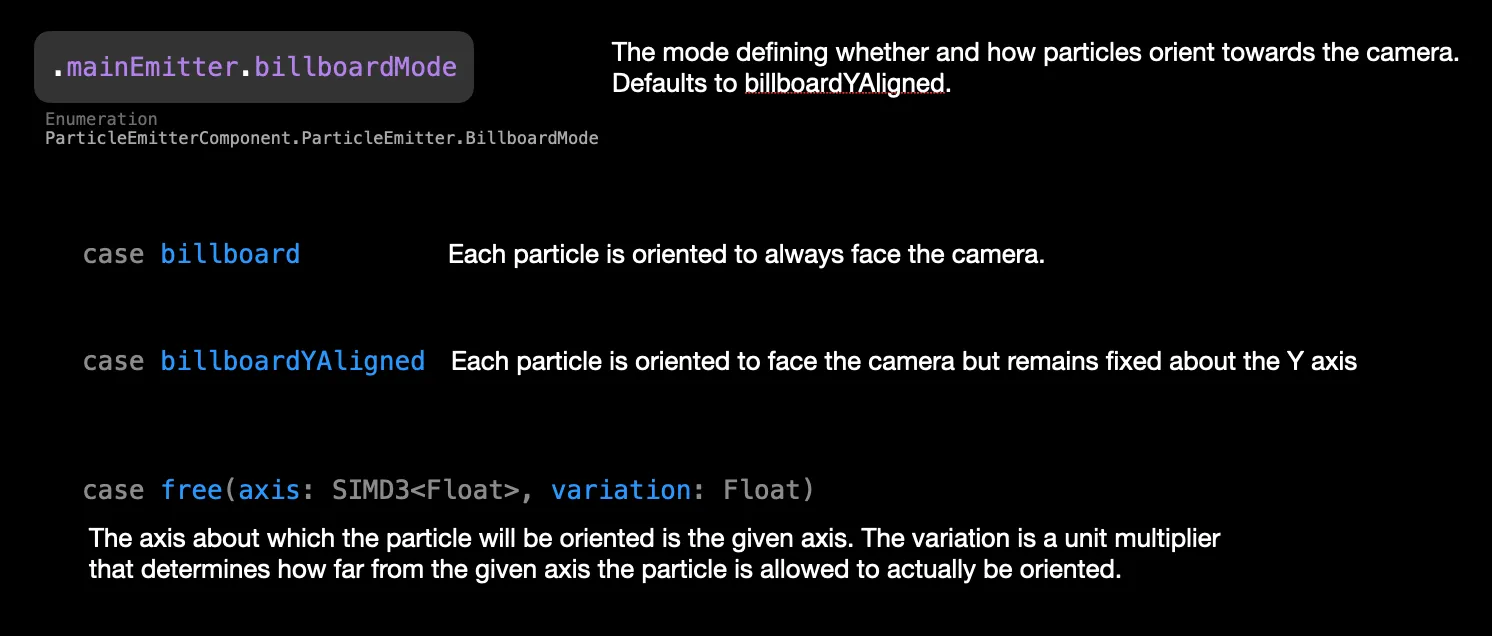
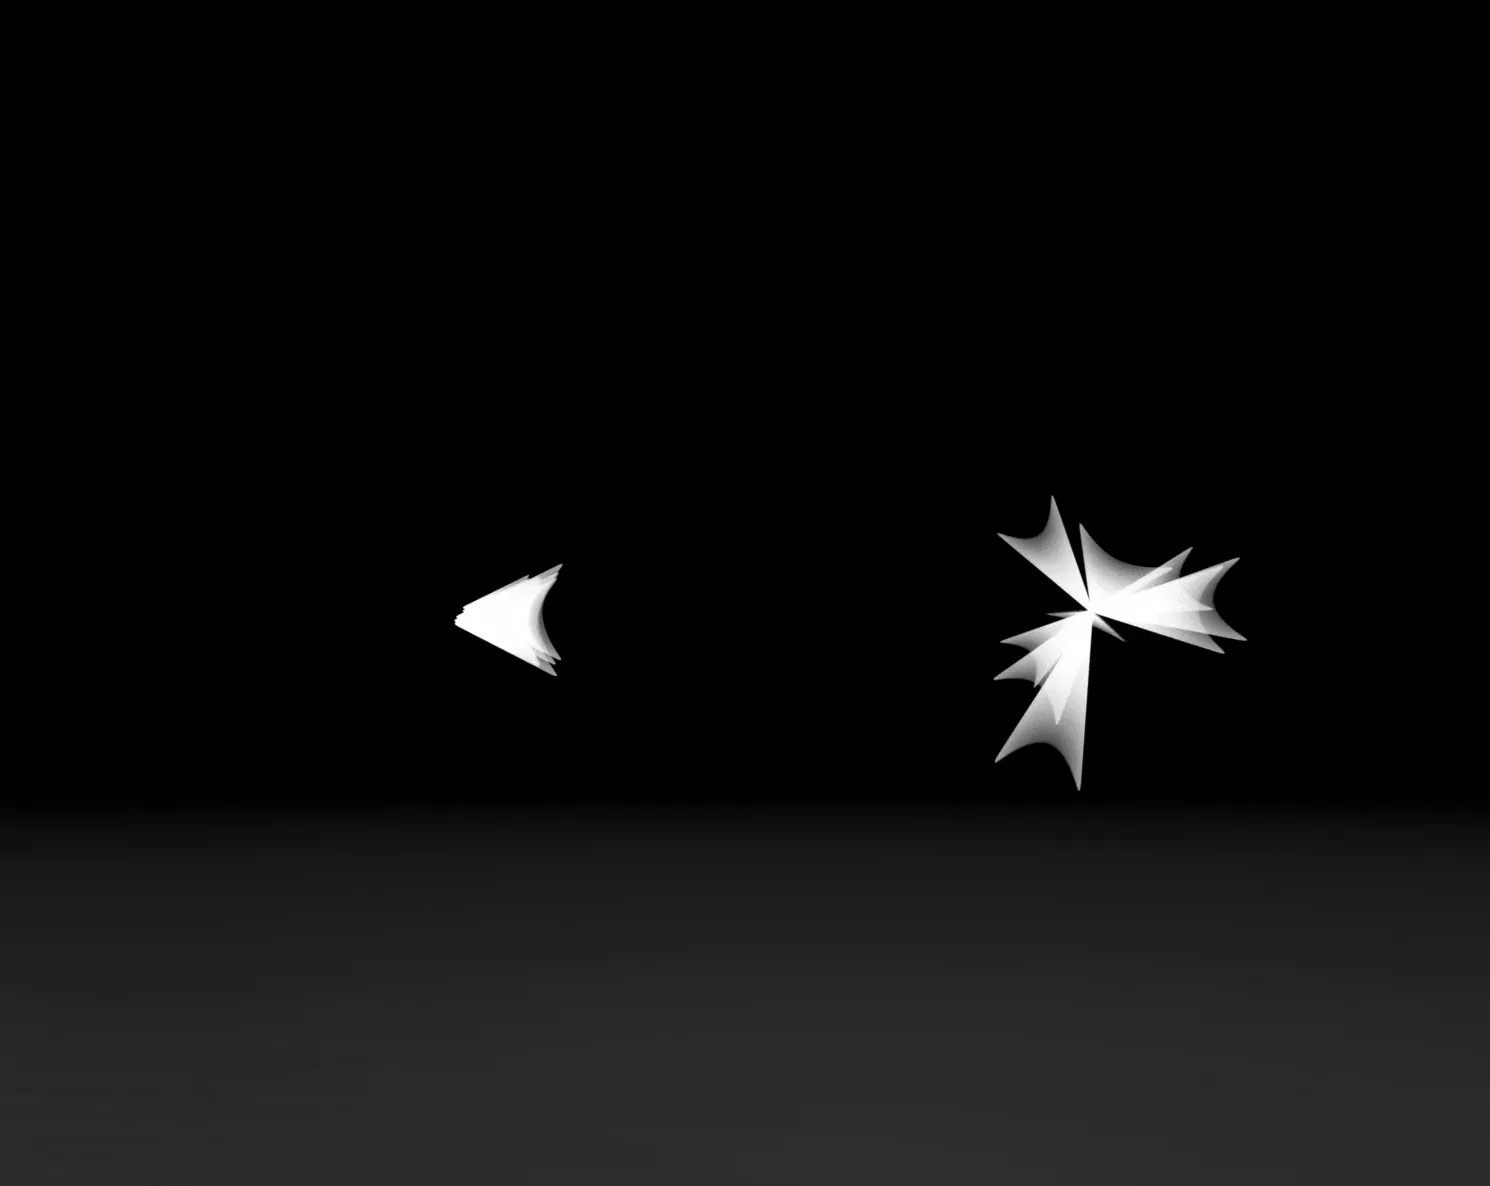
To elaborate, when using billboard, regardless of the viewing angle, the particles always face the camera directly. Whereas with billboardYAligned, there will be an “illusion” when viewed from the Y-axis, as shown in the diagram below. Of course, the current particle system’s Orientation Mode is still quite basic, but its iterative updates are rapid (compared to visionOS 1 beta 1, which only had the billboard mode, it has now increased to three modes). In the future, it may offer more orientation choices similar to other software like Unity and other software.

💡 There are SketchedBillboard, HorizontalBillboard, VerticalBillboard, and Mesh in Unity. Here is a video from three.quarks to show the difference.
We can also control the movement of particles through the parameters in Motion and Force Fields.
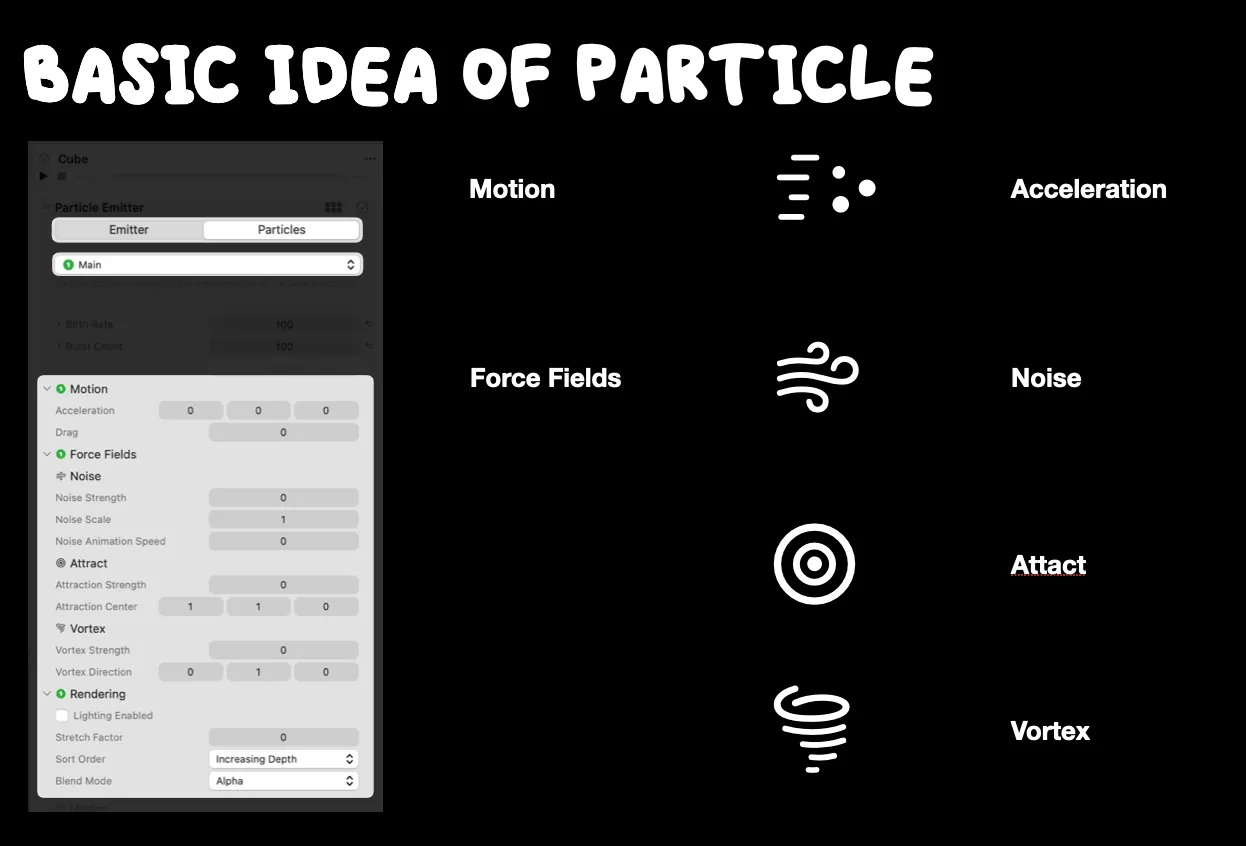
In the Motion section, the Acceleration and Damping Factor control the positive and negative acceleration of particle movement respectively. Some might wonder, how is this different from the previous Speed parameter? Well, these two parameters can control the acceleration or deceleration of the particles.
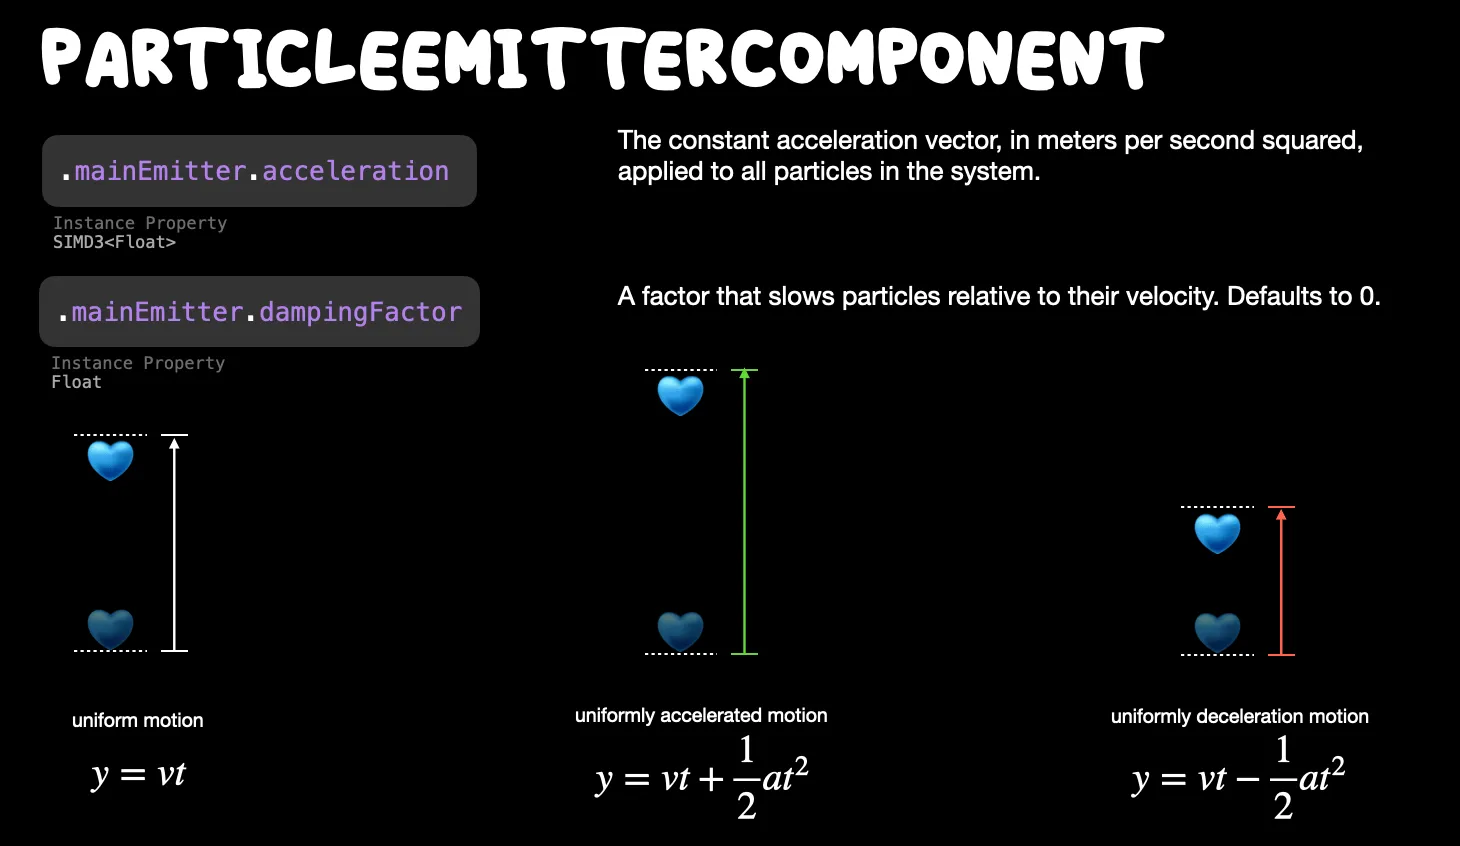
Using the parameters in Force Fields, effects similar to whirlwinds, vortices, and gravity can be achieved. The Noise parameter controls the degree of Turbulence, bringing randomness, variability, and complexity to the movement of the particles. Why do this? Because it enhances realism (many natural phenomena are combinations of structure and randomness). We have three parameters to control the scale, intensity, and rate of change of randomness, as shown in the figure.
💡 When do we generally need to introduce random noise?
Smoke and Flames: Turbulence is crucial for creating realistic smoke and flame effects. It introduces the unpredictable wavy motion seen in real-life smoke.
Water and Fluids: For water simulations, Turbulence introduces the chaotic whirlpools and vortices observed in actual fluid flows.
Floating Particles: For scenarios where particles like dust or pollen float in the air, Turbulence makes their paths appear random and natural.
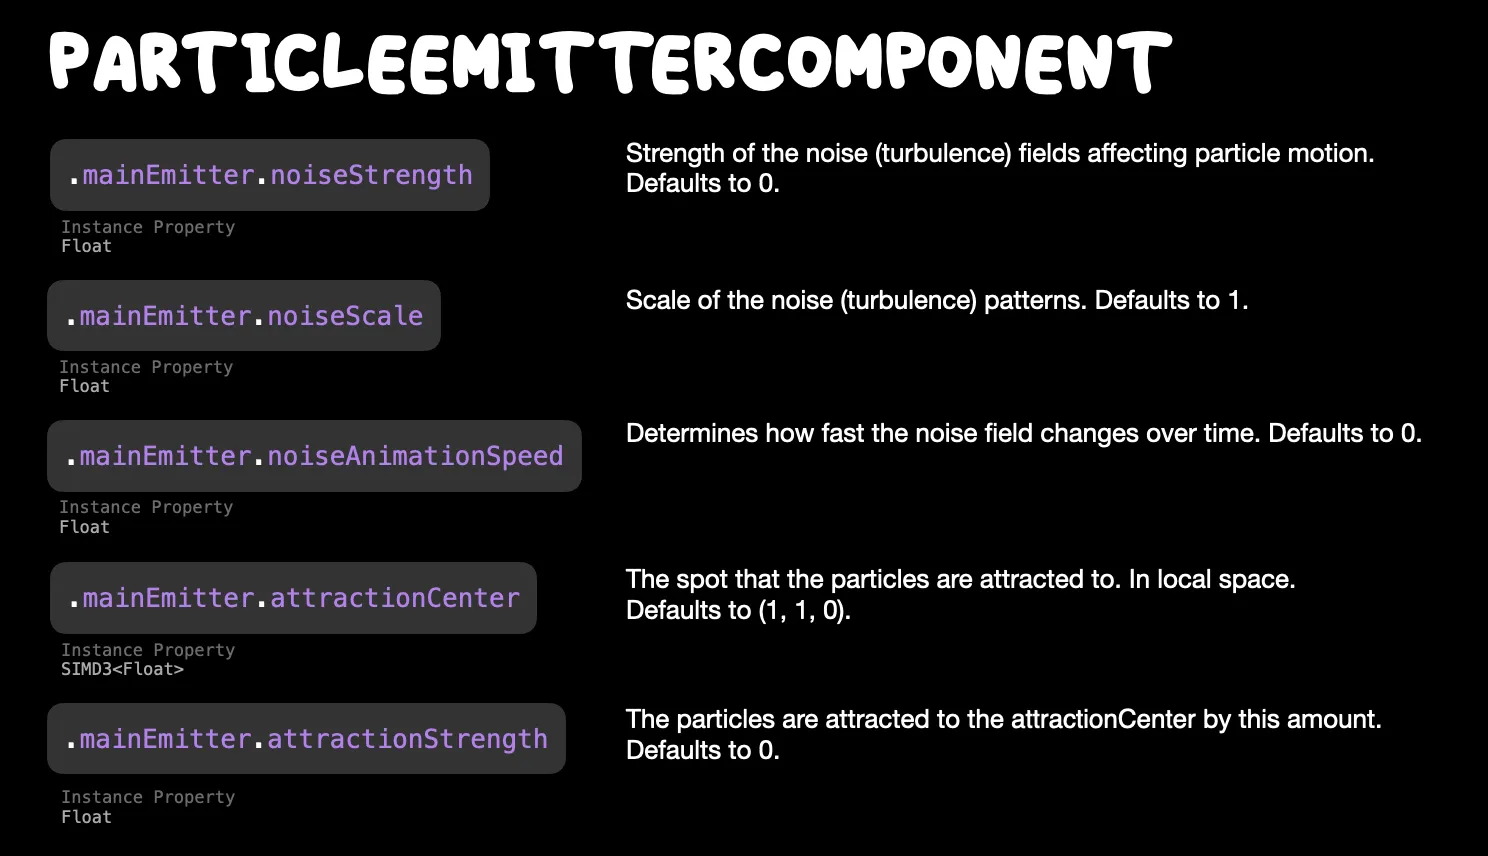
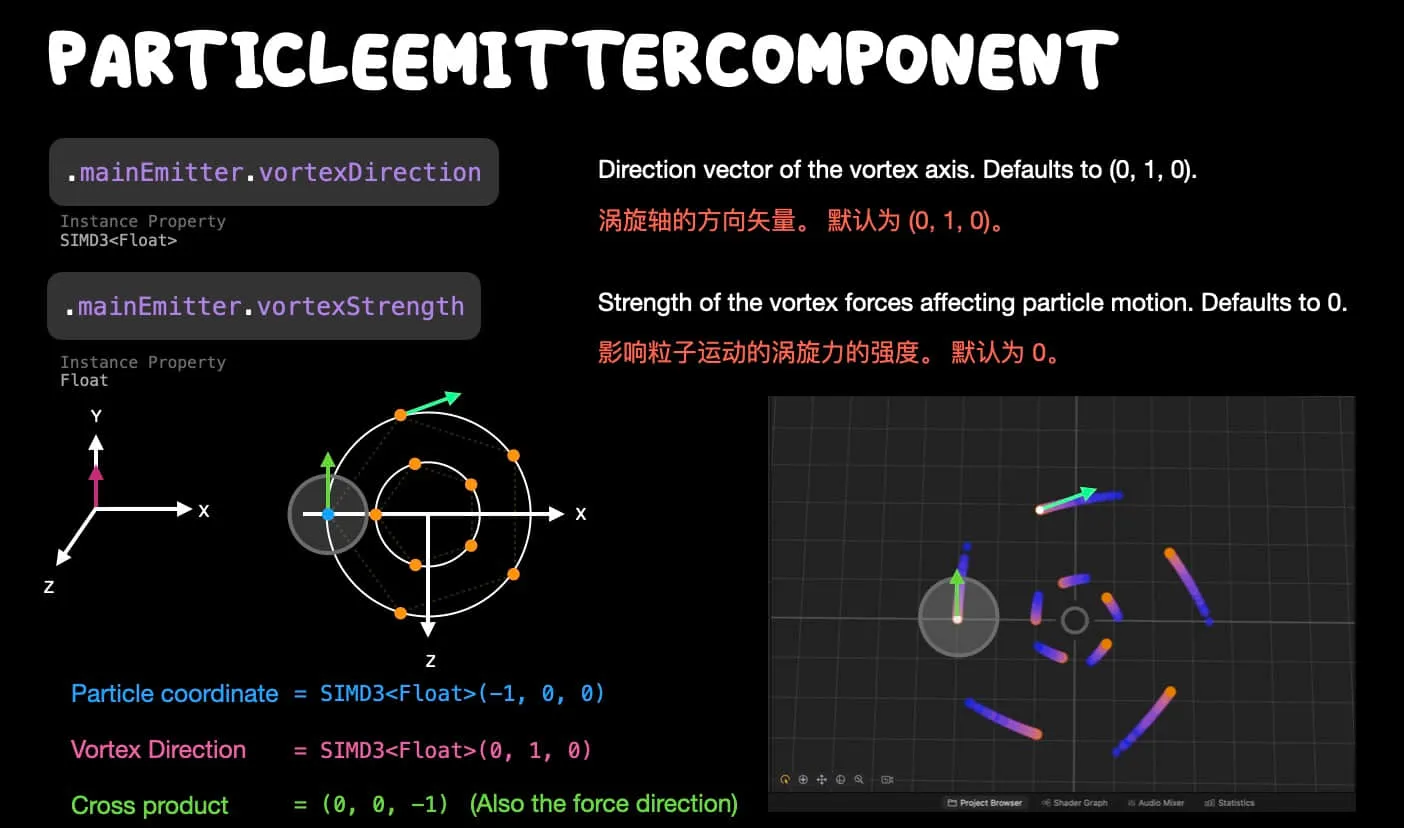
In comparison, more uniform field control parameters include attraction center and attraction strength. Additionally, we have vortex direction and vortex strength, which respectively control the axis direction and strength of the vortex.
💡 Note that this vortex axis direction is not the direction in which the particles are subjected to force. As shown in the figure below, the direction of the force acting on the particles is determined by the cross-product of the particle’s position and the axis of the vortex. As the particles move and their position changes, the direction of the force also changes in real-time, eventually forming a vortex effect.
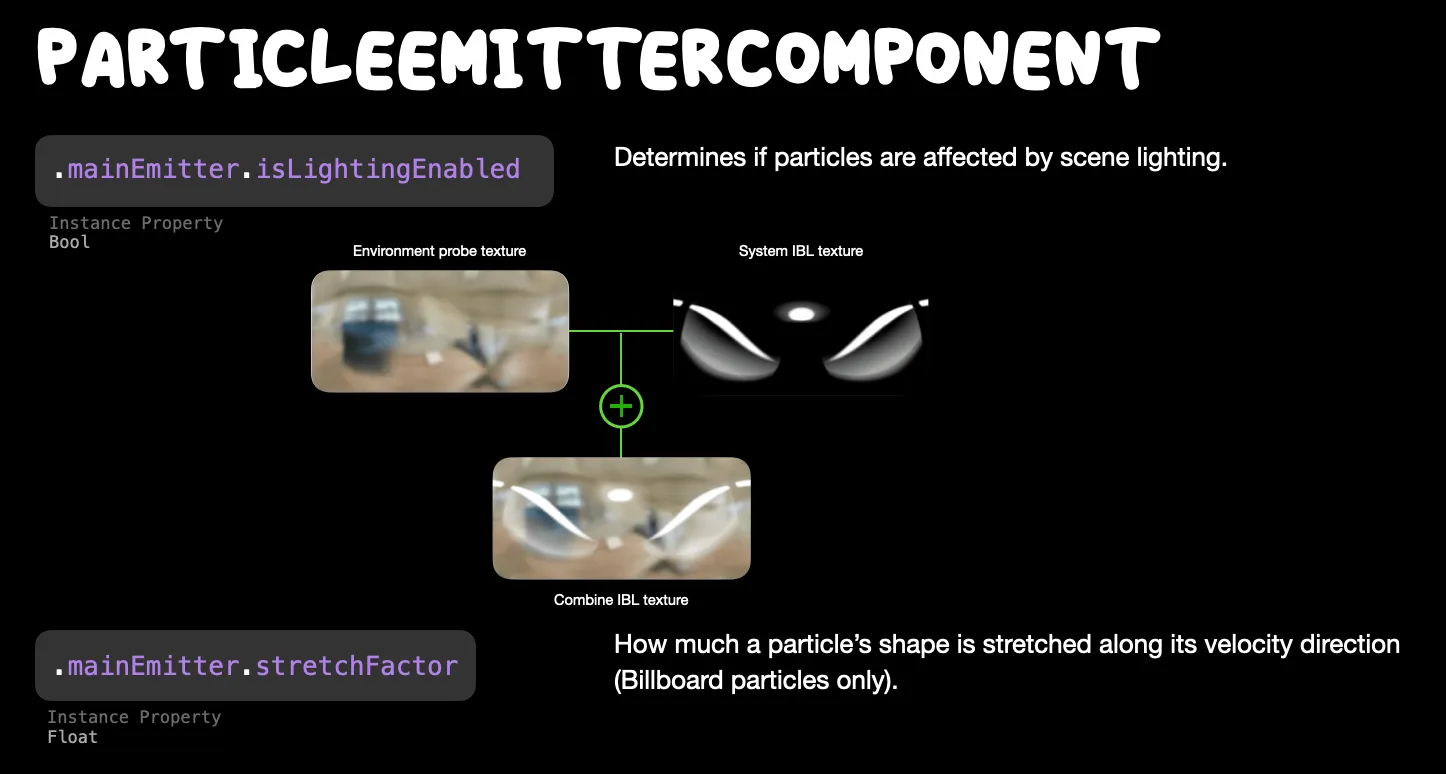
The last parameter module in the particle emitter that we haven’t touched upon is related to rendering. The Lighting Enable primarily controls whether particles will be affected by the scene’s lighting. By default, RCP has an HDR image of Image-based Light consistent with Xcode. However, you can not modify it in RCP. In Xcode, you can change this system’s IBL texture, and in actual applications, the lighting effect on particles will also be superimposed based on the environmental texture.
The Sort Order determines the rendering order of the particles. The image below shows the effects of various options for comparison. Since users can view particle effects from various angles in visionOS, these rendering orders mainly affect the perception of the depth of the particle effects.
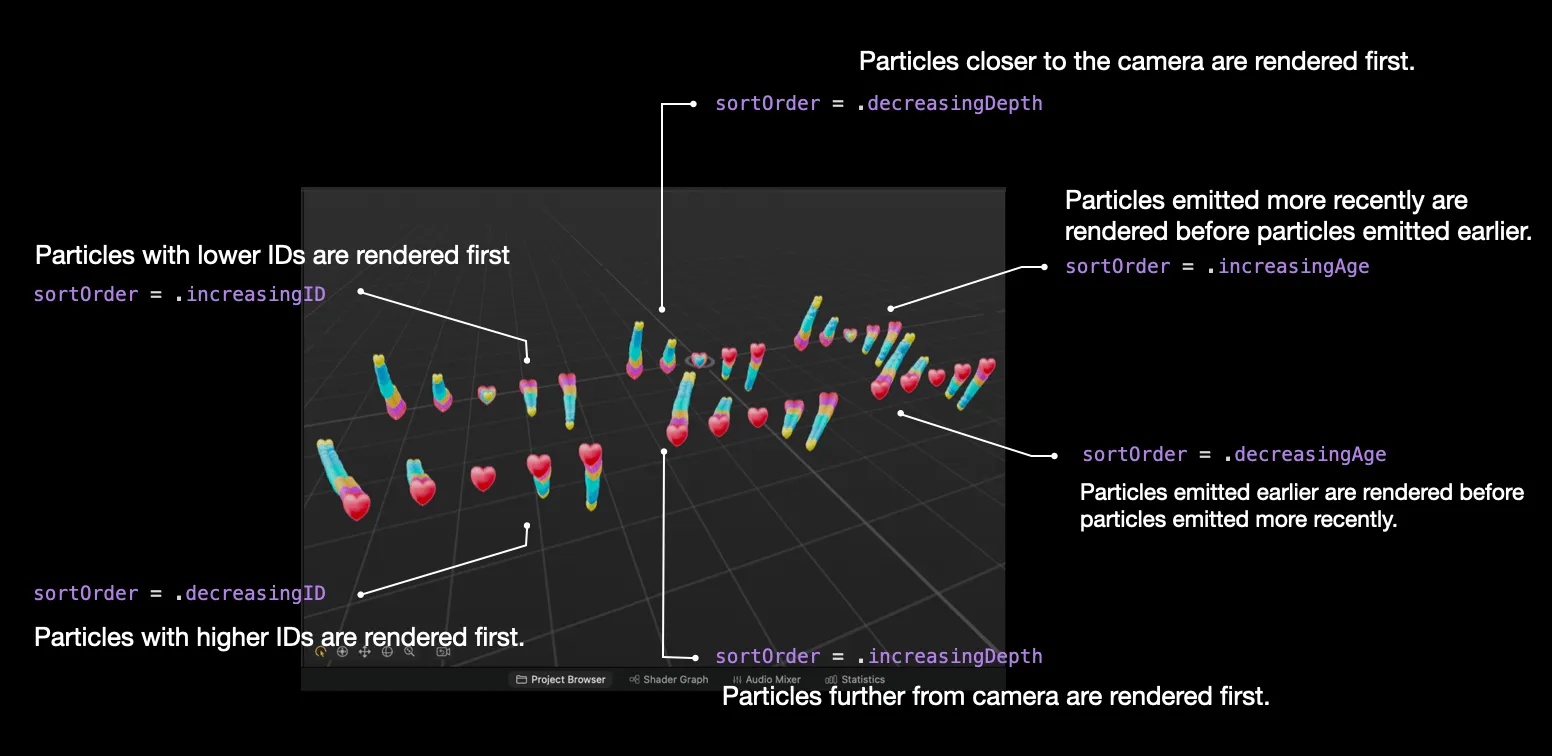
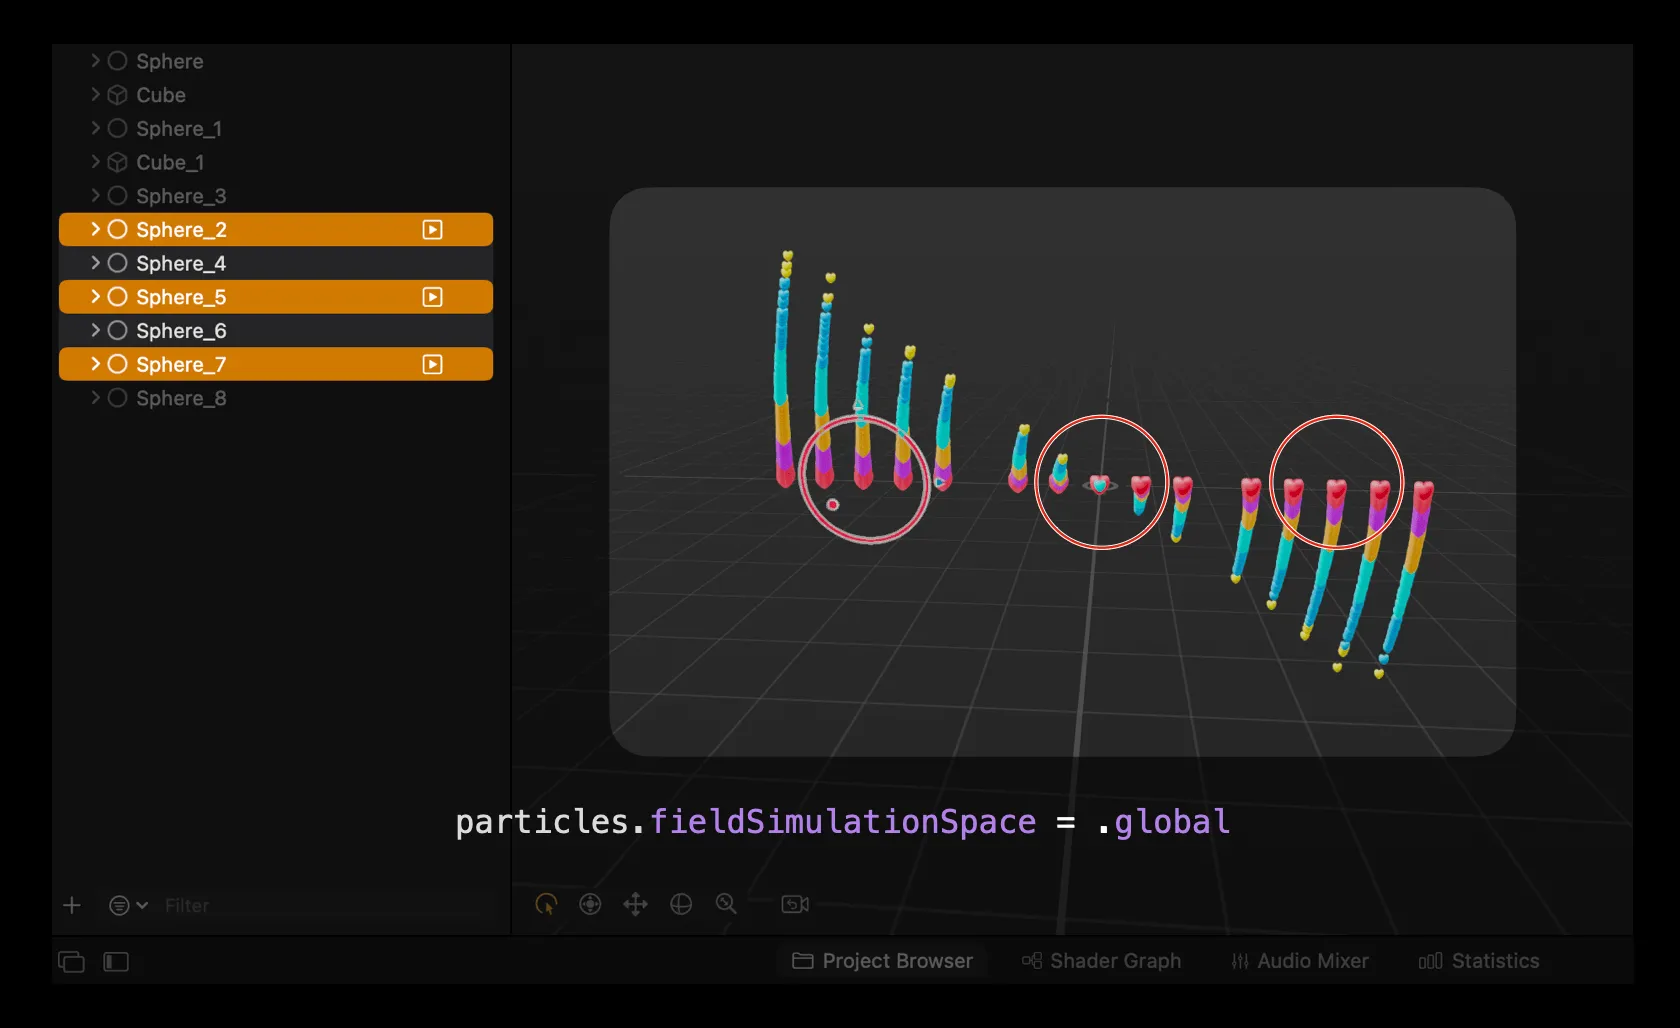
💡 In the above image, we used the parameters vortex strength = 1 and vortex direction = (1, 0, 0). When using Force Fields, please note whether the force field is in a global or local coordinate system. If it’s in the global coordinate system, particles with the same field control parameters will appear more integrated. The image below shows the vortex effect formed by particles under the control of the global vortex parameter.
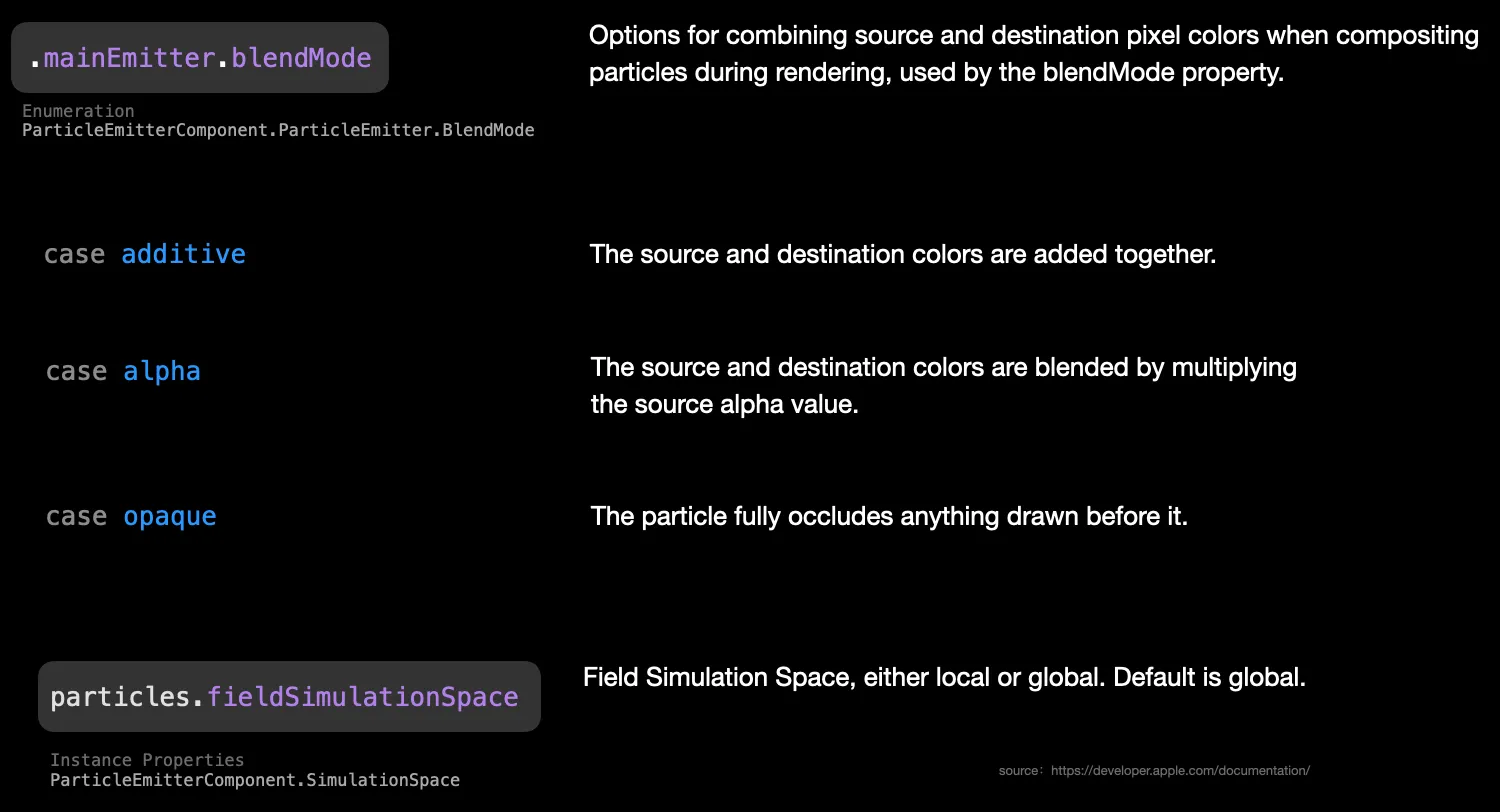
The Blend Mode determines the rendering mode of the particle color. Currently, the most commonly used is the Alpha blending mode.
Voilà! We have discussed all the parameter details about the particle emitter. For complex particle effects, like launching fireworks, the emitters need to be interconnected. The current particle system only supports connections between two emitters, which are controlled through the Spawn-related parameters. Among them, spawn Occasion is the most critical control parameter. It determines when the spawn particles are emitted relative to the main particles. By default, spawn particles are generated after the main particles are emitted. In addition to this, there are three other options, as shown in the following image.
💡 The onCollide is currently ineffective on RCP.
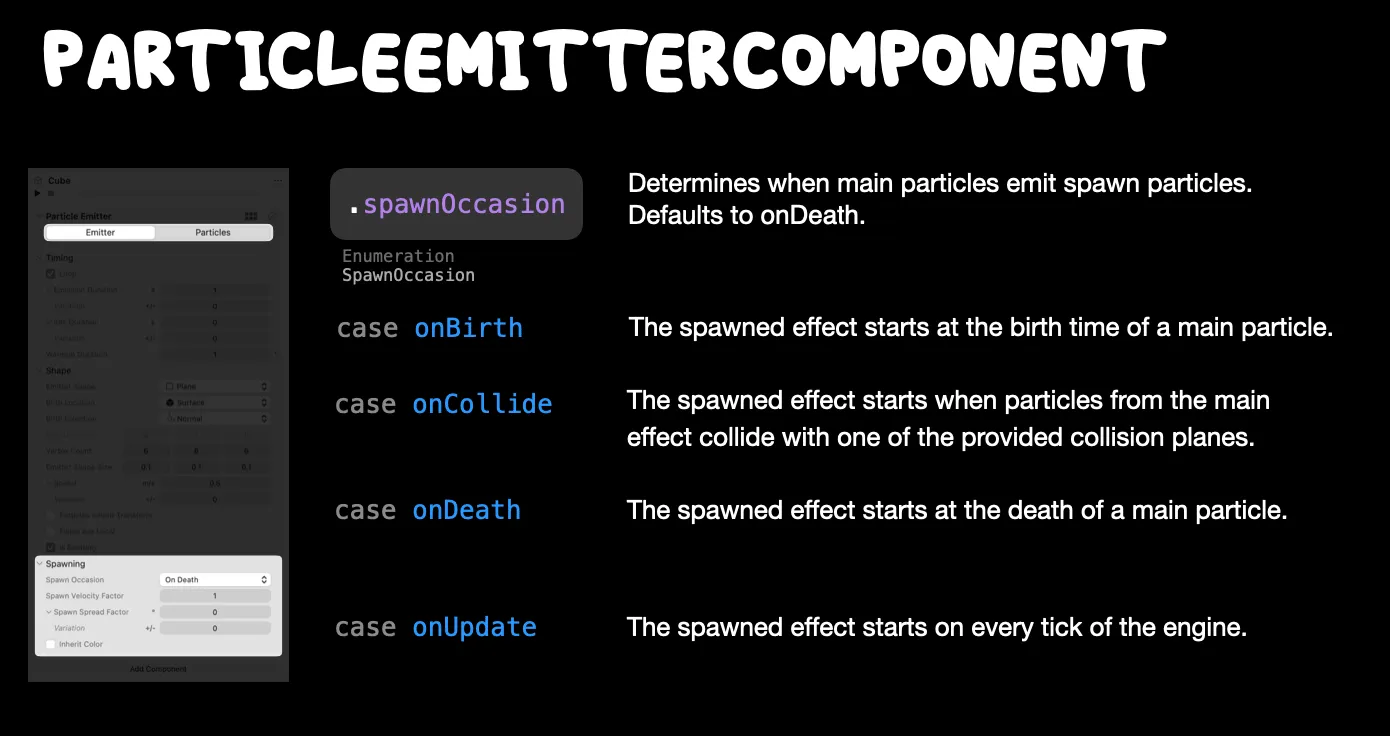
In addition, there is the Spawn Velocity Factor which controls the speed of the spawn particles, as well as the Spawn Spread factor which controls the spread angle (this parameter has an added randomness with Variation). And the configuration options for the spawn particle emitter are consistent with those of the main particle emitter.

Advanced Particle Effects and Their Applications
We just delved deep into the various details of particles. Let’s show some specific particle effects now:
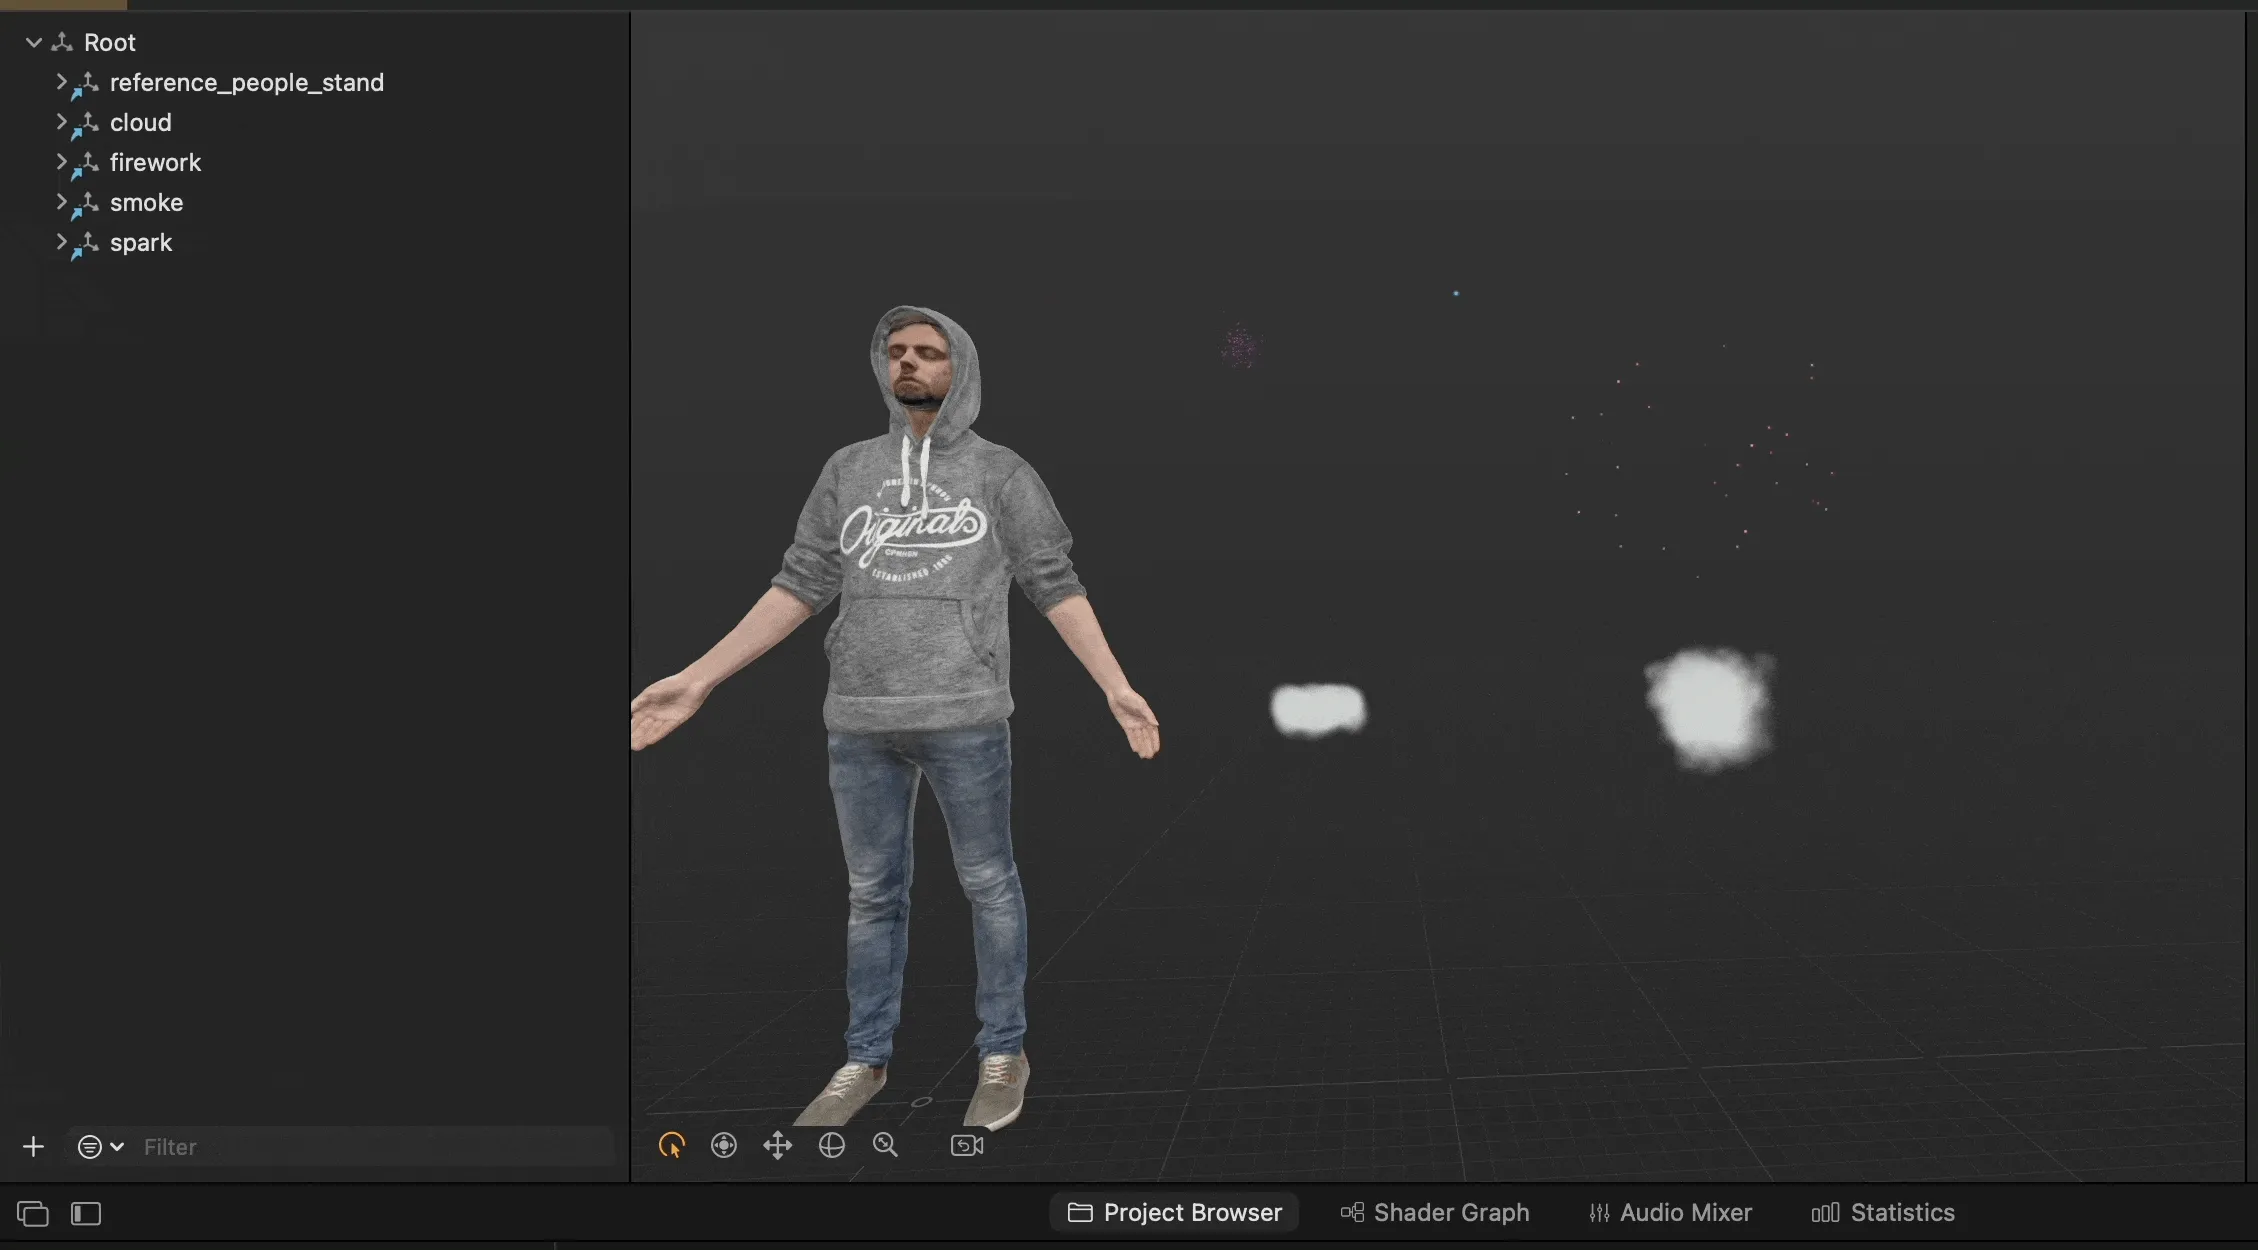
- Apple provides 6 presets for particle effects. You can also configure them yourself by following the instructions in this PDF to help you quickly get started with the particle system.
💡 When creating a particle effect, it’s a good idea to use a reference object. This way, you can easily gauge the actual size of the particle and ensure it’s not too tiny or oversized.
- We highly suggest checking out the WWDC session: Enhance your spatial computing app with RealityKit and Build spatial experiences with RealityKit. It offers insights into advanced particle effects and how to efficiently integrate them into your app using a custom system.
So, you might be wondering, what are the applications of particles? Of course, it is up to you! Here, through some special effects in films and TV series and some existing project cases, we hope to provide some inspiration:
- Expressing feelings and attitudes anytime, anywhere, with gestures
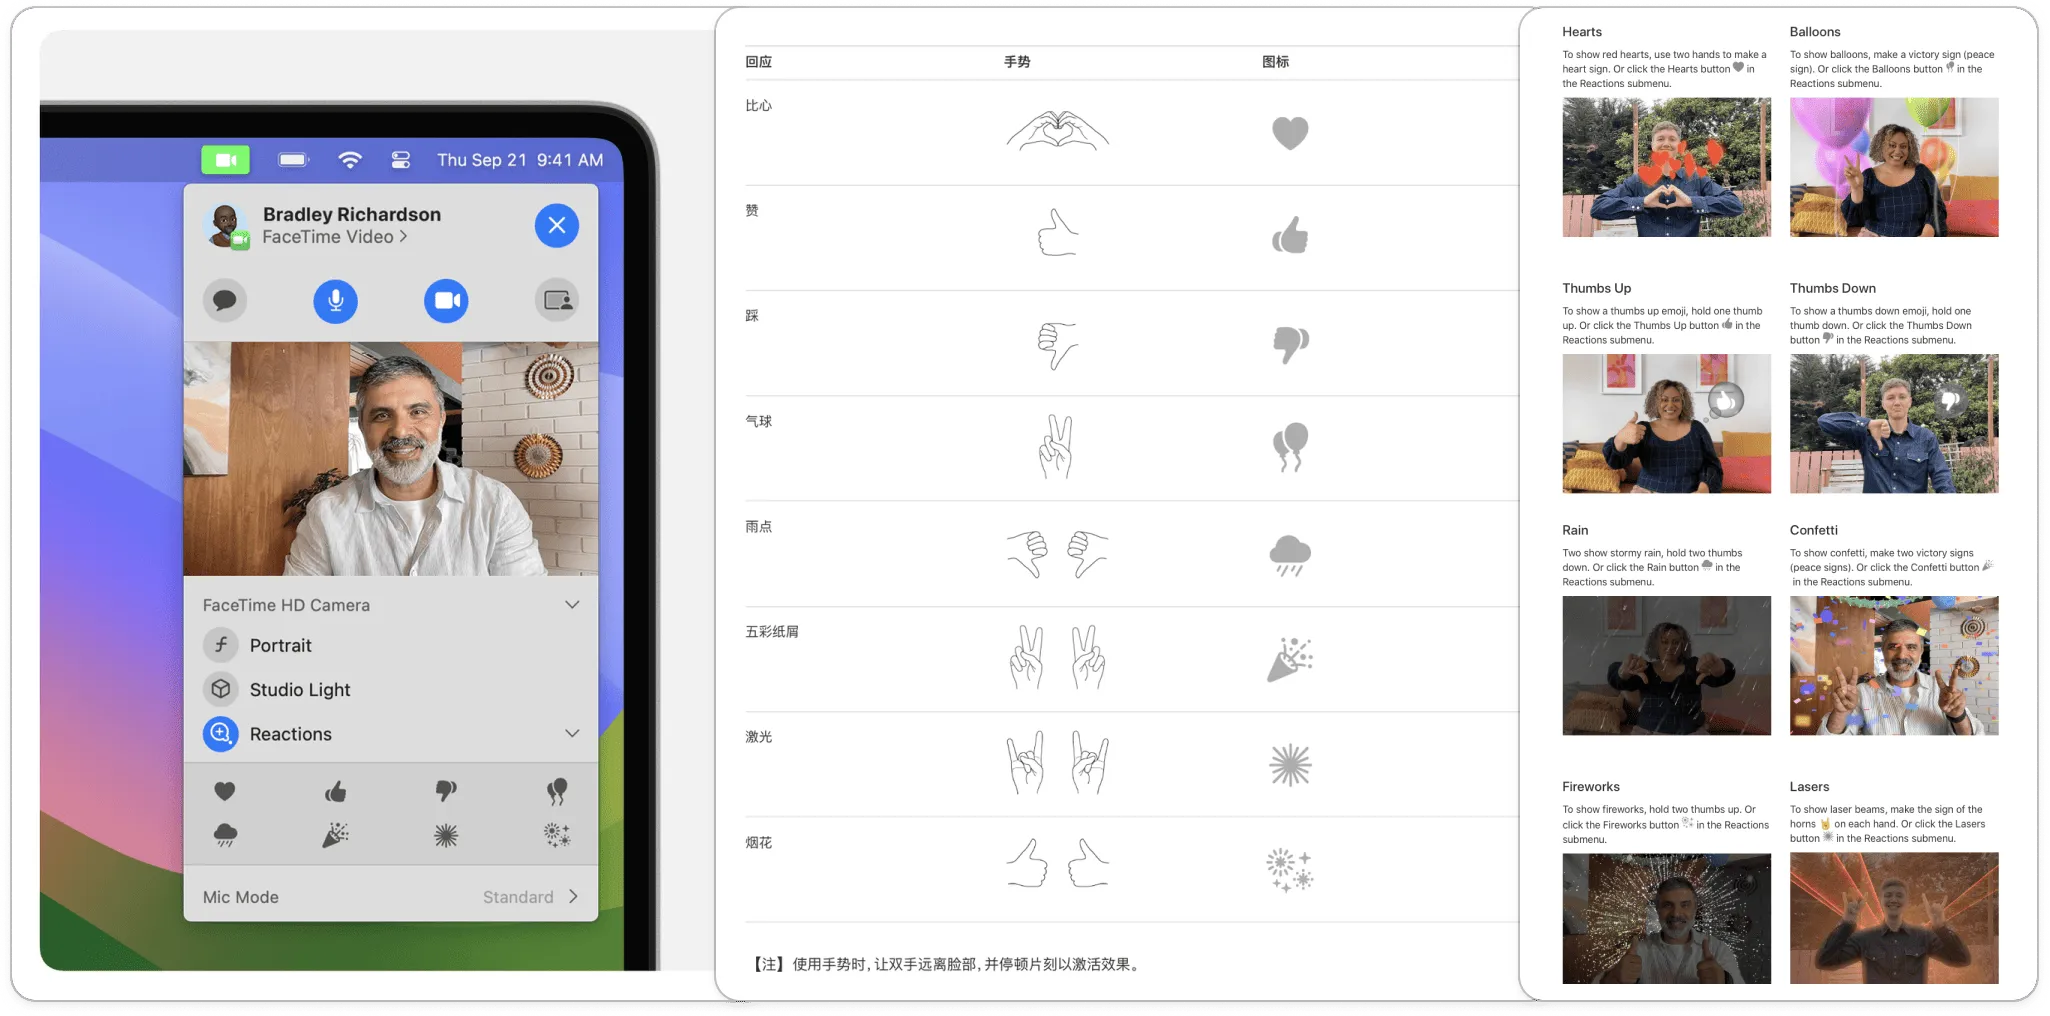
On the 2D phone screen, we express agreement with a friend’s circle by liking it, and we triple-click to show approval of a video. In spatial computing, can’t we express our feelings and attitudes anytime, anywhere with gesture recognition??
Do you remember the ninth issue of our newsletter where we introduced that in iOS 17’s Facetime, we can activate special effects using some simple gestures?
- Being charming in virtual social apps
In the Loki series, Loki showed Sylvie some fireworks with his magic. In virtual social applications, can’t we interact with friends anytime and anywhere using fireworks, balloons, blooming roses, etc., to show some unique charm?
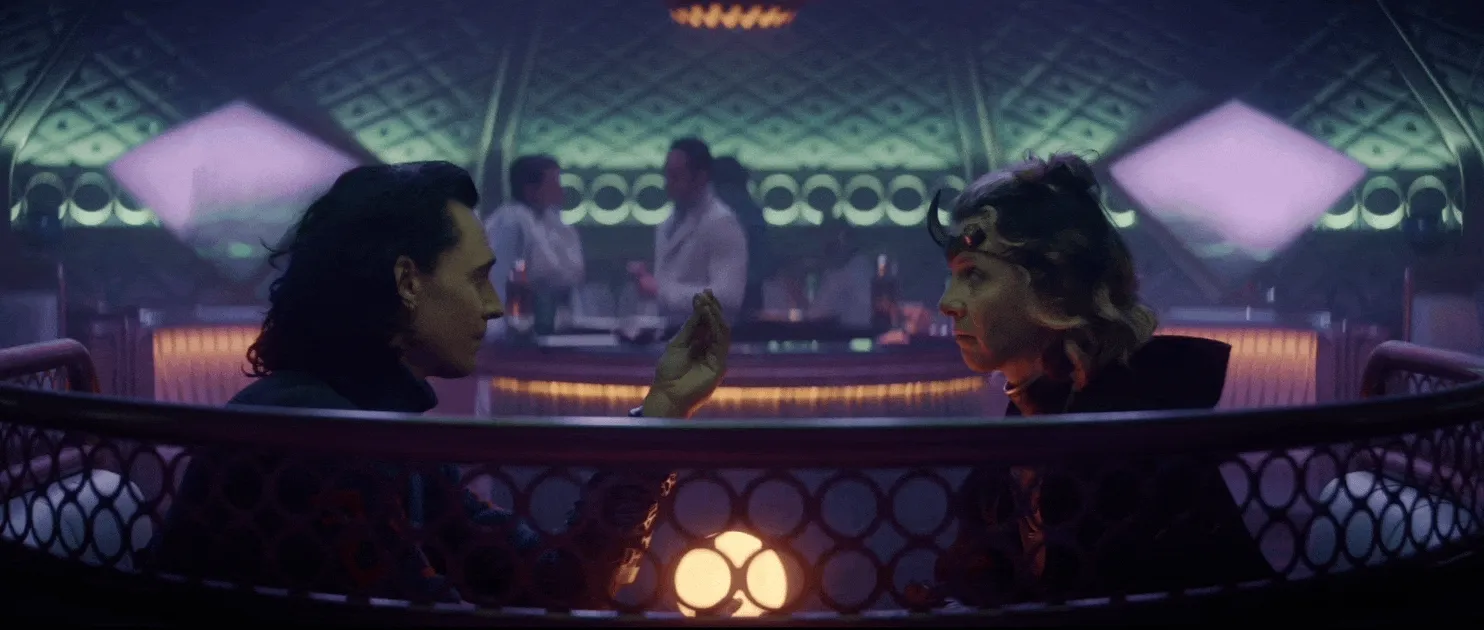
Loki Season 1 Episode 3, video from the internet, copyright belongs to Marvel.
- Transition animations in 3D interaction
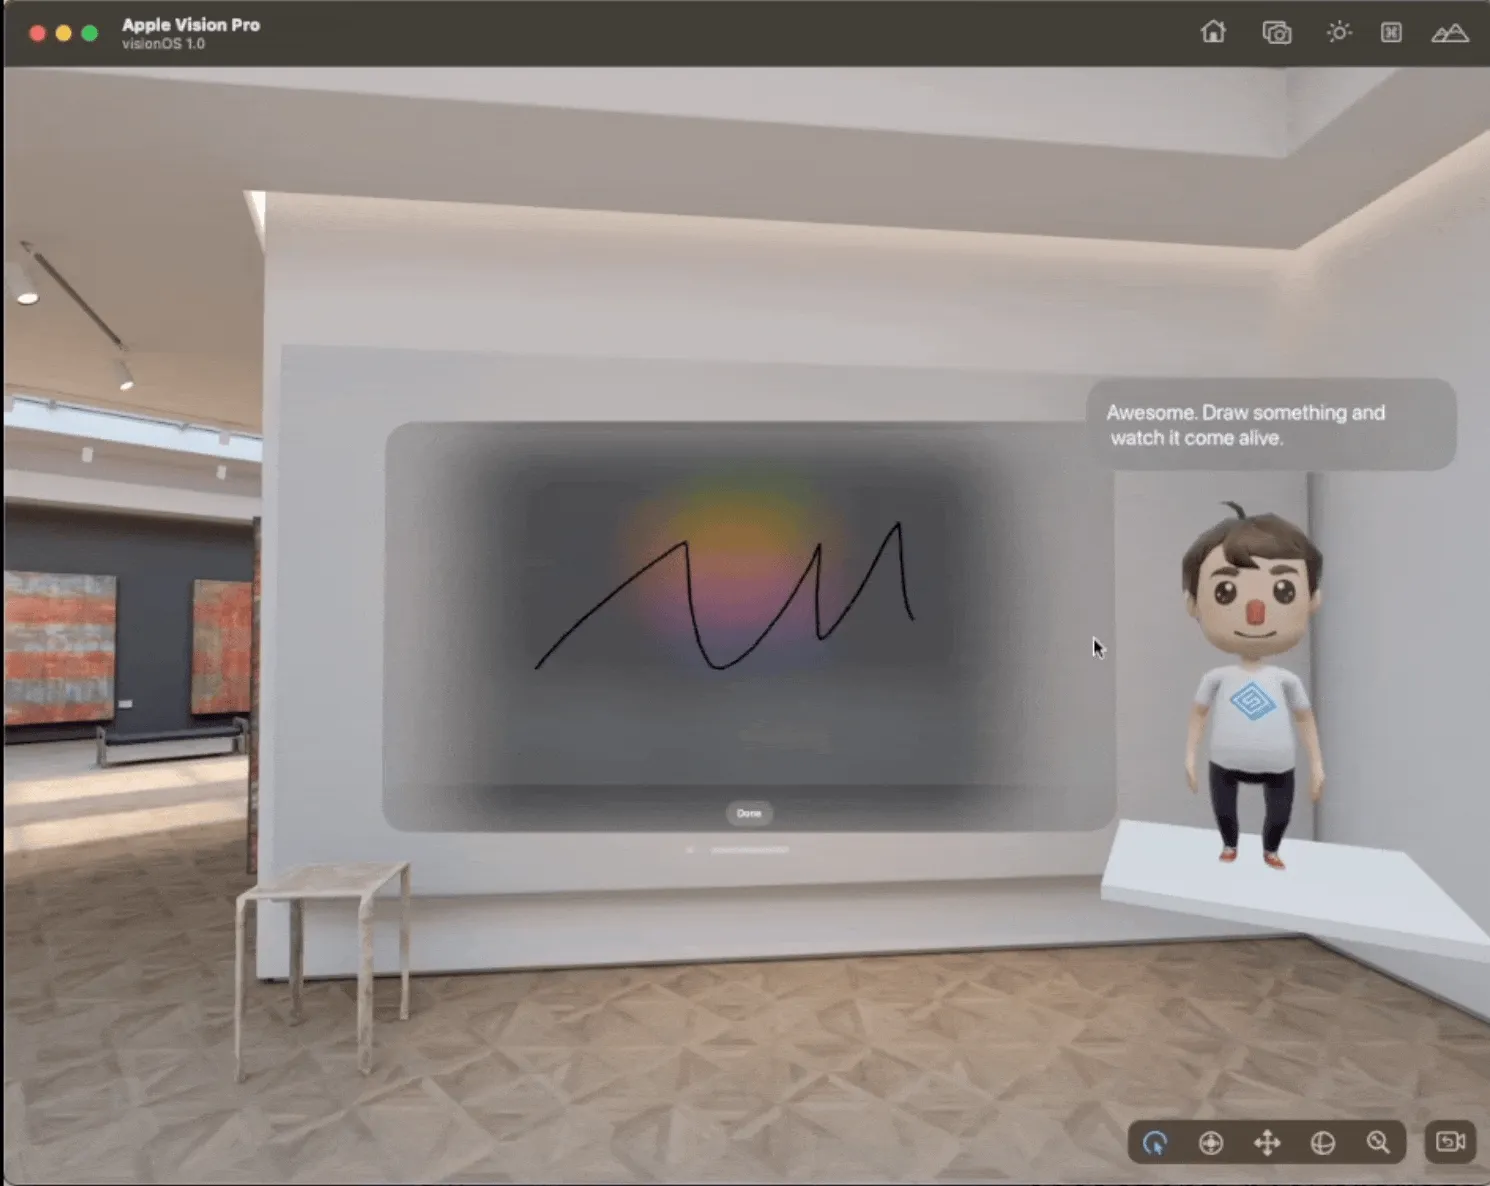
In 2D interaction, we can use animations to optimize the user experience during various element changes. In 3D interaction, particles are the best little helpers for model entrances and exits. For example, in the process of Tassilo’s unique mural creation combining drawing with AIGC, particle effects were used to assist the model’s transition.
In Conclusion
Using particles in a 3D scene can greatly enhance the realism, immersion, and visual appeal of the environment or animation.
- Realism: Many natural phenomena like smoke, fire, rain, and snow are extremely complex and would be impractical to model or animate by hand. Particle systems can simulate these effects with a high degree of realism.
- Efficiency: Rather than modeling thousands of individual objects, particles allow you to represent large quantities of similar items, such as a flock of birds or a crowd of people, using a single system. This can be more memory and computationally efficient.
- Variability: Particle systems can introduce randomness, ensuring that effects like sparks, water splashes, or falling leaves don’t appear too uniform or predictable. This variability can make scenes look more organic and less computer-generated.
- Interactivity: In real-time environments like video games, particle systems can respond to player actions. For instance, a character walking through water might create ripples and splashes, or an explosion might produce a dynamic cloud of smoke and debris.
- Aesthetic Appeal: Beyond realism, particles can be used for stylized visual effects to add flair and artistic appeal to scenes, such as magical auras, glowing trails, or dreamlike atmospheres.
- Narrative Enhancement: Particles can be used to emphasize and support story elements. For instance, a dusty environment can show a place’s age and neglect, while cherry blossoms floating in the wind can symbolize a romantic or peaceful moment.
In summary, the particle system is an essential tool for 3D applications, and many effects that it can achieve are difficult to realize through other means. Using particles can make a scene come alive, captivating users and providing a more immersive experience. While Apple’s current particle system may be relatively simple, it’s still very practical. We look forward to learning about how everyone uses particle effects in their own applications!
Author of this article
| Link | Image |
|---|---|
| Zion |  |
Medium Footer
If you think this article is helpful for you, you are welcome to communicate with us on X, xreality.zone
Recommended Reading
- Solving Nested Transparent Objects in RealityKit with Rendering Ordering - Part 1
- If you are a developer of Apple Vision Pro, then you must pay attention to these points
- Open Source Framework RealityShaderExtension: Transfer Shaders from Unity and Unreal to visionOS - Writing Shaders on visionOS Made Easy
- visionOS 2 HandMatcher HandVector Update to v2 and Add New FingerShape Function - A gesture matching framework that allows you to debug visionOS hand tracking function in emulator
- What Is Spatial Video On iPhone 15 Pro And Vision Pro
- Breaking down the details of Meta Quest 3's upgrades to MR technology
- visionOS 2 PortalComponent - A teleportation wonder that better meets expectations
 XReality.Zone