Before developing visionOS, you need to understand the full view of Apple AR technology
Medium Header
XRealityZone is a community of creators focused on the XR space, and our goal is to make XR development easier!
This article was first published in xreality.zone , a Chinese version of this article is available here.
Counting on our fingers, since Apple released ARKit in 2017 (the same year Apple released iPhone X), Apple AR-related technologies have been developed for more than 6 years. In these 6 years, AR-related technologies have occupied a place in the Sessions at WWDC every year, and although they are not as hot as Swift and SwiftUI-related topics, they still maintain a steady output.
Unfortunately, due to the limitations of the usage scenarios, the majority of developers may just know that Apple has AR-related technologies, but they don’t have actual hands-on or in-depth understanding of this technology. That’s why it’s probably not too much of a stretch to say that it’s a “stranger” to iOS developers.
In this article, we will try to help you have a general understanding of Apple AR technology before the release of visionOS from the following aspects:
- What’s happening at WWDC every year from 2017 to 2022
- The overall AR framework summarized from 30+ official Sample Code demos.
- The most basic code and programming concepts that all AR apps use.
- Other technologies you need to know to get better at Apple AR.
- Recommendations for getting started with Apple AR.
After you read this article, you will be able to get along with Apple AR from a stranger to a colleague you can further collaborate with 😉.
Timeline: from 2017 to 2022
First, let’s take a look at what happened at each year of WWDC from 2017 to 2022.
2017
2017 can be said to be the “first year” of Apple AR. At WWDC this year, Apple released the ARKit framework to help developers develop AR Apps under the Apple ecosystem.
At the time of its release, ARKit provided two basic capabilities for plane recognition (PlaneTracking) and device motion state tracking (WorldTracking), which are based on the computer vision framework Vision for camera data and the iOS device’s gyroscope sensor. Although basic, these two capabilities already provide the strongest foundation for AR App development. Using these two capabilities, developers can implement an “object placement” AR App very simply.
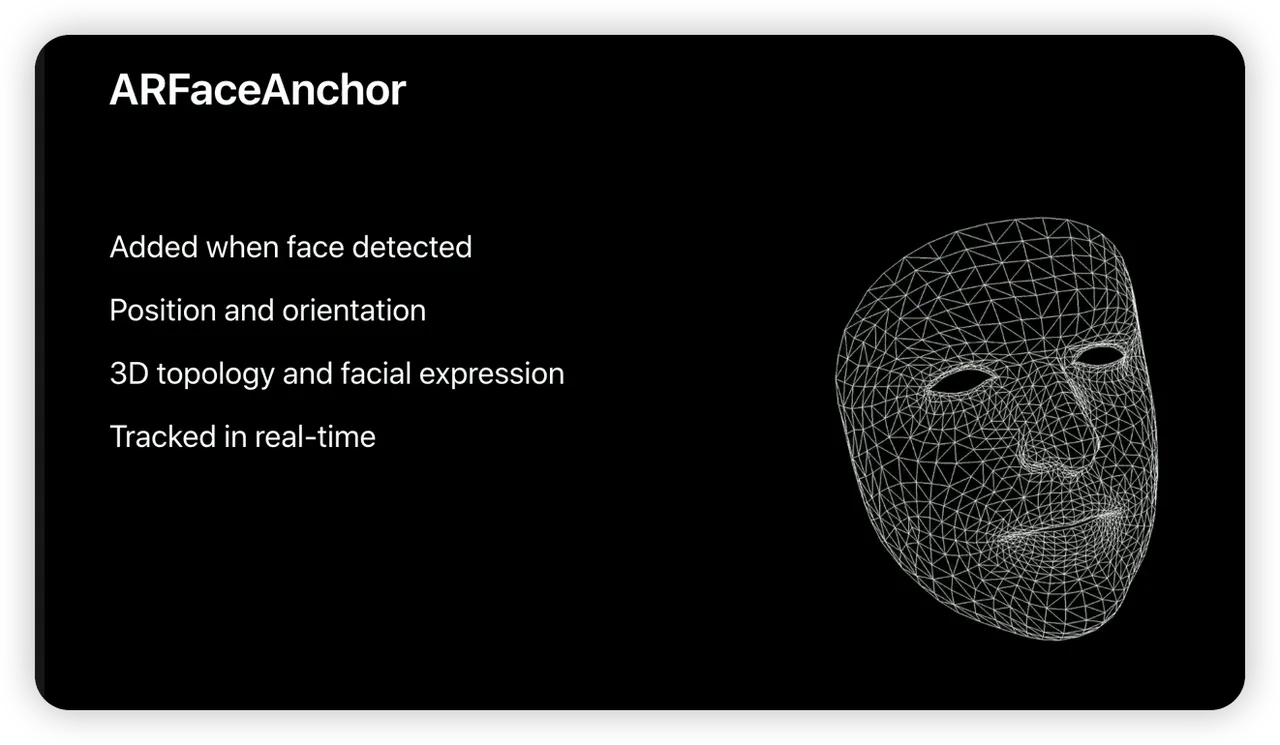
In addition, the deep-sensing camera on the iPhone X provides the hardware for fine-grained face recognition. Based on this, ARKit offers FaceTracking, which allows developers to use ARKit to recognize not only a user’s face, but also their expression and the corresponding 3D model of their face.
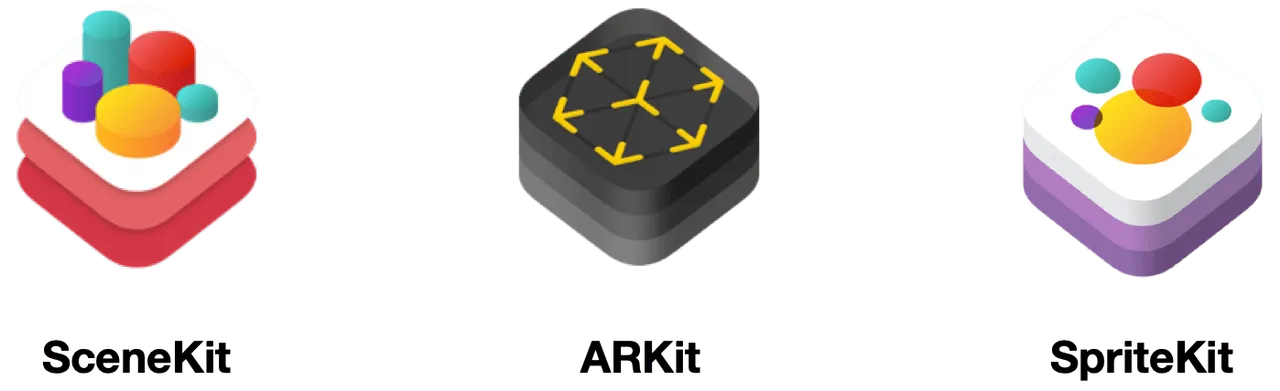
However, ARKit itself is just a framework for understanding the real world through cameras and gyroscopes, so to develop AR Apps, you need to have the right 2D or 3D rendering engine to work with it in order to let users see more realistic AR images.
Previously, Apple’s technology ecosystem included SceneKit and SpriteKit, two game engines for 3D and 2D games. When ARKit was released, Apple naturally chose to combine ARKit with SceneKit and SpriteKit to allow developers to complete AR App development based on SceneKit or SpriteKit.
In this year, developers also made a lot of interesting apps based on ARKit’s ability, such as 3D brushes:

2018
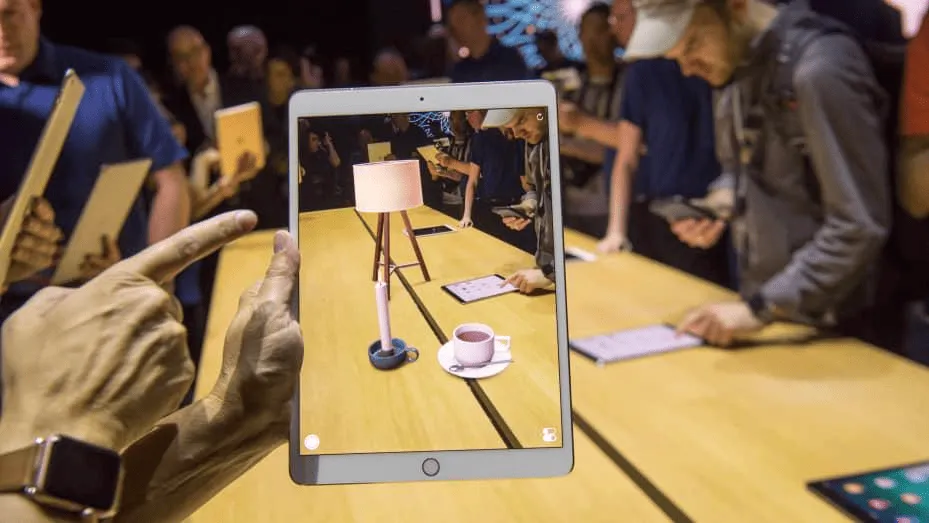
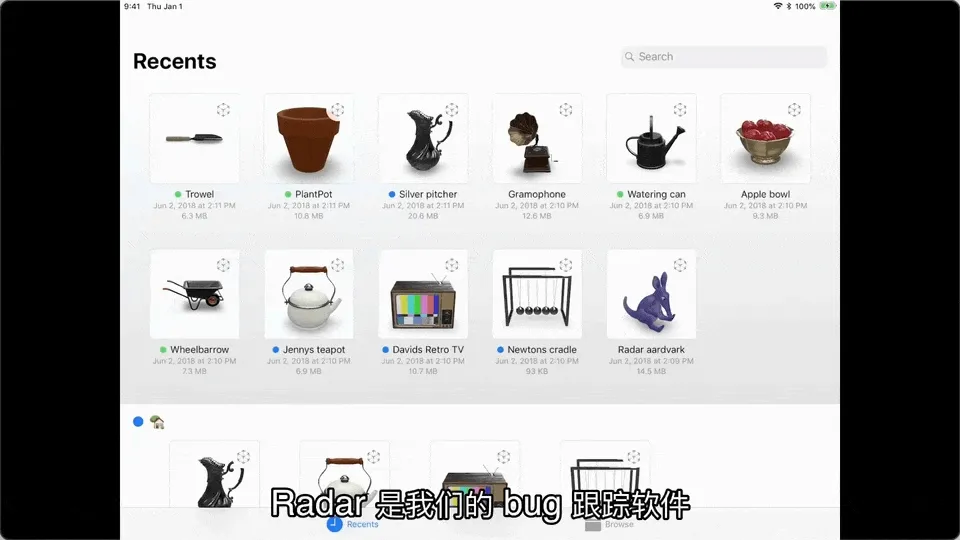
Since ARKit is a technical framework, it is difficult for users to experience the charm of AR directly without the help of an app, so in 2018, Apple provided AR QuickLook based on the original QuickLook, allowing users to preview 3D models in AR directly through the system’s built-in file app:
And in this year, the updated ARKit 2 updated even more real-world recognition capabilities. In addition to real-world planes and faces, ARKit can track and recognize real-world images (ImageTracking), 3D objects (ObjectTracking), and even take a “screenshot” of the real world as the user scans it “screenshots” of the real world as the user scans it, and then reflects them on reflective 3D objects in the scene (EnvironmentTexturing).
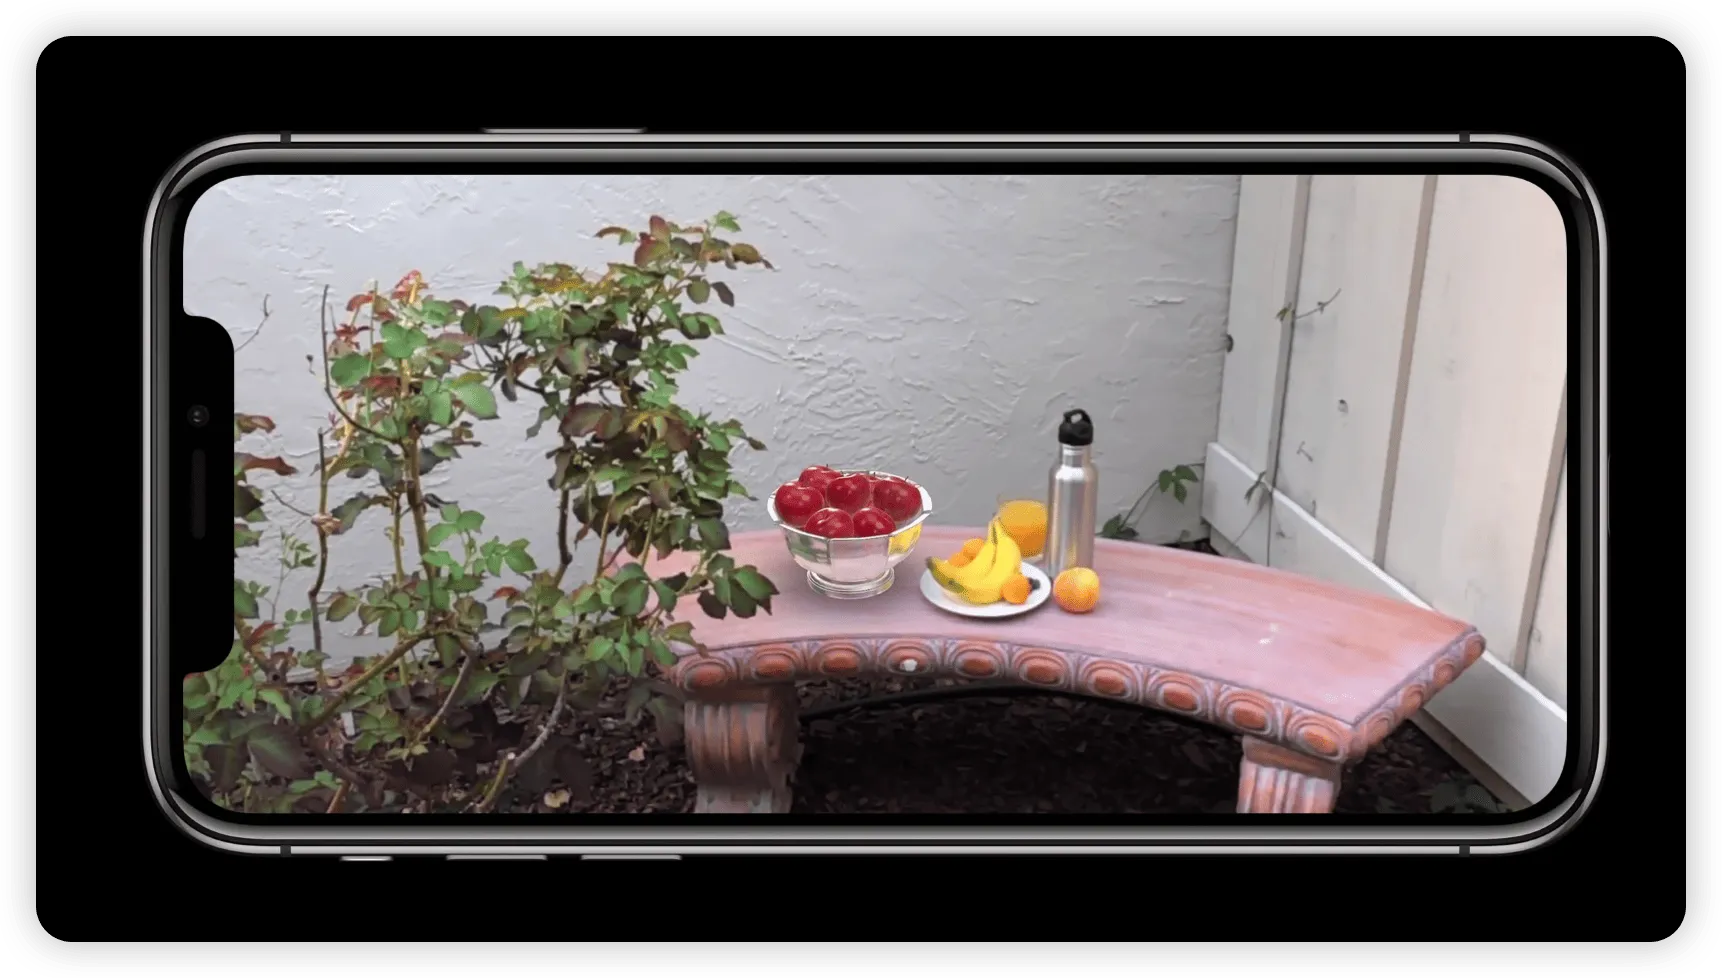 (WWDC 2018, Environment Texturing effect shown, where the fruit bowl is modeled in 3D and the banana exists in the real world, you can see the appearance of the banana reflected on the fruit bowl)
2019
With the enhancement of ARKit’s capabilities, Apple found that SceneKit, an engine designed for games, still has limitations in AR scenes in terms of both performance and ease of use. Therefore, at WWDC 2019, Apple released RealityKit, a rendering engine designed specifically for AR scenes.
Compared with SceneKit, RealityKit’s API is much easier to use in AR scenes. And Reality Composer, a creator tool launched at the same time, can only work with RealityKit.
With Reality Composer, even if you’re an AR enthusiast who doesn’t know how to develop, you can build a complete AR scene with a few simple operations, and you can use Reality Composer to build scenes on Mac, iPad, or iPhone.
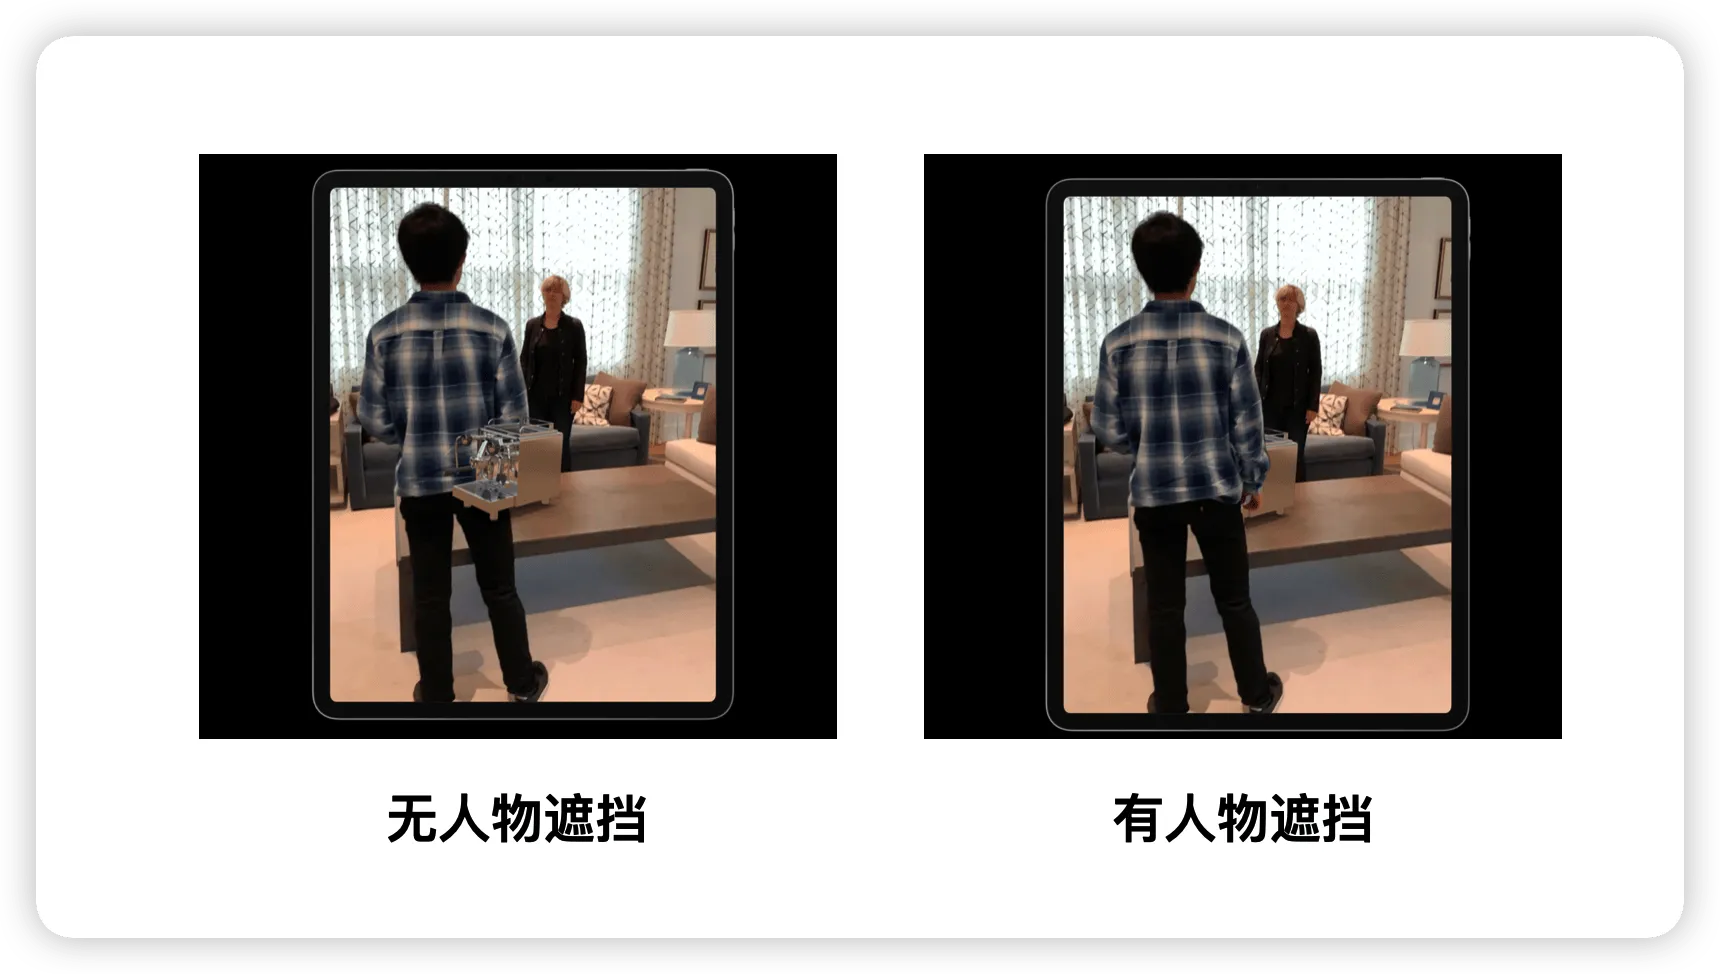
ARKit also brought a number of updates this year, the most notable of which is ARKit’s PeopleOcculusion, which makes the entire AR experience more realistic by obscuring 3D objects when they are in front of them:
In addition to this, ARKit also supports motion capture of the character - this can be done with just a regular camera (BodyTracking), without the need for complex motion capture equipment.

2020
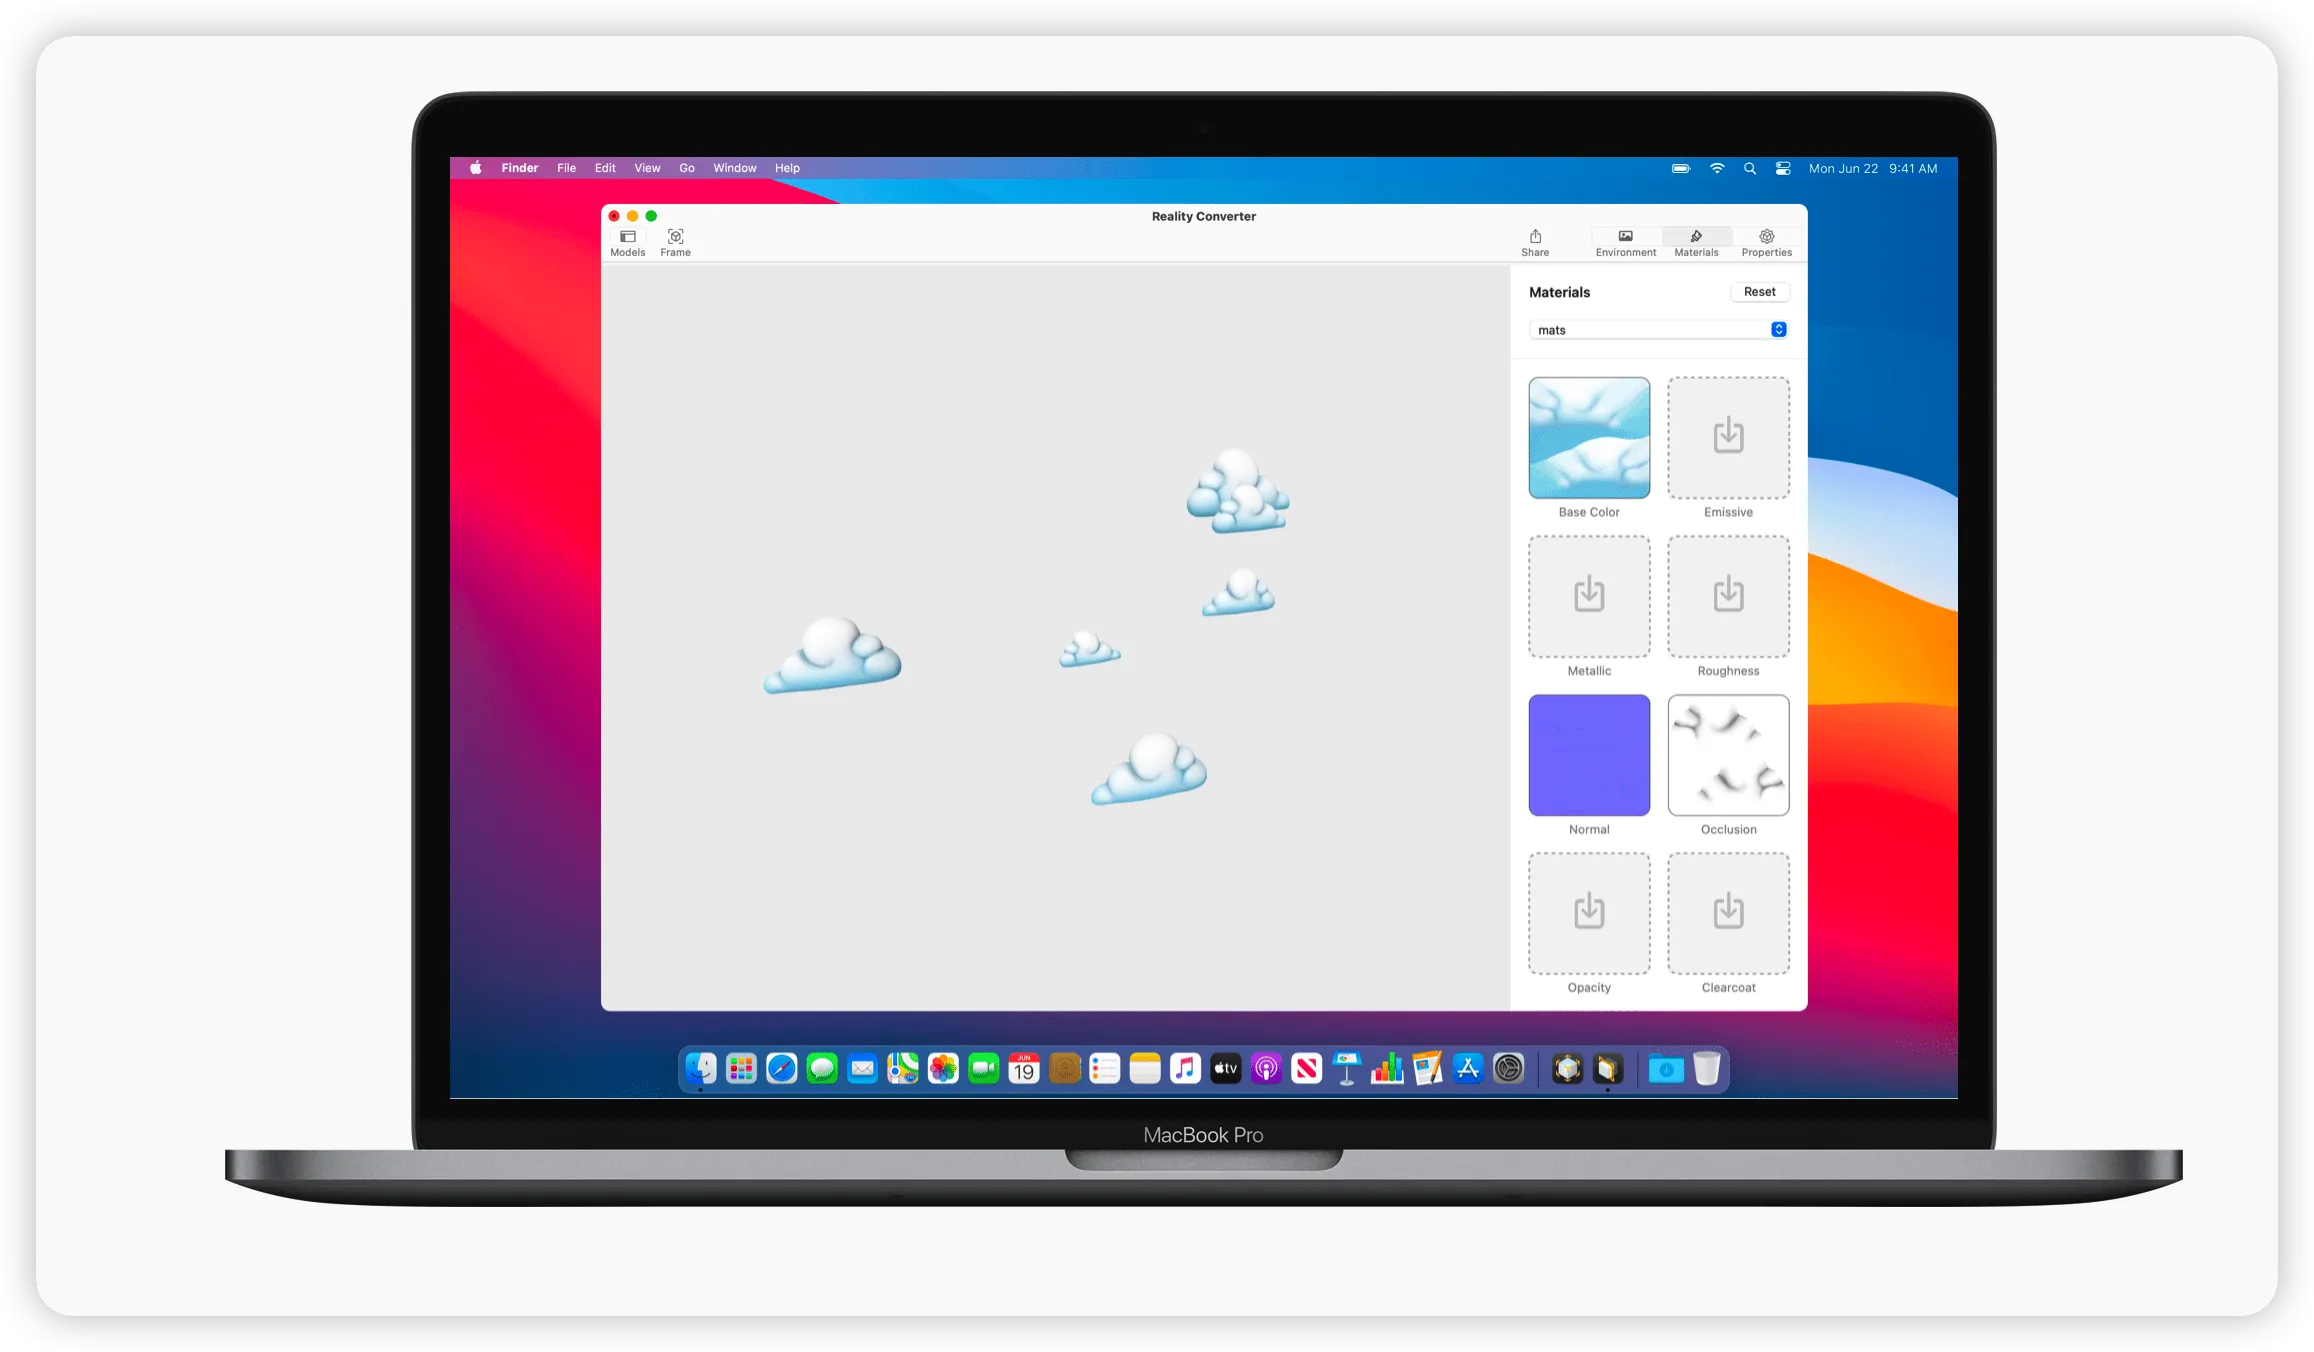
Until 2020, developers who want to convert a 3D model to the USDZ format supported by RealityKit or SceneKit will have to use a command line tool, USDZ Converter, which is not very convenient in scenarios where fine tuning of the model is required. This is not very convenient in some scenarios where fine tuning of the model is required. So in 2020, Apple introduced Reality Converter to fill in the missing piece of Apple’s creator tools puzzle.
Meanwhile, starting that year, Apple also began adding LiDAR scanners - a sensor that measures the distance from a device to an object by firing a laser into the real world - to some of its devices.
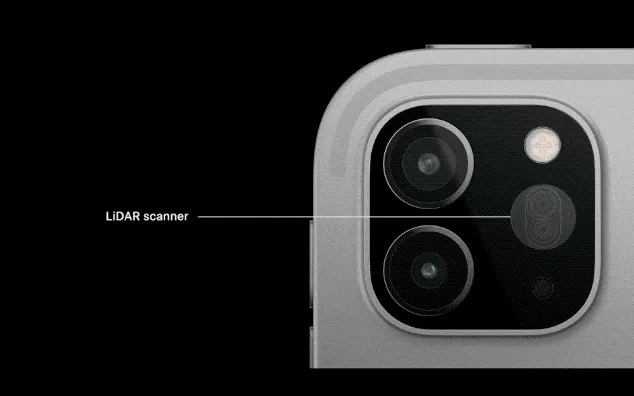
Previous ARKit’s have been based on computer vision technology to recognize the real world, and as a result have had problems with poor localization in some poorly lit scenes. With LiDAR sensors, this problem has been solved and the AR App experience has been significantly improved.

This year ARKit also added a new way to recognize the real world: GeoTracking. Unfortunately, this feature is only available in some US cities. This is because GeoTracking requires a combination of GPS data and Apple’s high-precision scans of the real world to get consistent results, so Apple must scan the local real-world scene before using GeoTracking.
2021
In the development of AR Apps, beautiful 3D models have always been an indispensable part of a good user experience. In order to reduce the cost of acquiring these models, in 2021, Apple provided the Object Capture API in RealityKit, which allows developers to generate high-quality 3D models by taking photos of objects directly.

2022
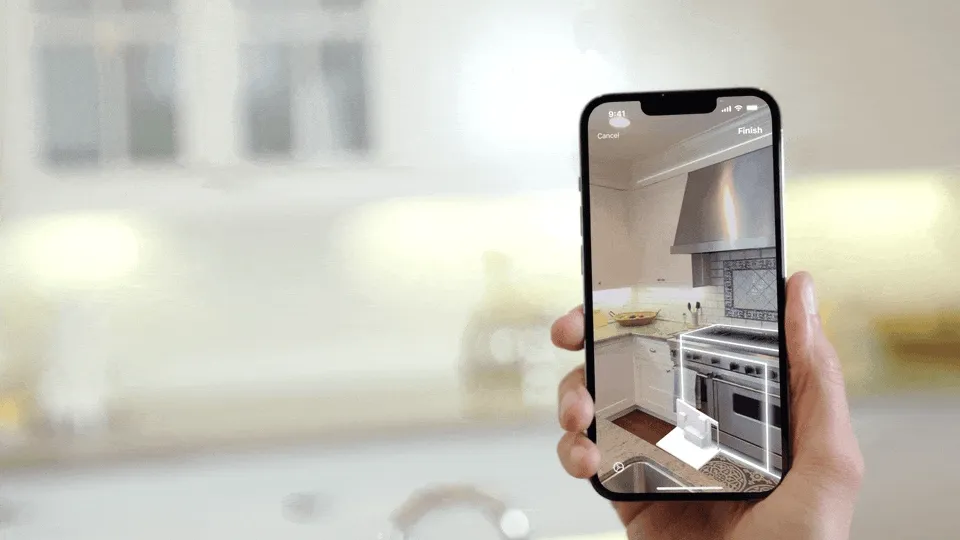
Not only that, but in 2022 Apple introduces RoomPlan, a framework that lets developers model houses using LiDAR-equipped devices.
Summary
The long six years have gradually enriched Apple’s AR capabilities. Just the various frameworks and tools that emerged in these six years can already make one’s head spin. Don’t worry, you can review when the various terms above appeared and some of the major updates each year through the chart below:
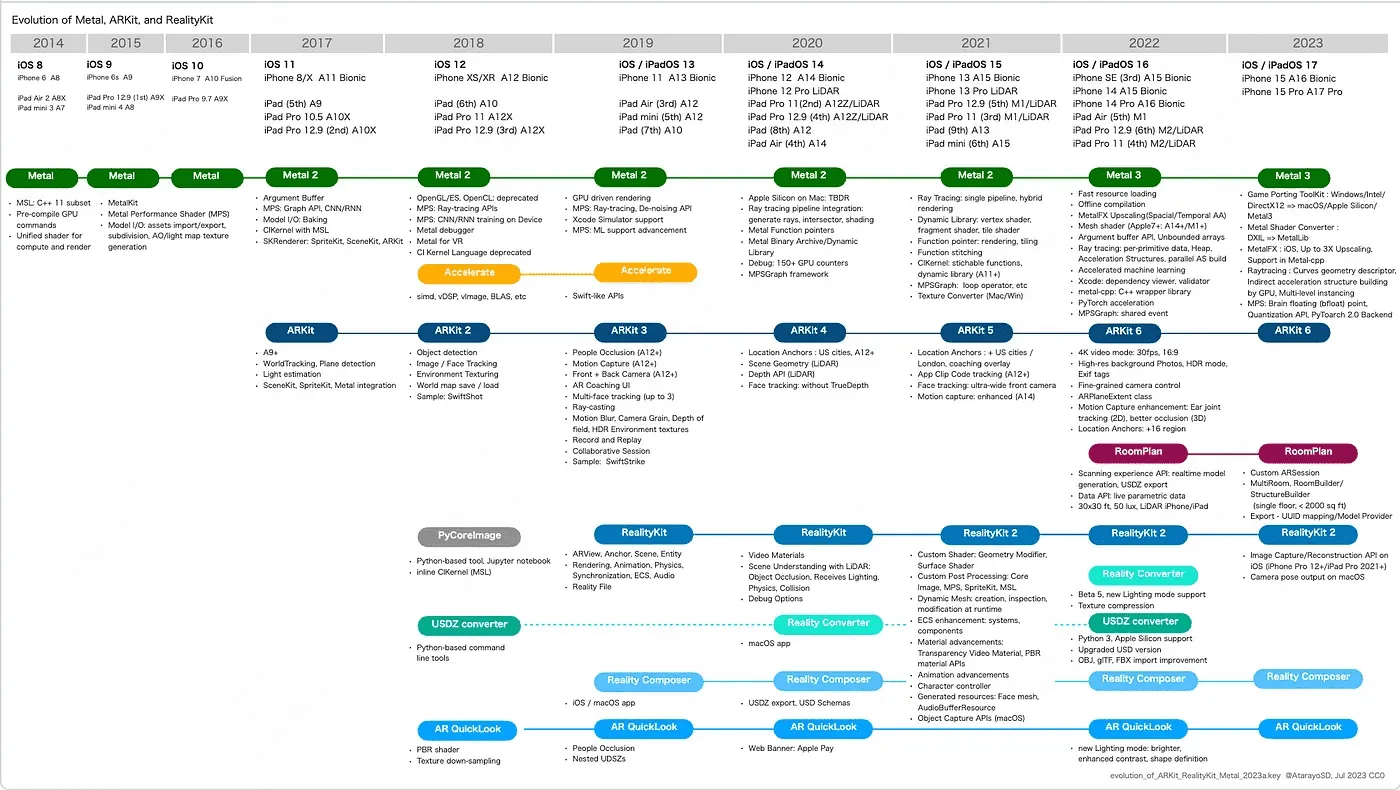
You can find more details in this Repo Evolution of Metal, ARKit, and RealityKit by Yasuhito Nagatomo
Of all the nomenclature out there, the key ones are the ARKit and RealityKit frameworks, each of which has its own division of labor, with ARKit being responsible for acquiring all sorts of information about the real world, and RealityKit focusing on rendering virtual 3D content realistically.
If you compare Apple’s AR inaccuracies, ARKit is like a device information framework like CoreLocatioin / CoreMotion, which acquires more dimensional information about the real world, while RealityKit is a UI framework like UIKit / SwiftUI, except that it focuses more on rendering the 3D world. RealityKit is a UI framework like UIKit / SwiftUI, but RealityKit is more focused on rendering the 3D world.
Okay, great, now you know and understand ARKit, RealityKit, two of the most central frameworks in the AR world, and they were featured in the WWDC AR related video took the absolute lead:
In addition to RealityKit and ARKit, you’ll probably see a few other terms, some of which may be completely new to you, don’t worry, we’ll expand on them later, for now, let’s continue our journey.
Doing the sorting: recognizing AR tech in the right frame
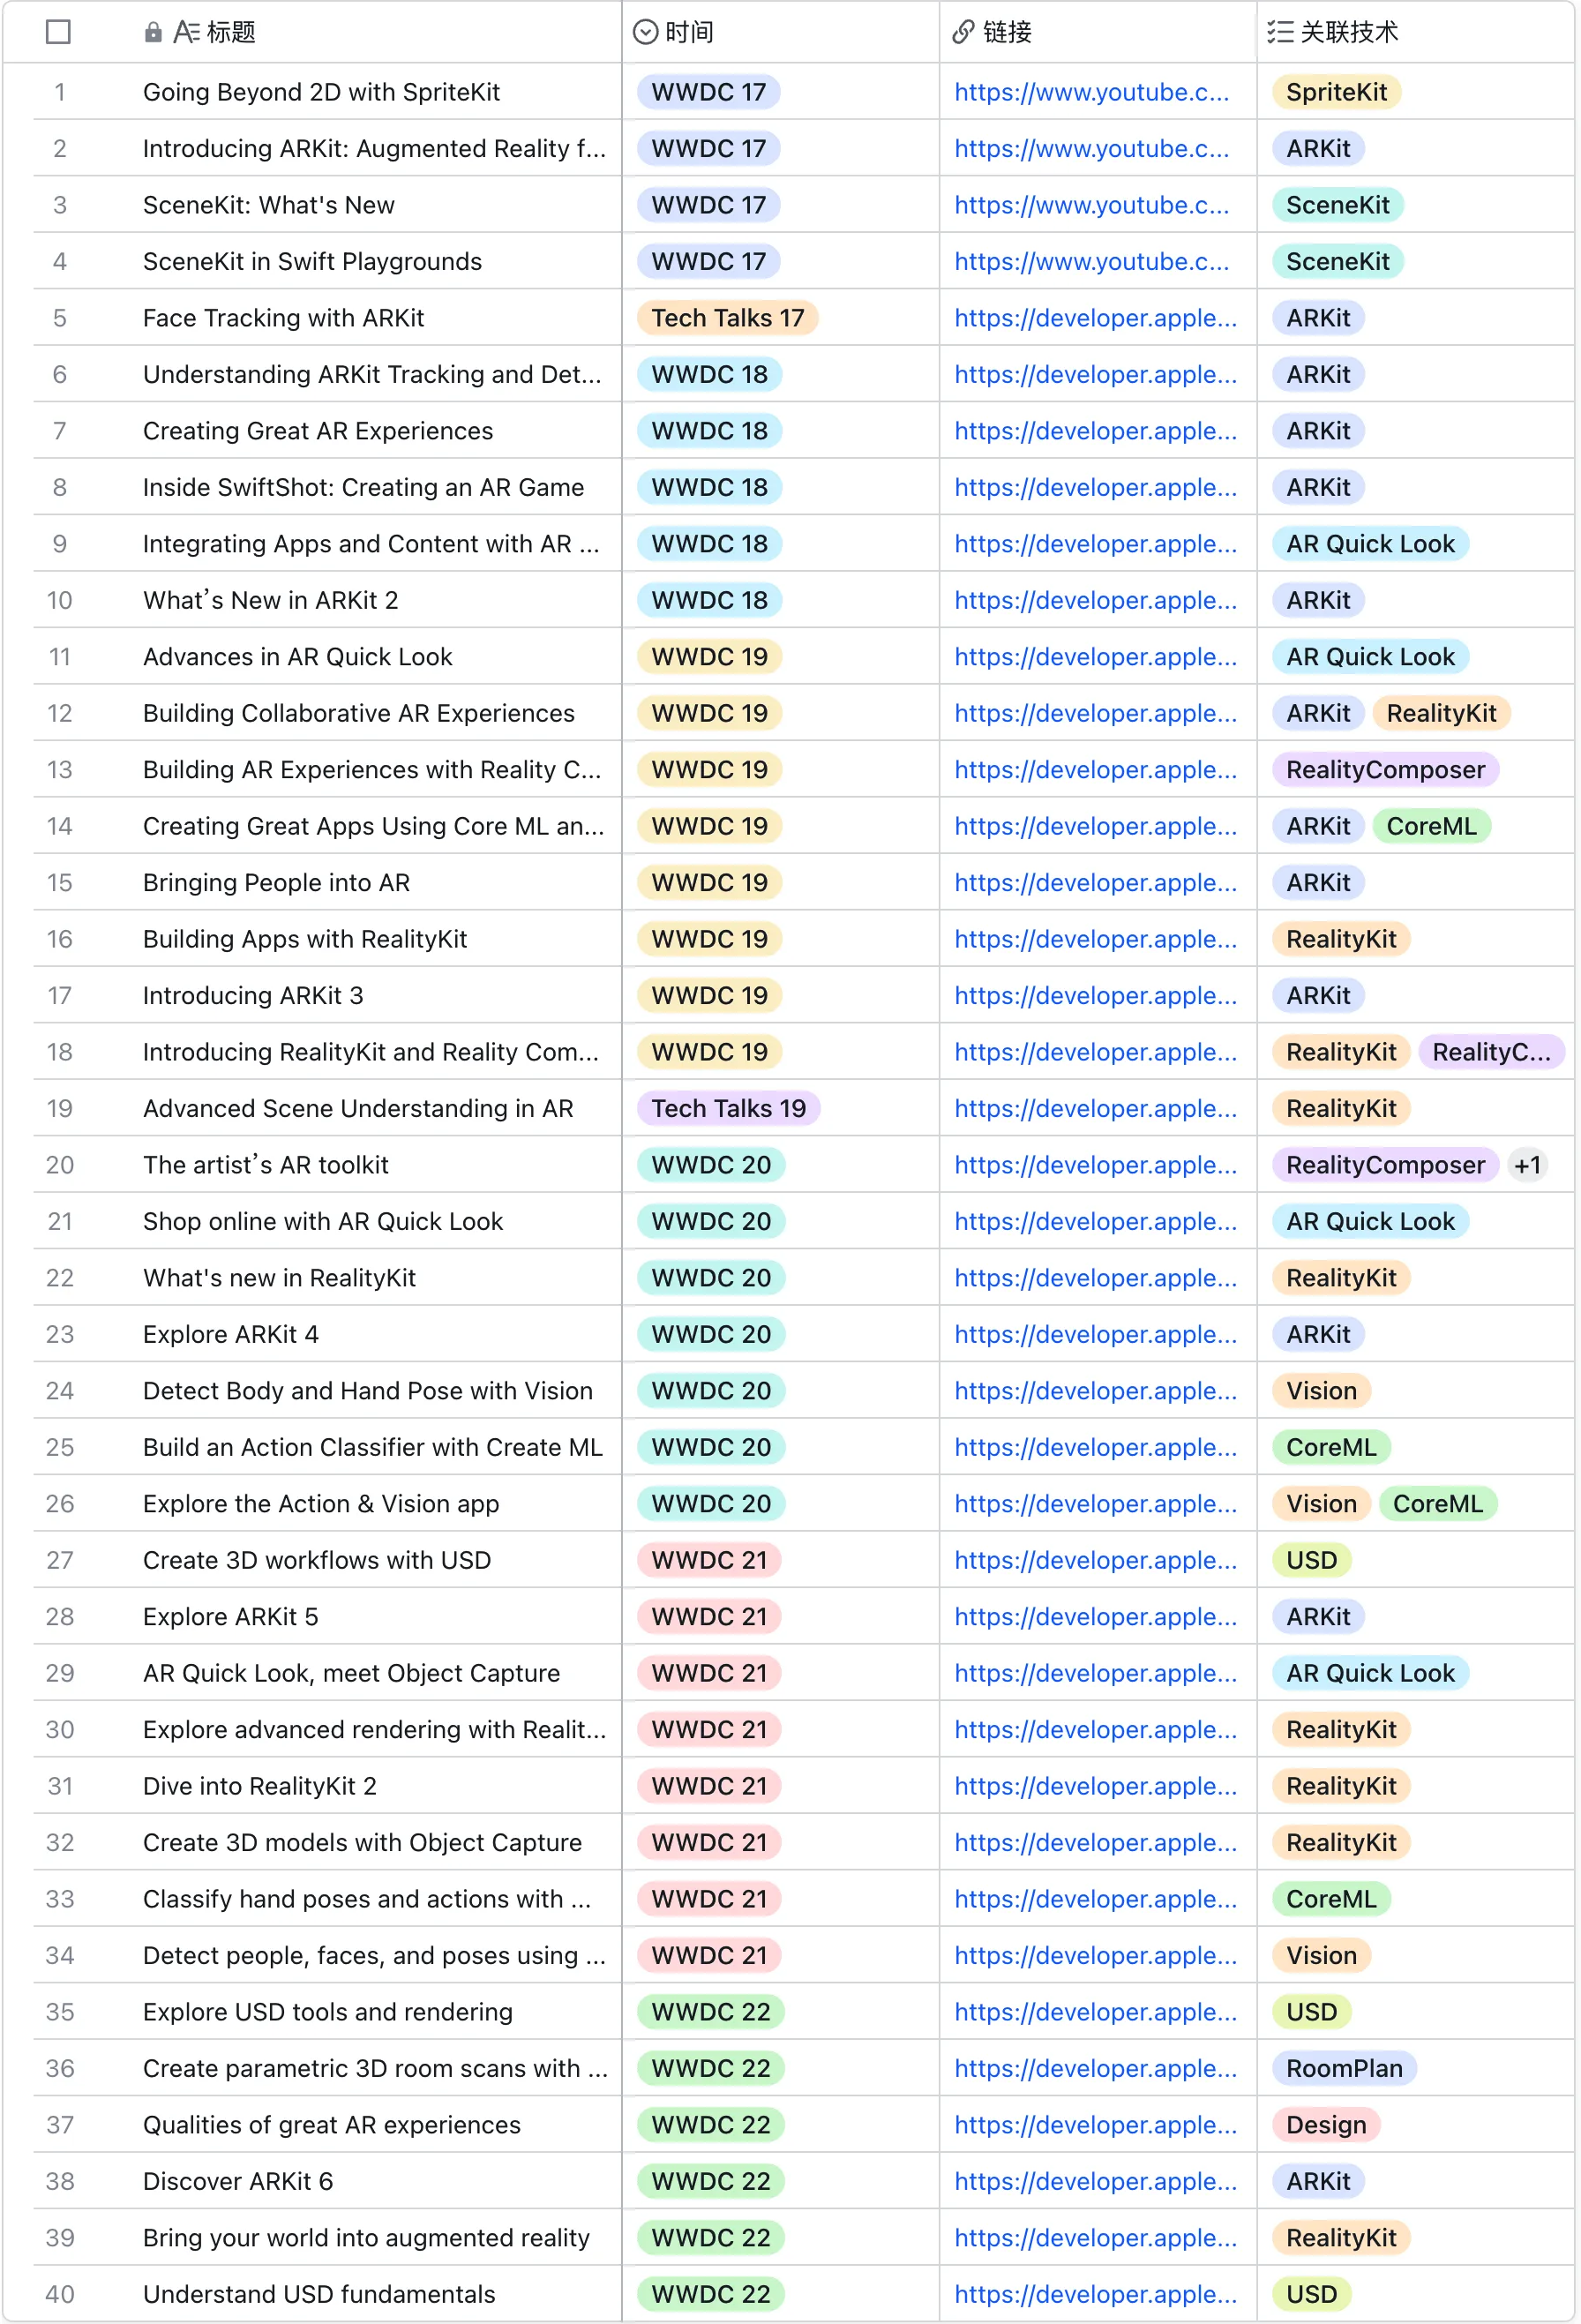
I’m sure you’ve seen a lot of terms like WorldTracking and FaceTracking in the previous timeline. In the world of AR, the list goes on and on. Just by looking through all of Apple’s official Sample Code, you can see the variety of things that these demos show. the technical terms used in these demos are dizzying:

Tips:
In order to facilitate your quick understanding of the capabilities embodied in these Demos, each Demo here is accompanied by a demonstration video or image, and an explanation of the Demo’s highlights, which you can directly click on Feishu Multi-Dimensional Forms link to view it.
If you want to run these demos yourself, the configuration of the certificates will be tedious as they need to be run on a real machine. To make it easier for you, XRealityZone aggregates all the demos in a repository called apple-wwdc-ar-demo, and configures them in a single xcconfig file. Each project can be opened and run directly.
If we didn’t use a proper framework to categorize them, we’d be lost in a sea of new terms.
So before we dive into the world of AR, let’s pause for a moment and think back to the basic frameworks we’re familiar with for developing apps on a small screen.
In the development of a simple iOS app, we can categorize the most basic development work in the following two areas:

- Rendering: the process of converting data into screen pixels, where UITableView has been with us for a good part of our lives
- Interaction: the process of responding to a user’s touch. Clicking, double-clicking, dragging, and a variety of custom gesture recognizers help us know exactly what the user is thinking.
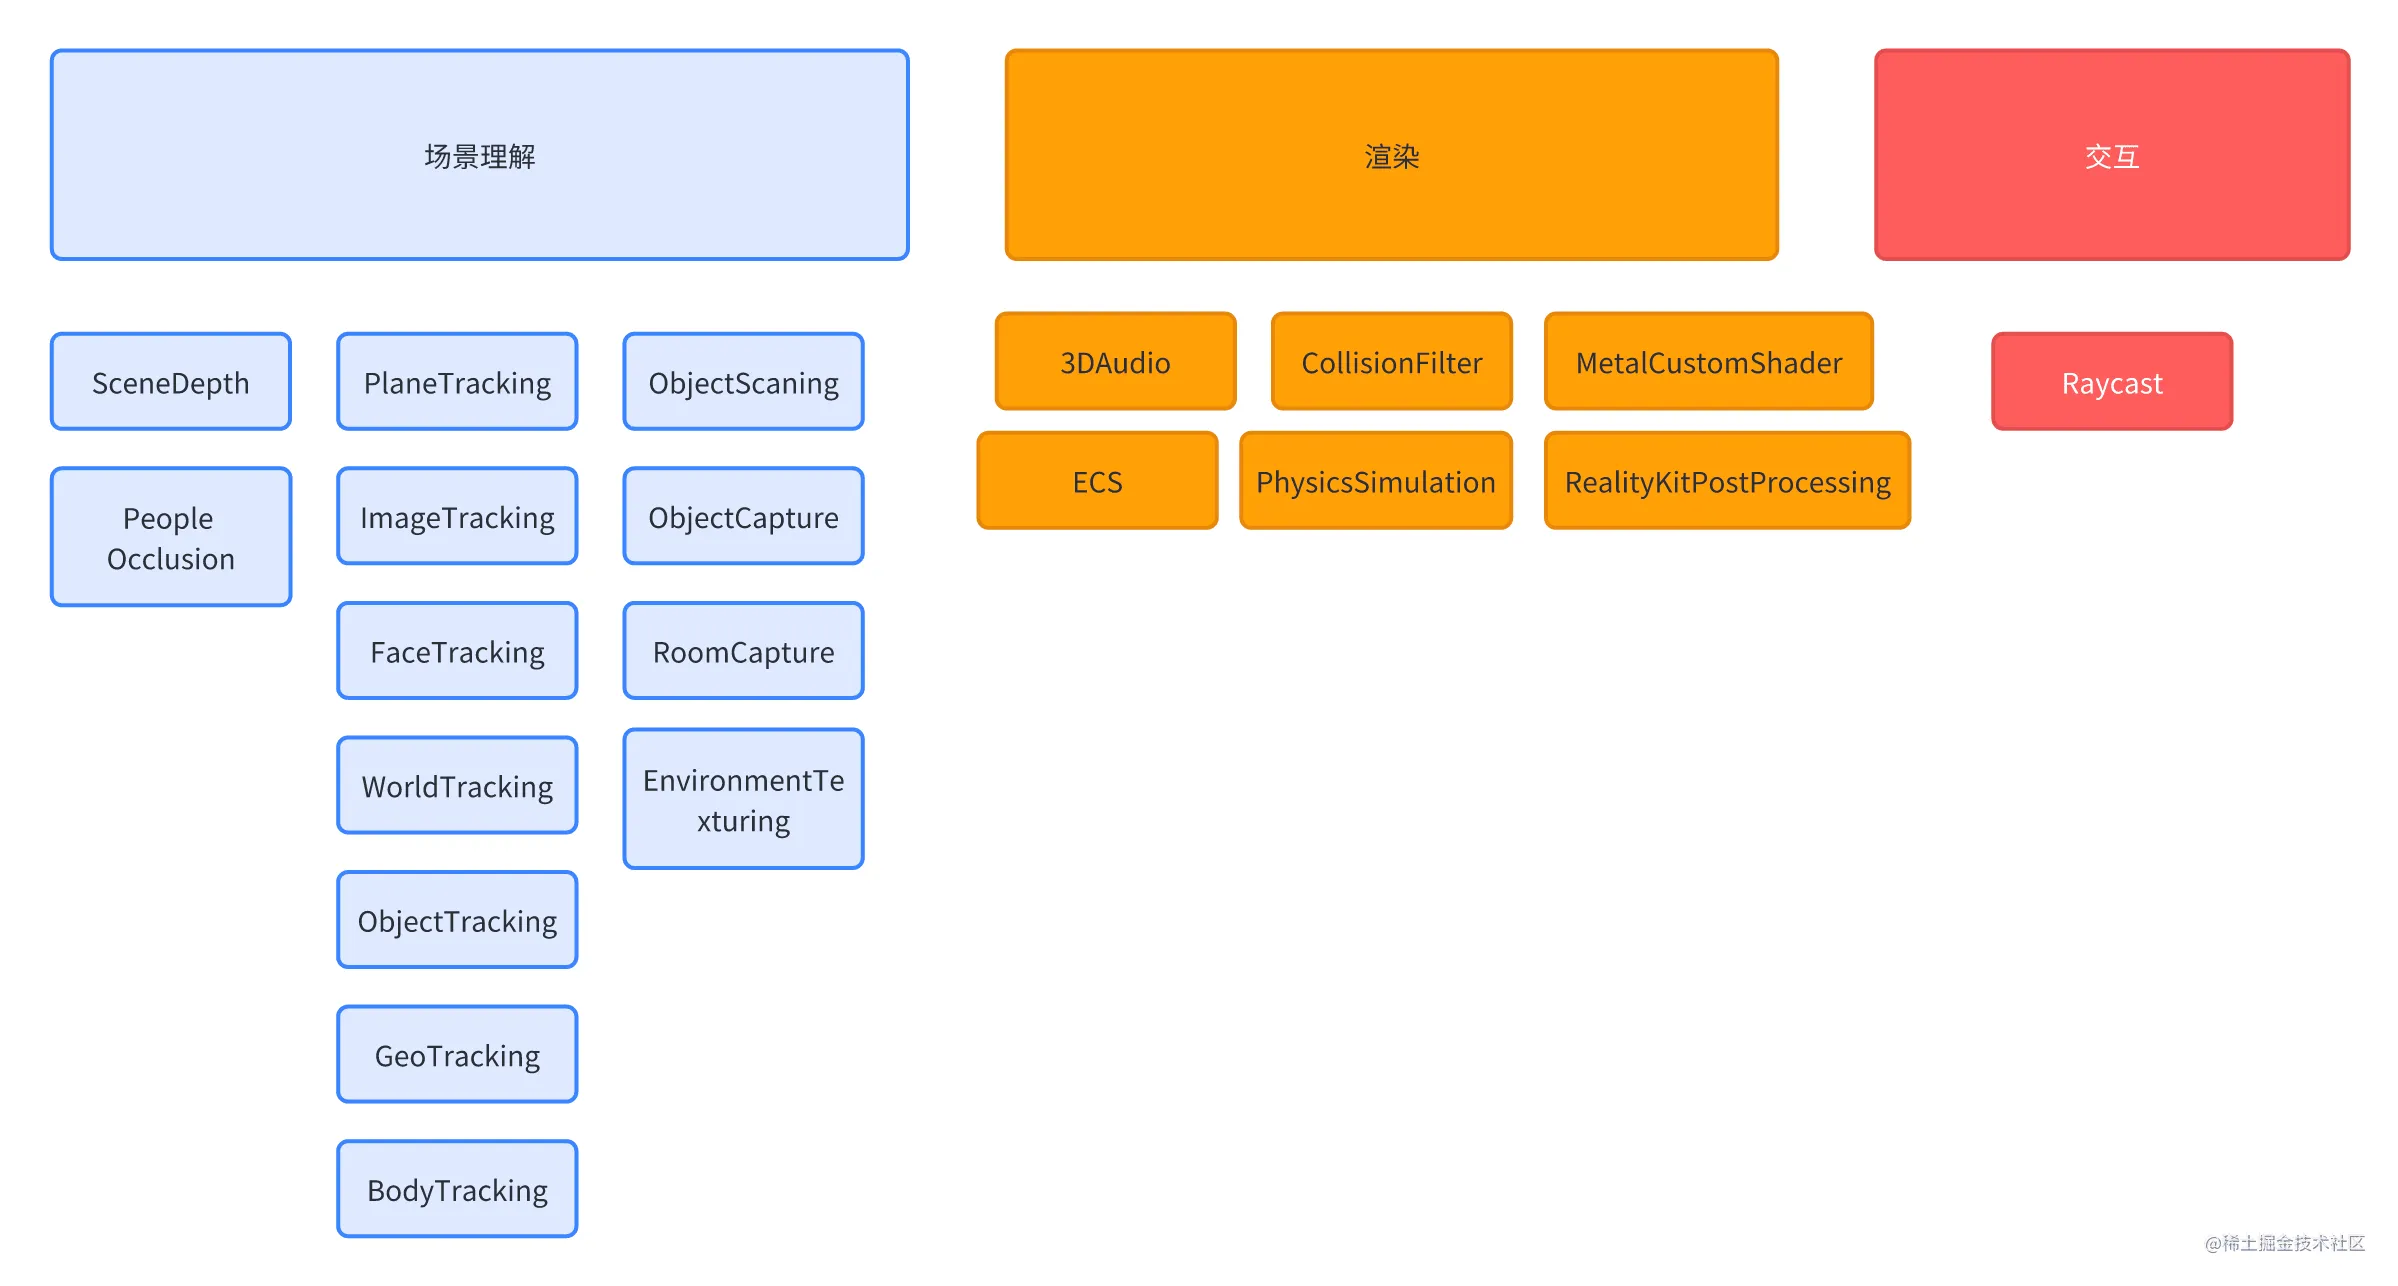
In fact, in an AR App, you can categorize all the capabilities in the same way as above, but with an additional addition: **Scene Understanding. **
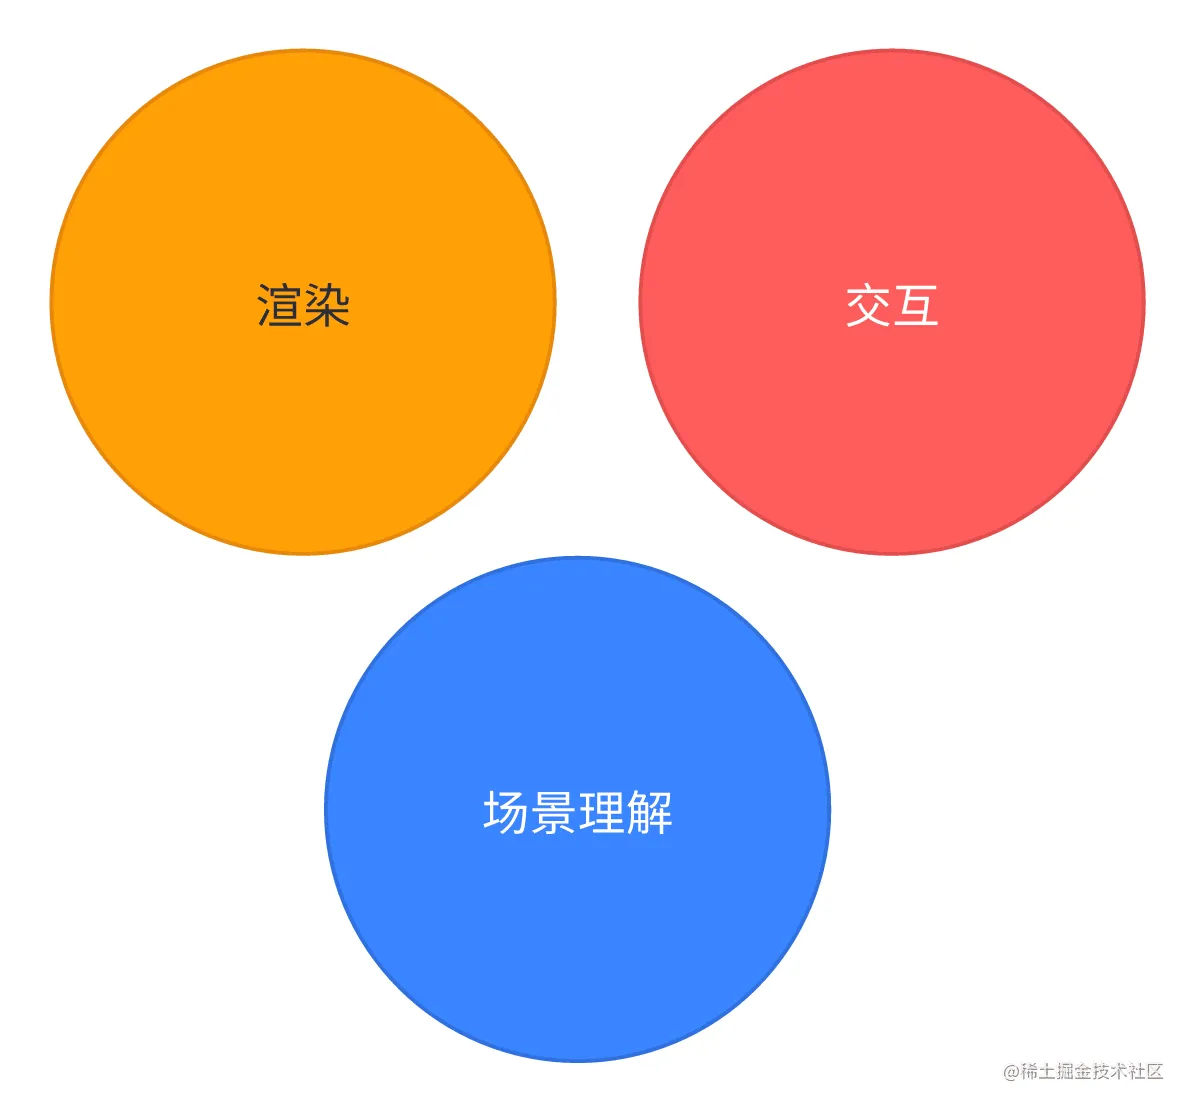
The so-called scene understanding refers to the AR App’s analysis and understanding of real-world information, which in turn affects the App’s content presentation.
In traditional iOS application development, the use of geographic location is also considered a basic manifestation of scene understanding, and some apps such as Meituan and Maps will display different contents according to the user’s current location.
In the AR App, the understanding of reality is not just a simple geographic location, a brief review you will find that all the capabilities of ARKit are centered around scene understanding, we look back at the previous years of WWDC to see a variety of scene understanding capabilities:
- PlaneTracking: recognizing planes
- WorldTracking: recognizing the relative position of a device in the real world
- FaceTracking: recognizing faces and facial expressions captured by the device
- ImageTracking: recognizes images in the real world.
- ObjectTracking: recognizes 3D objects in the real world.
- BodyTracking: recognizes human body postures in the real world.
- GeoTracking: recognizes the location of a device.
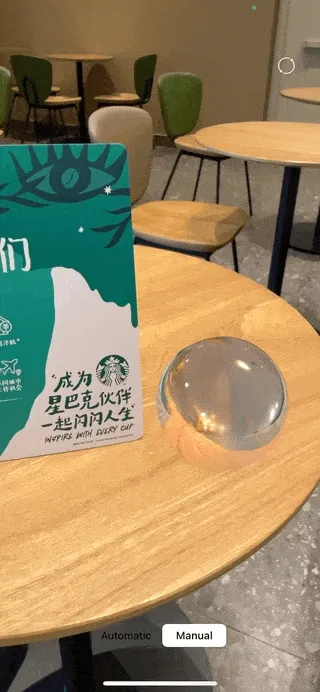
These scene understanding capabilities are the most important ones to help developers create realistic AR Apps. For example, with WorldTracking’s EnvironmentTexturing, ARKit’s ability to model the general look of the real world by analyzing camera footage to give virtual objects more realistic reflections, you can get realistic reflections on the surface of a virtual metal sphere.
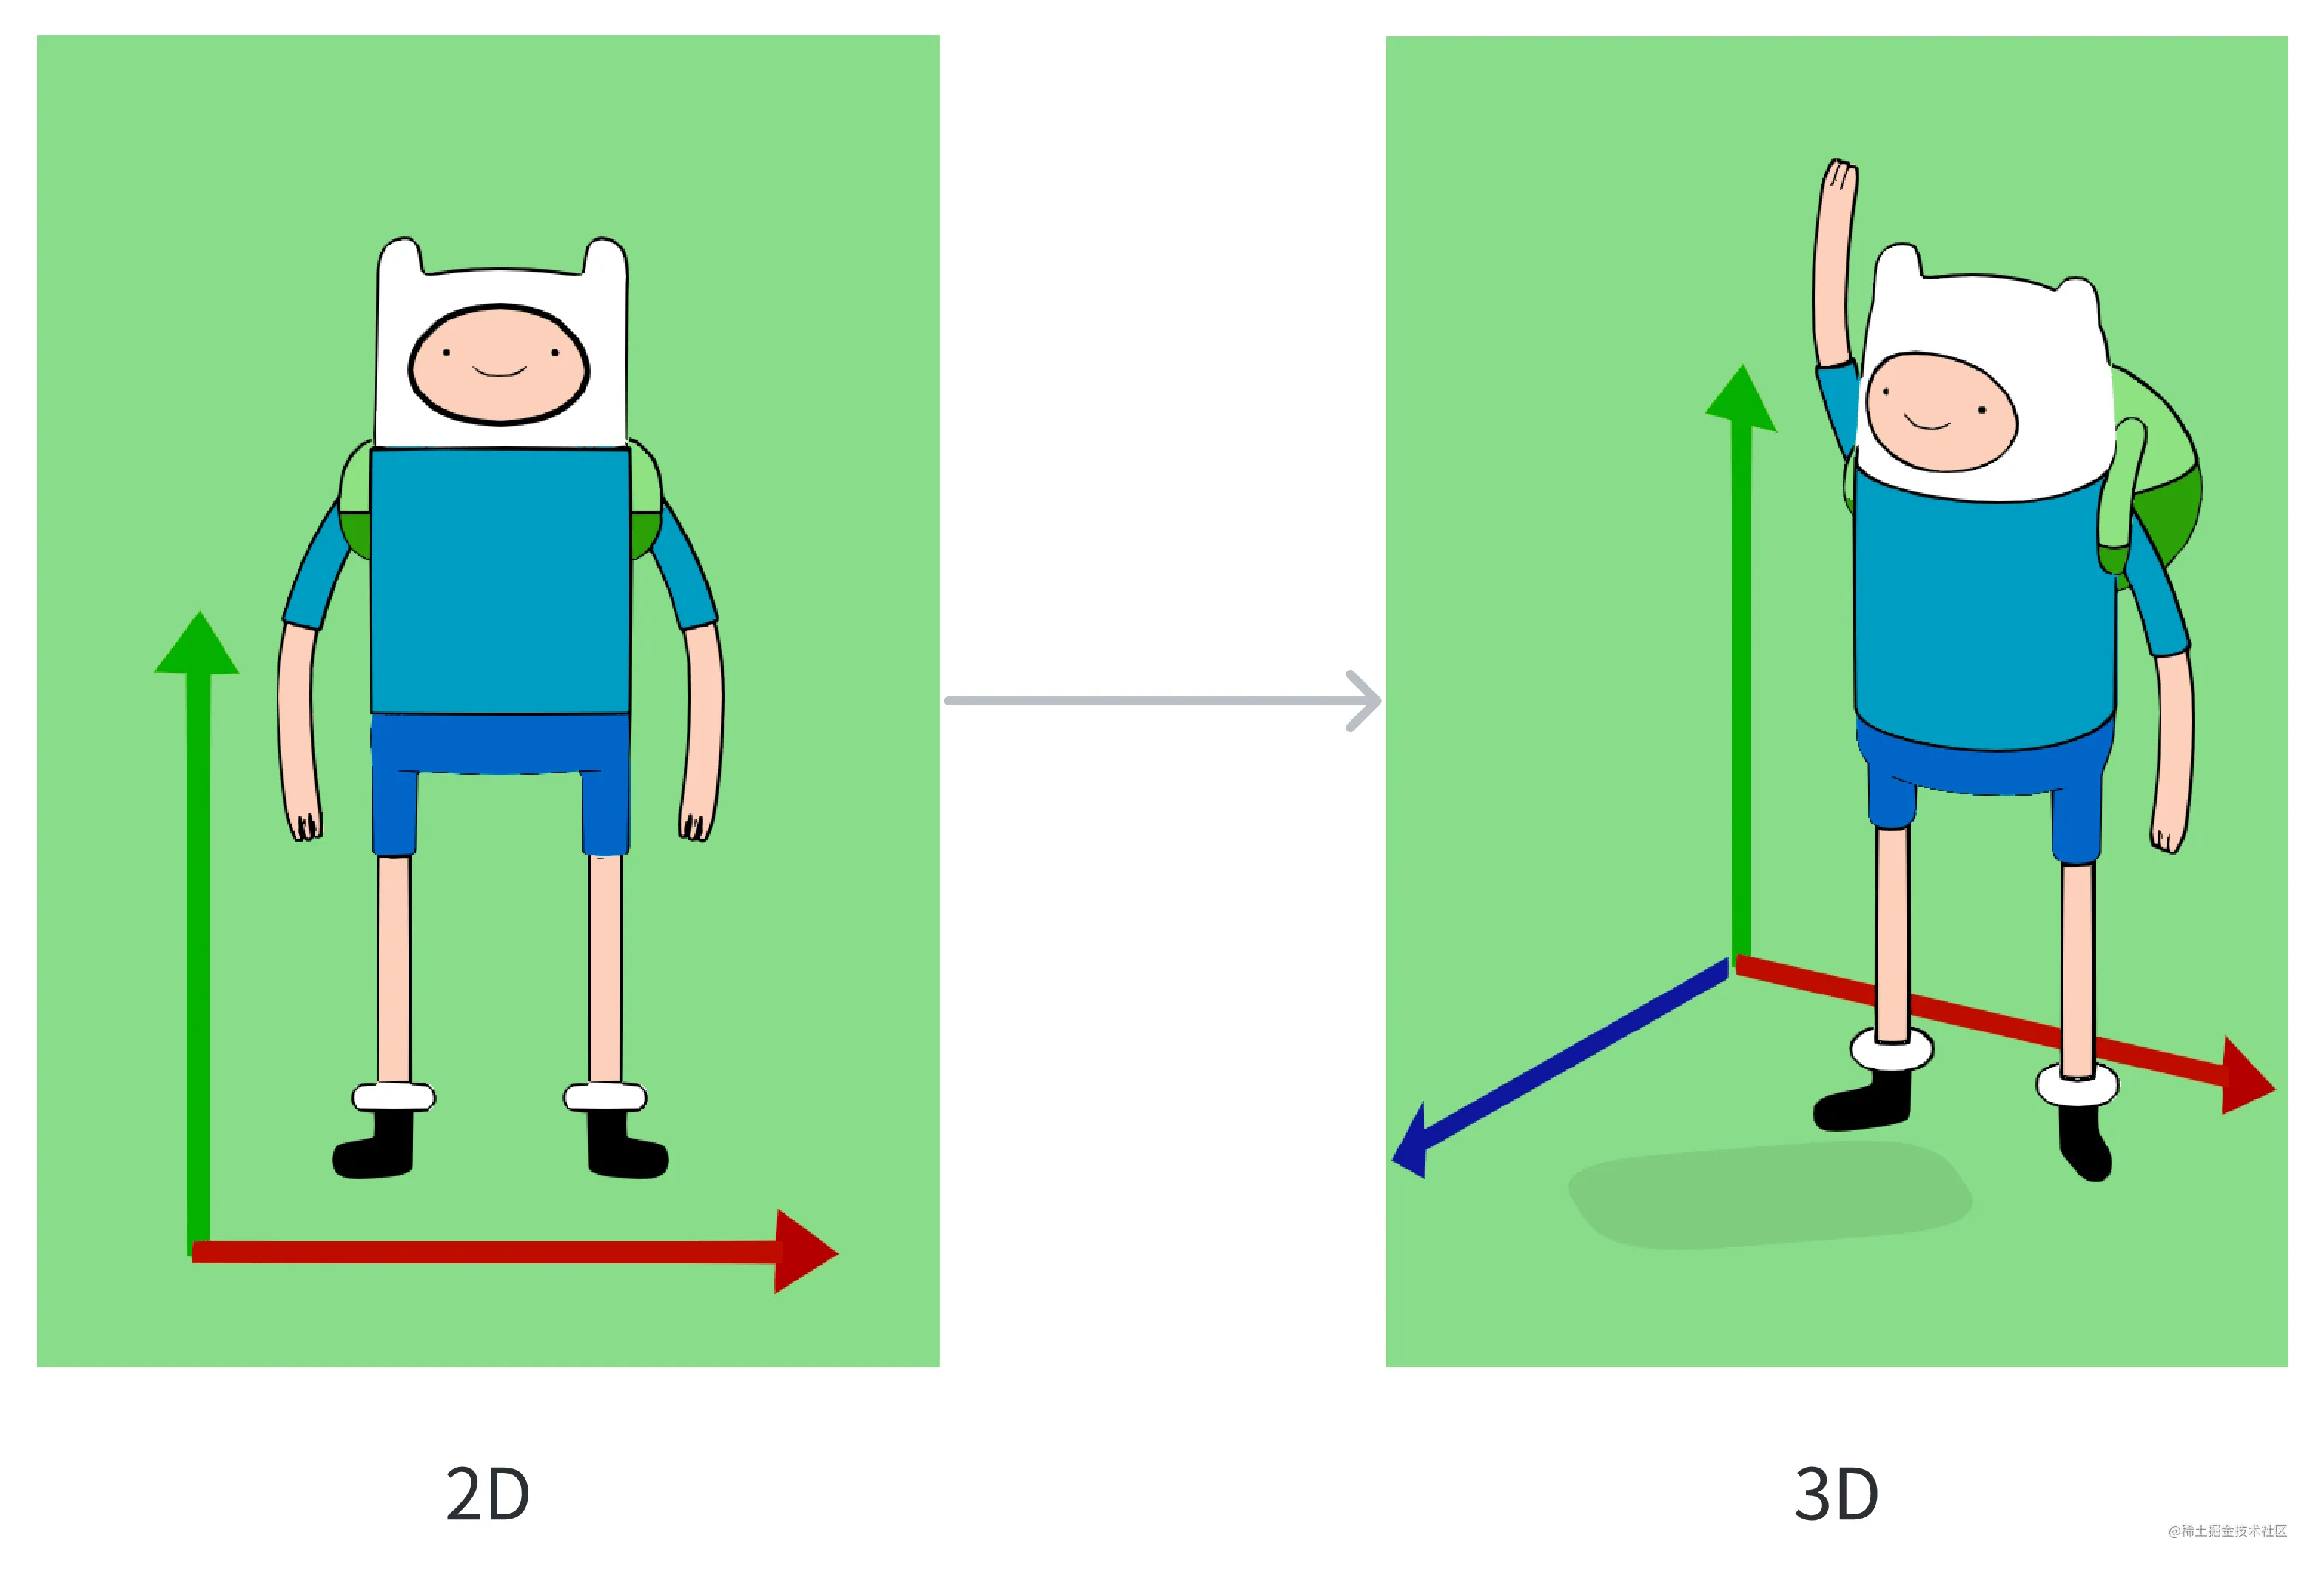
As for rendering and interaction, most AR Apps choose 3D scenes for rendering and interaction due to the need to interact with the real world, which requires developers to shift their vision from 2D to 3D space when developing the App.
After shifting to 3D space, the developer’s knowledge base needs to be expanded with new knowledge from games, as game engines (e.g. Unity, Unreal) have already accumulated a lot of knowledge in this area. Terms such as physics simulation, ECS (a paradigm for organizing game code that can be likened to what we know as MVC), which are only found in game programming, will also enter the developer’s mind.
While it may be rough, this framework is pretty much all we need to understand most of Apple AR’s capabilities and the roles they play. Now, let’s try to categorize all of the Sample Code’s capabilities above according to this framework and see if it feels a little clearer 😉:
Code Up: How to Develop a Simple Placement AR App
After talking about the conceptual stuff, you might still be a little bit in the dark. After all, Talk is Cheap, Show me the Code.
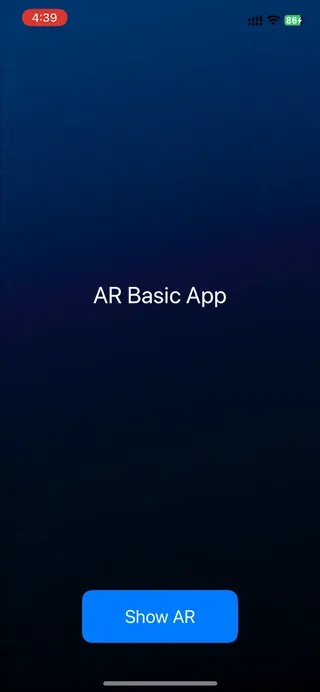
Then, through some simple code examples, you will understand how to develop an AR App. Here we borrow the code example of ARBasicApp written by Yasuhito Nagatomo, a Japanese guy. Here we borrow the code example of ARBasicApp written by Yasuhito Nagatomo. In this App, we will implement a simple placement AR App - when you tap the screen, some cute toys will appear in the real world.
First, you need to create an ARView, which is the first key to open the door to the AR world:
class ARViewController: UIViewController {
    private var arView: ARView!

    override func loadView() {
       // ...
       override func loadView() { // ... arView = ARView(frame: .zero, cameraMode: .
                            cameraMode: .nonAR, automaticConfigureSession
                            automaticallyConfigureSession: false)
       // ...
       // set up delegate
       arView.session.delegate = self
    }
}
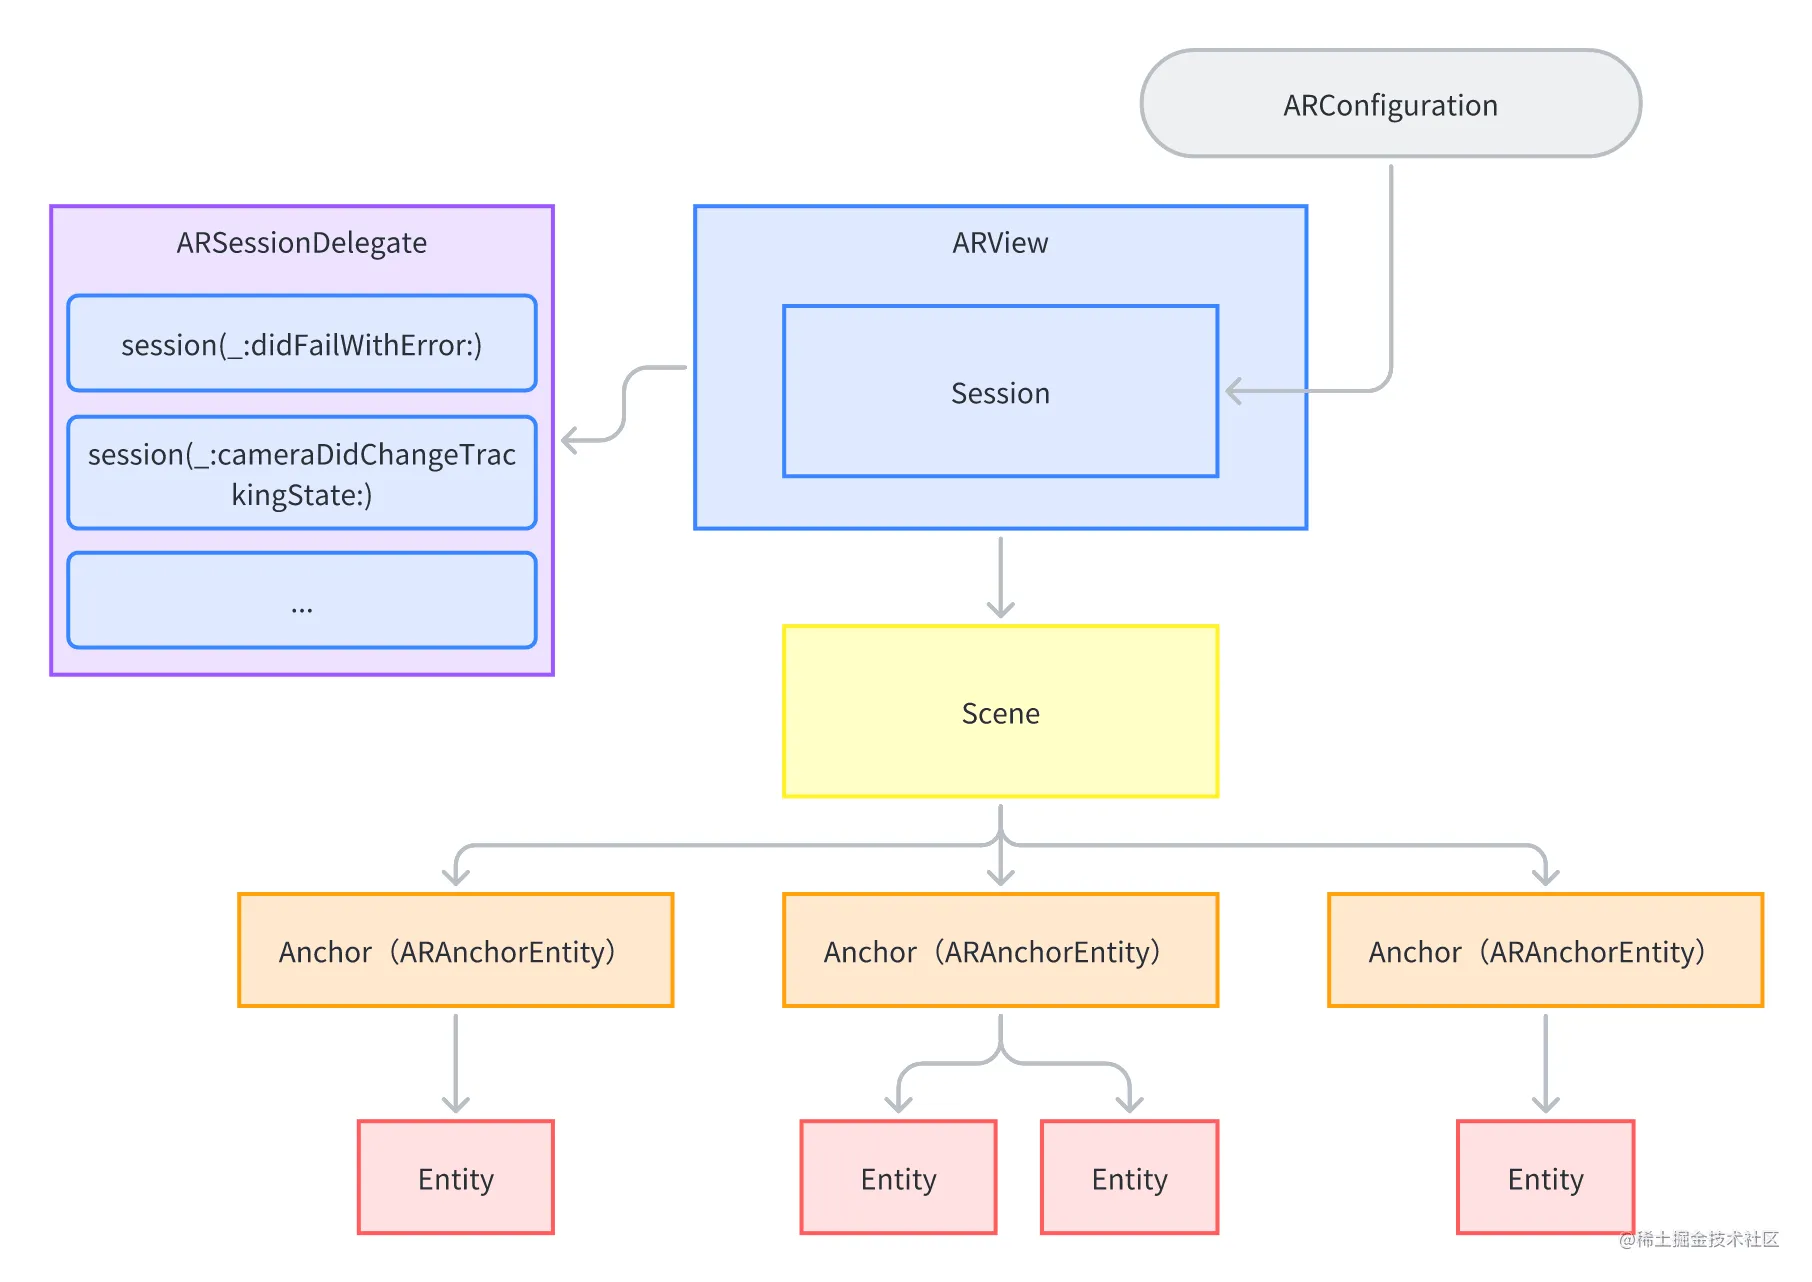
Here, in addition to the ARView, the notion of a session comes into play. In an AR App, scene comprehension is an ongoing process, so here Apple abstracts the whole comprehension process into a Session object, like NSURLSession, and uses a Delegate to get the details of the comprehension process:
// MARK: - ARSession Delegate

extension ARViewController: ARSessionDelegate {
    func sessionShouldAttemptRelocalization(_ session: ARSession) -> Bool {
        // ...
    }

    func sessionWasInterrupted(_ session: ARSession) {
        // ...
    }

    func sessionInterruptionEnded(_ session: ARSession) {
        // ...
    }

    func session(_ session: ARSession, didFailWithError error: Error) {
        // ...
    }

    func session(_ session: ARSession, cameraDidChangeTrackingState camera: ARCamera) {
        // ...
    }
}
Next, since we chose not to auto-configure the session here, we have the opportunity to configure an ARWorldTrackingConfiguration ourselves and use that to enable the various scene recognition capabilities we saw earlier:
extension ARViewController {
    private func startARSession() {
        // ...
        let config = ARWorldTrackingConfiguration()
        // Plane Detection
        config.planeDetection = [.horizontal, .vertical]
        // Environment Texturing
        if AppConfig.enableEnvironmentTexturing {
            config.environmentTexturing = .automatic
        }
        // ...
        // People Occlusion
        if AppConfig.enablePeopleOcclusion {
            if ARWorldTrackingConfiguration.supportsFrameSemantics(.personSegmentationWithDepth) {
                config.frameSemantics.insert(.personSegmentationWithDepth)
            }
        }
        // Run the AR Session with reset-tracking
        arView.session.run(config, options: [.removeExistingAnchors, .resetTracking])
        // ...
}
At this point, we’re ready to run the AR App with scene recognition. Let’s add a little more user interaction to the app, which is still the UITapGestureRecognizer familiar to iOS developers:
class ARViewController: UIViewController {
    // ...
    override func viewDidLoad() {
        super.viewDidLoad()

        let tap = UITapGestureRecognizer(target: self, action: #selector(selector))
                                         action: #selector(tapped(_:)))
        arView.addGestureRecognizer(tap)
    }
}
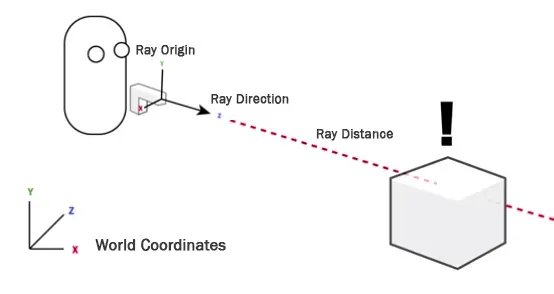
When the user taps on the screen, the UITapGestureRecognizer can only tell us the location of the user’s tap in the two-dimensional space of the screen.
In an AR app, we need to know the 3D location of the user’s tap, and we can use a Raycast to get this information. A Raycast is a ray that fires a ray and returns all the objects touched by this ray (it can be imprecisely interpreted as a 3D version of HitTest):
Once you understand the concept, it’s easier to look at the code:
extension ARViewController {
    @objc private func tapped(_ gesture: UITapGestureRecognizer) {
        if gesture.state == .ended {
            let location = gesture.location(in: arView)
            // create ray cast query
            guard let query = arView.makeRaycastQuery(from: location, allowing: .estimatedPlane, .estimatedPlane) { if gesture.state == .
                                                      allowing: .estimatedPlane, alignment: .any) else {
                                                      alignment: .any) else {
                from: location: allowing: .estimatedPlane, alignment: .any) else {
            }
            let raycastResults = arView.session.raycast(query)
            if let result = raycastResults.first {

                // [Note] result.anchor: ARAnchor? can not be casted to ARPlaneAnchor
                // - if query's allowing is .existingPlaneInfinit, result.anchor will be ARPlaneAnchor
                // - if query's allowing is .estimatedPlane, resutl.anchor will be nil

                let anchorEntity = AnchorEntity(raycastResult: result)
                placeARScene(anchorEntity)
            } else {
                // do nothing (no raycast result)
            }
    }
With raycastResults, we get a real-world 3D coordinate, and the next thing to do is to load the corresponding model.
You may notice another unseen term here - Anchor. In the world of Realitykit and ARKit, an Anchor represents a virtual point or region that is used to correlate images, models, videos, etc. in the virtual world with the real world’s physical location and orientation in the real world.
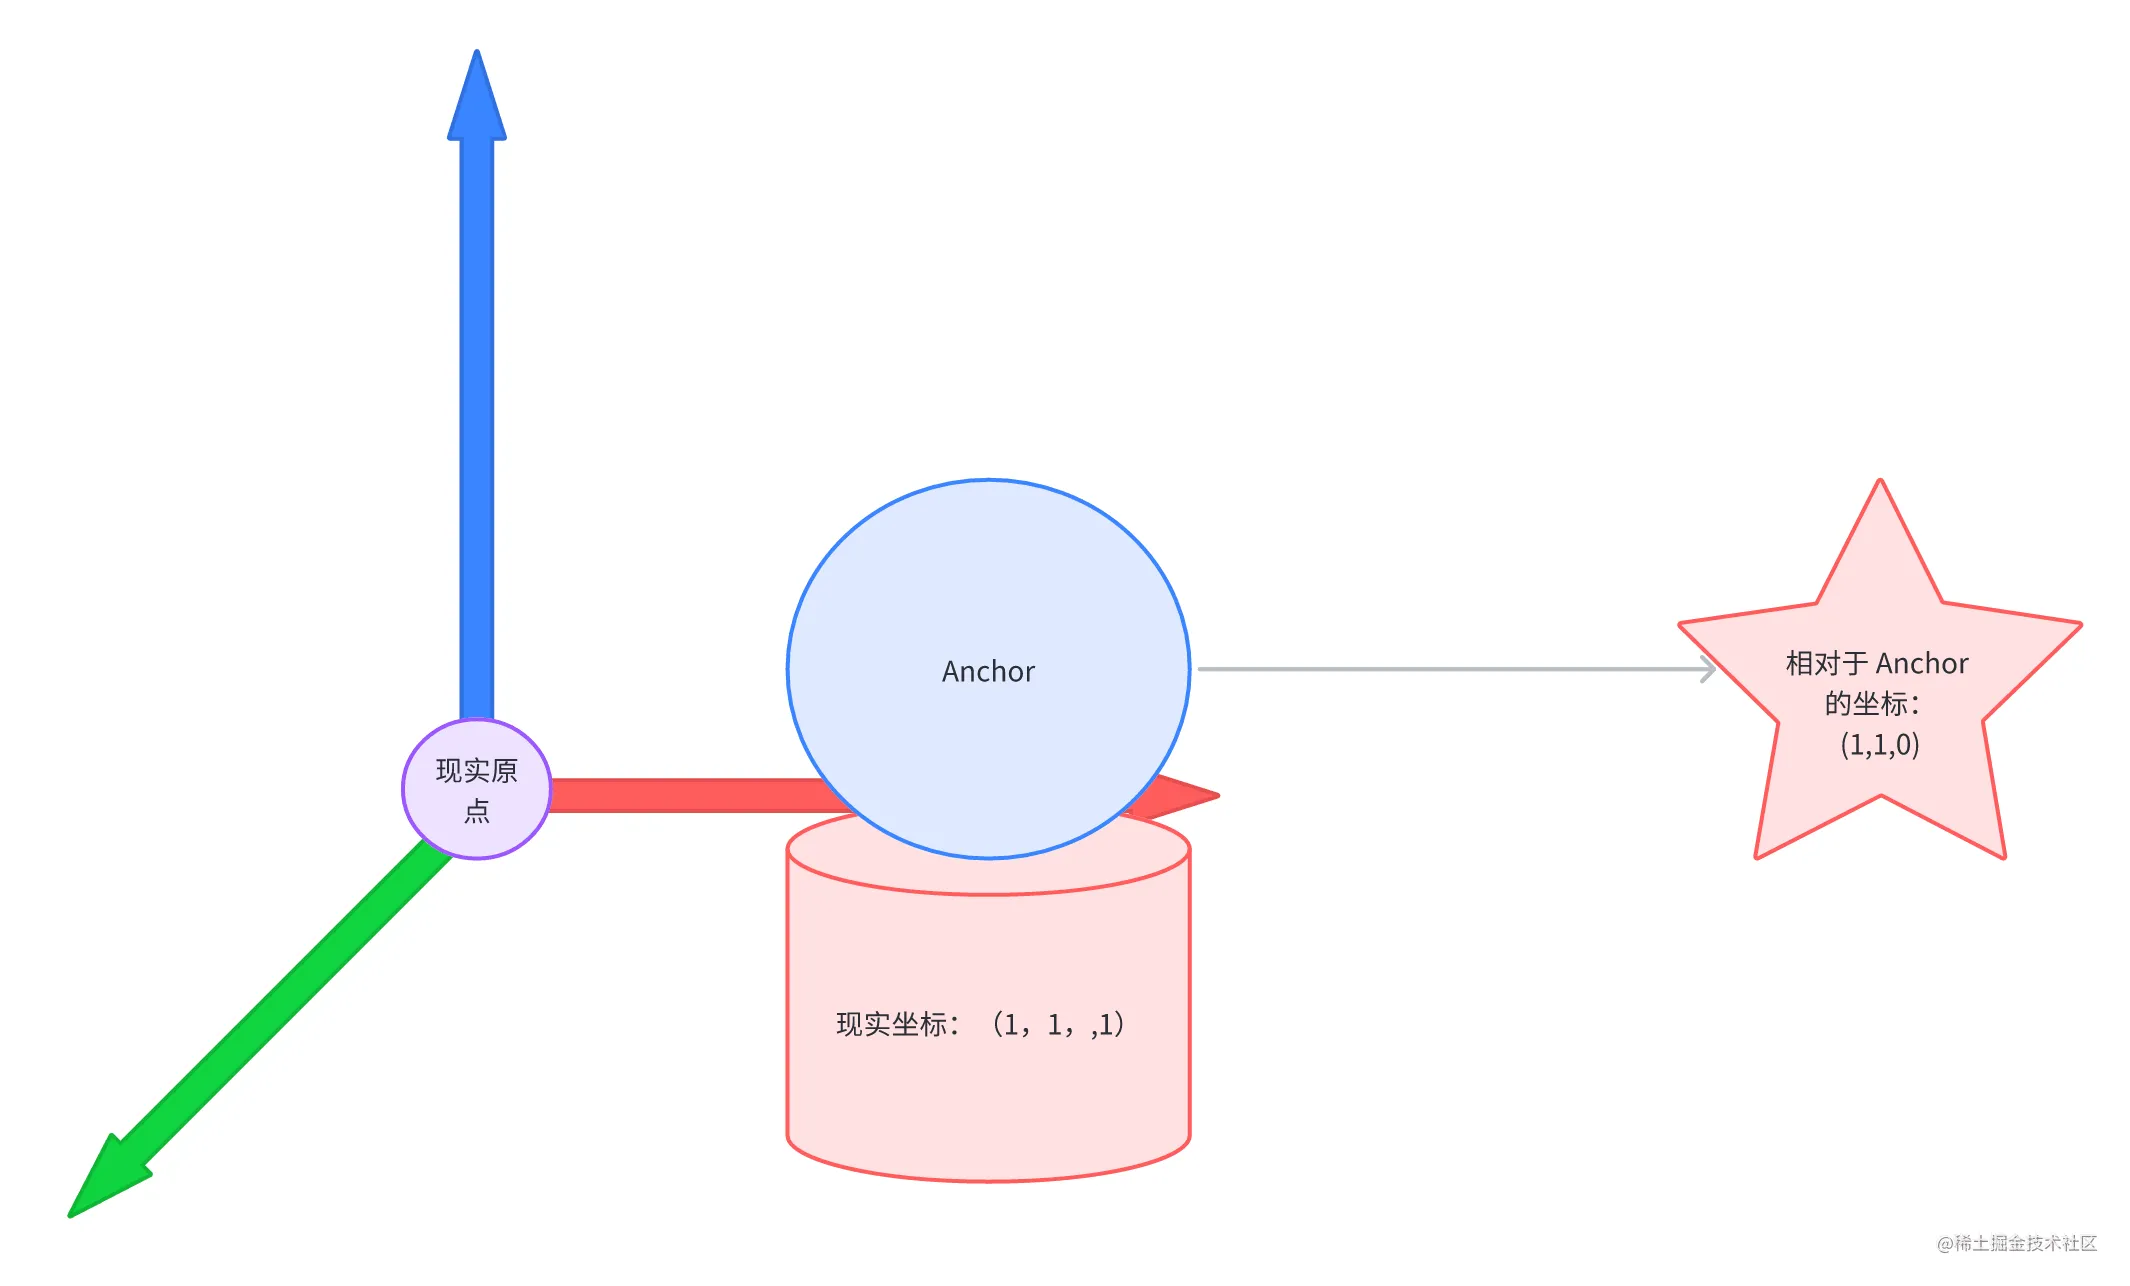
Here, we bind this anchor point to the area that the user clicked on, so that the model is loaded in the right place when it is loaded in the next step.
As we mentioned earlier, there are inevitably a lot of programming concepts from the game engine involved in an AR App, and the Scene in the placeARScene() that we’re about to call here is also a concept from the game engine. You can imprecisely think of a Scene as a level in a game, a Scene is responsible for organizing everything the player sees in a level in a hierarchical way, for example in Unity you would see:
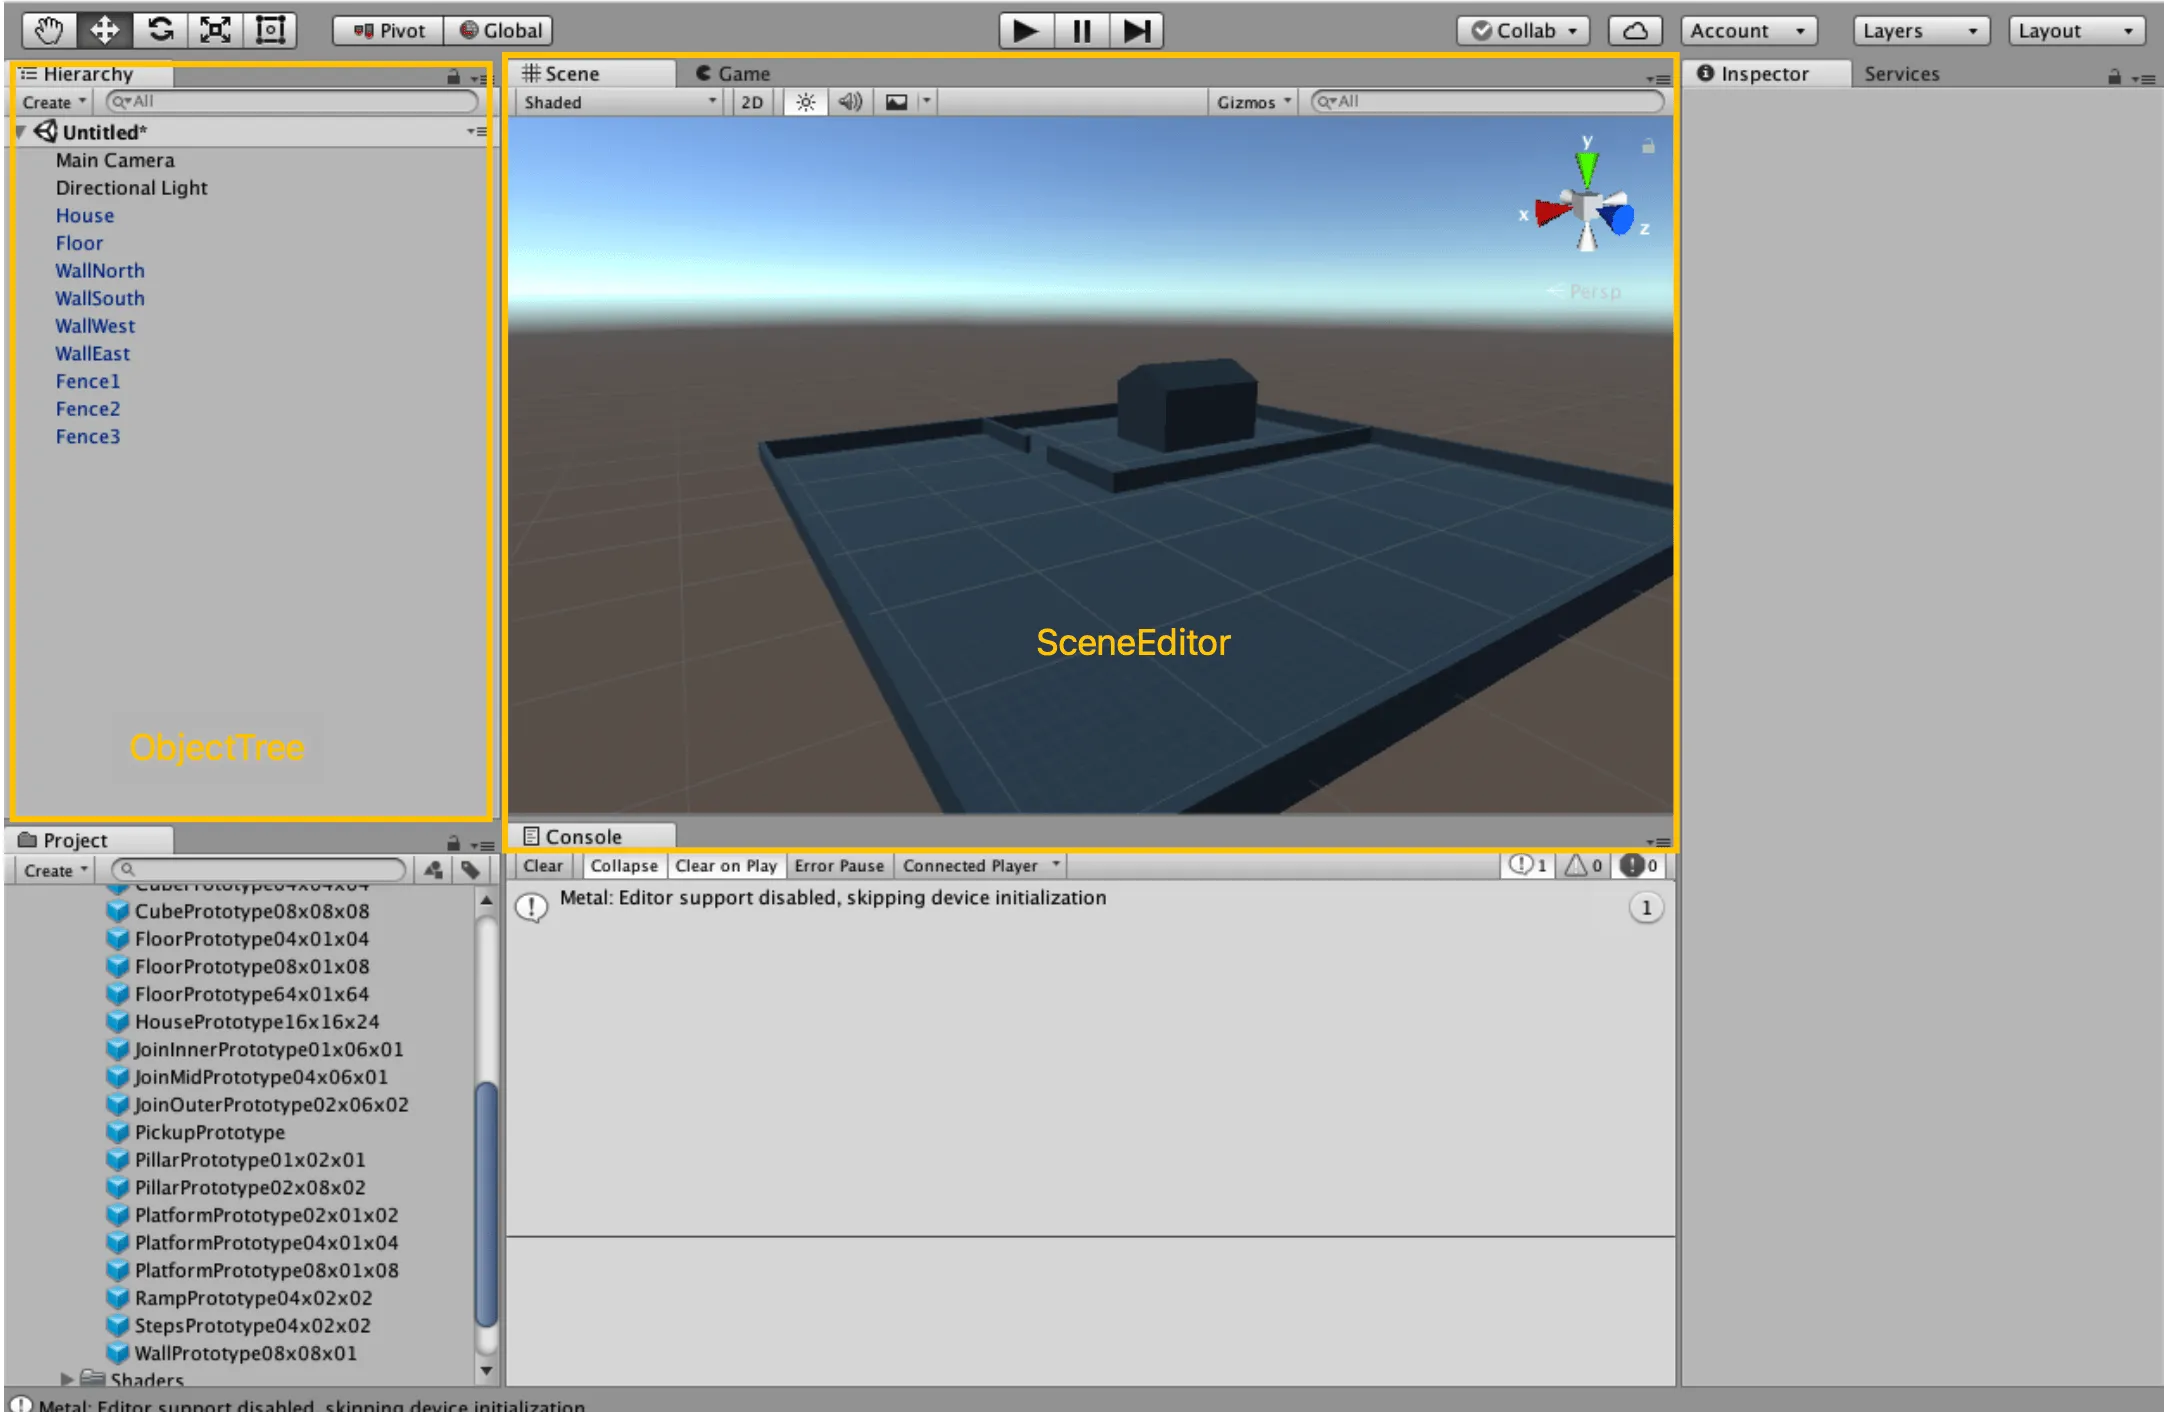
But here we don’t yet have such visualization tools to assist us in our development, so let’s go ahead and build our AR world in code by placing the AnchorEntity we just created under the root node of the Scene:
extension ARViewController {
    private func placeARScene(_ anchorEntity: AnchorEntity) {
        if arScene ! = nil {
            removeARScene()
        }

        arView.scene.addAnchor(anchorEntity)

        arScene = ARScene(anchorEntity: anchorEntity)
        arScene?.setScale(sceneScale)
        arScene?.loadModels()
        startFrameLoop()
    }
}
With scene understanding and interaction complete, let’s now move on to the all-important rendering.
Here, we’ll mount the three 3D models in USDZ format under AnchorEntity via the RealityKit built-in method:
final class ARScene {
    func loadModels() {
        ARSceneSpec.models.forEach { modelSpec in
            // ...
            Entity.loadAsync(named: modelSpec.fileName)
                .sink(receiveCompletion: { _ in
                    // handle error
                }, receiveValue: { [weak self] entity in
                    // ...
                    self?.anchorEntity.addChild(entity)
                    // ...
                })
                .store(in: &loadingSubscriptions)
        }
    }
}
At this point, a simple placement AR App is complete!
After looking past all that code, let’s go over all the concepts we just touched on:
Refinement: other technologies quietly supported behind AR
In addition to ARKit and RealityKit, there are many other technologies in Apple’s vast arsenal that can help us achieve a great AR App experience, and here we’ll focus on a few of these that you’re likely to run into as you dive in:
- USD: A 3D scene file format developed by Pixar.
- CoreML: Apple’s machine learning framework
- Vision: Apple’s visual intelligence framework
- Multipeer Connectivity: Apple’s end-to-end framework for local connectivity and discovery services.
- Metal: Apple’s high-performance underlying graphics framework.
USD

Let’s start with USD (Universal Scene Description). Given the interesting history between Pixar and Apple, it’s not surprising that Apple chose a Pixar-published 3D scene format. USD is also the only third-party 3D model format supported by RealityKit. USD is also the format supported by AR Quicklook, which we mentioned earlier.
In the day-to-day development process, we see these file extensions-usda, usdc, and usdz. usda is a plain text file (you can open it in a text editor), usdc is a binary format, and usdz is a zip-like compressed package. In this file there can be some textures (png, jpg, etc.), and you can use unzip -l to see what’s inside, e.g. this file wateringcan/wateringcan.usdz):
$ unzip -l teapot.usdz

Archive: teapot.usdz
Length Date Time Name
--------- ---------- ----- ----
4262569 01-24-2023 18:24 teapot.usdc
2210854 01-24-2023 18:24 0/teapot_bc.png
489015 01-24-2023 18:24 0/teapot_ao.png
1246353 01-24-2023 18:24 0/teapot_r.png
793984 01-24-2023 18:24 0/teapot_n.png
17302 01-24-2023 18:24 0/teapot_m.png
--------- -------
9020077 6 files
If you want to see more examples of USD files, you can take a trip to Apple’s Quick Look Gallery.
Tips:
You may notice that in the Quick Look Gallery, the examples in Examples with animations are downloaded in .reality format. This format is Apple’s proprietary file format for 3D scenes in Reality Composer (in the beginning of Reality Composer, 3D scenes could only be exported as .reality), so you can think of it as Apple’s proprietary format for 3D scenes. It can be thought of as Apple’s proprietary format for 3D scenes. However, the downside of proprietary formats is that they’re not versatile enough - you can’t open a .reality file in almost any modeling tool other than Reality Composer - and in order to make them more versatile, in 2020 Apple made AR-related extensions to the USD specification. .com/documentation/realitykit/usdz-schemas-for-ar?changes=_2) to allow Reality Composer to export the .usdz format, and to provide [examples of] (https://developer. apple.com/documentation/arkit/usdz_schemas_for_ar/schema_definitions_for_third-party_dccs).
A couple of sentences may not be enough to fully explain the history of the twists and turns here, but don’t worry, we’ll dedicate an installment to this topic later in this Tech Explainer, so be sure to check back!
CoreML && Vision
Machine Learning and Visual Intelligence are the cornerstones of ARKit’s scene understanding, and CoreML and Vision have been Apple’s mainstay for AR scene understanding since iOS 11. Many of ARKit’s scene understanding capabilities can be found in CoreML and Vision, which are more low-level interfaces.
For example, for the BodyTracking we mentioned earlier, you can also use VNDetectHumanBodyPoseRequest in Vision. vndetecthumanbodyposerequest#) for this:
// Get the CGImage on which to perform requests. guard let cgImage = cgImage = cgImage.html
guard let cgImage = UIImage(named: "bodypose")? .cgImage else { return }

// Create a new image-request handler. let requestHandler = VNS.NET.
let requestHandler = VNImageRequestHandler(cgImage: cgImage)

// Create a new request to recognize a human body pose. let request = VNDetectHandler(cgImage: cgImage).
let request = VNDetectHumanBodyPoseRequest(completionHandler: bodyPoseHandler)

do {
    // Perform the body pose-detection request. try requestHandler.perform().
    try requestHandler.perform([request])
} catch {
    print("Unable to perform the request: \(error).")
}
Of course, learning about CoreML and Vision is certainly not about using the features that ARKit already encapsulates. There are many features in CoreML and Vision that are ideal for AR scenarios that have not yet been encapsulated in ARKit, and understanding them will help us realize those features that ARKit has not yet encapsulated, the most typical example of which is gesture recognition.
In the current version of ARKit, it is not possible to recognize and differentiate between gestures of people in the frame in a very fine-grained way. With Vision’s VNDetectHumanHandPoseRequest and CoreML’s model training tool, CreateML, we can recognize and differentiate the gestures of people in the screen. With the help of VNDetectHumanHandPoseRequest provided by Vision, and the Hand Action Classification provided by CreateML, which is a matching model training tool, we can easily recognize the hand gestures of the characters.
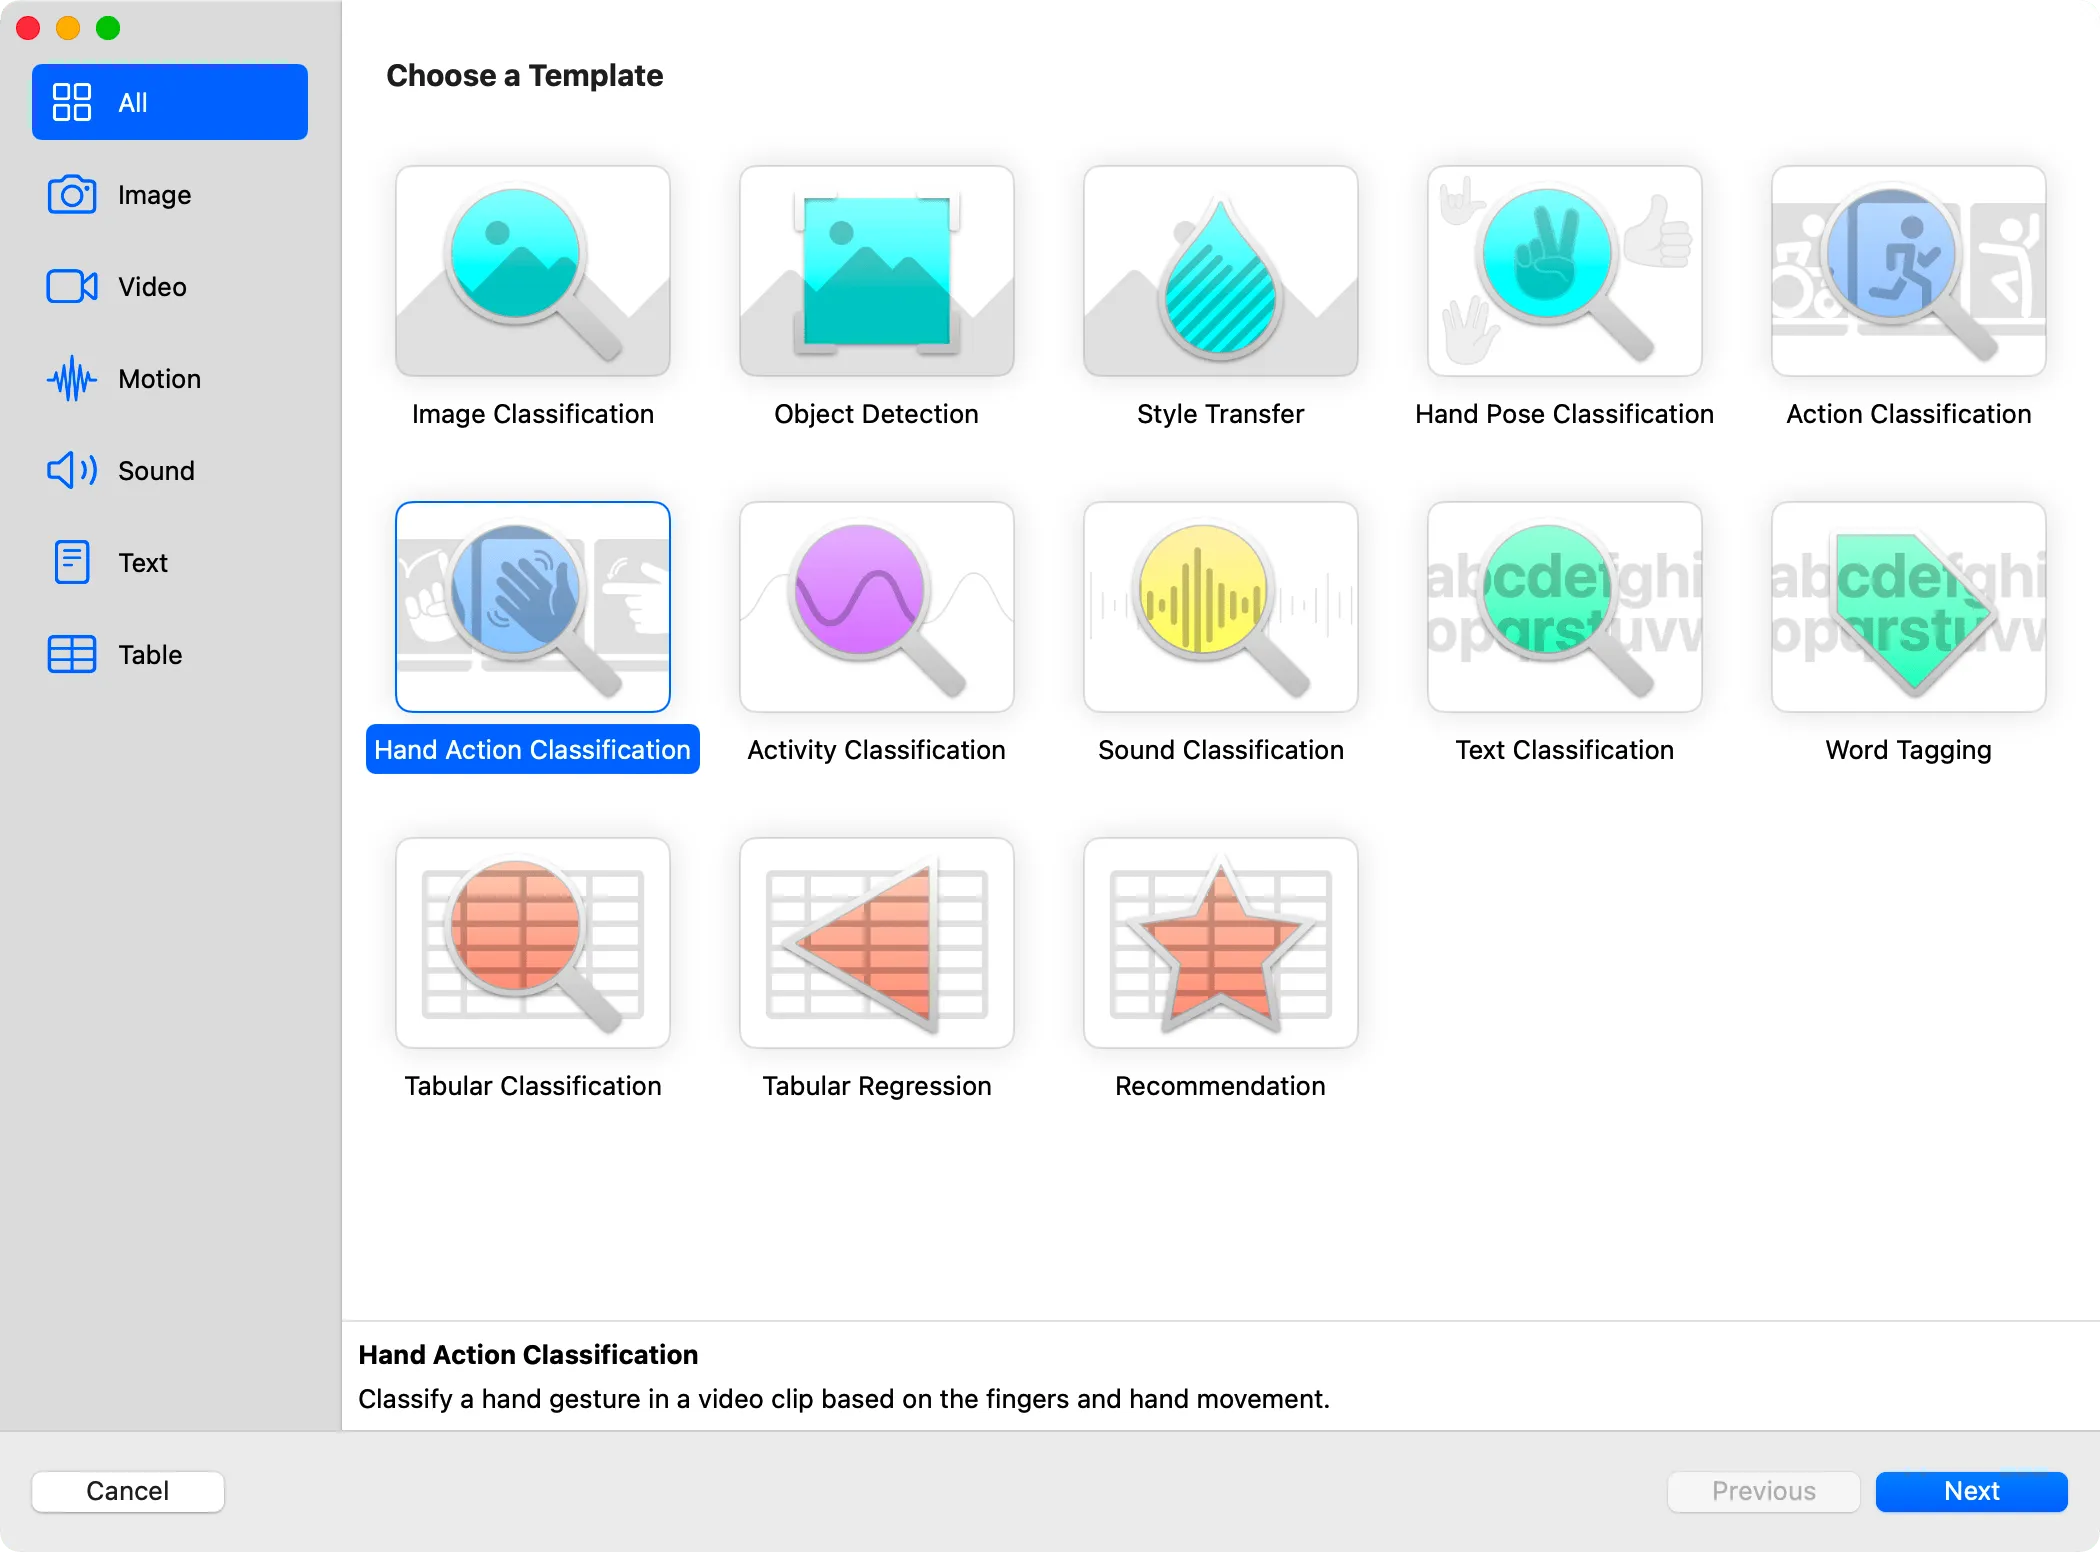
For example, in this example from WWDC 21, with the help of the above two frameworks, we can realize the accurate recognition of character gestures in the following video:
Multipeer Connectivity
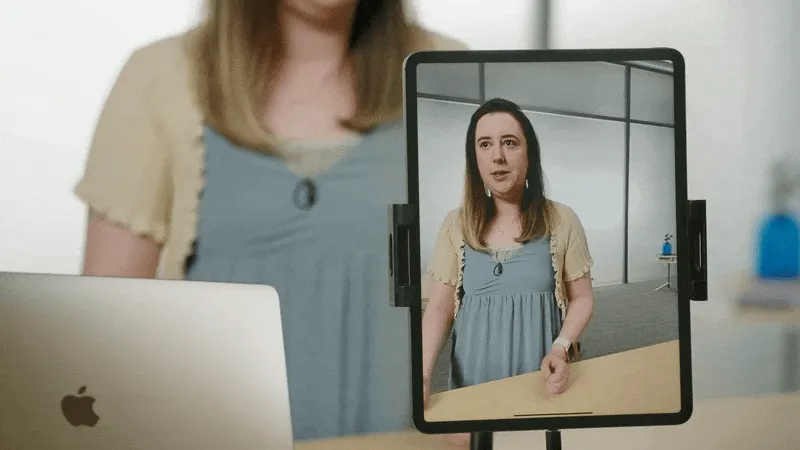
The joy of being alone is not as good as the joy of all, and this is true for mobile apps, and AR apps are no exception. In addition to direct recording and sharing, the joy brought by a beautifully crafted AR app will undoubtedly be doubled if it can provide local multiplayer connectivity.
In order to realize such a function, the Multipeer Connectivity framework, which has been introduced since iOS 7 but has been neglected for a long time, has been revitalized in AR scenarios, and RealityKit provides a very simple package based on this framework. For example, based on MultipeerConnectivityService, we can very simply share scenes with other devices with a few lines of code:
let peerID = MCPeerID(displayName: UIDevice.current.name)
let session = MCSession(peer: peerID, securityIdentity: nil, encryptionPreference: .required)
arView.scene.synchronizationService = try? MultipeerConnectivityService(session: self.session)
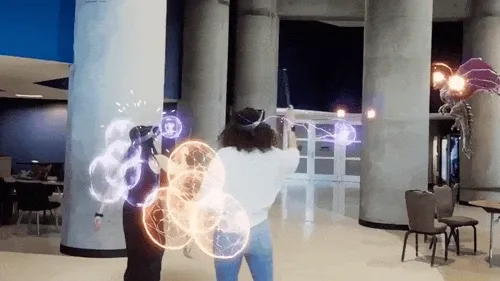
The amazing multiplayer AR game scenes in HoloKit are based on this capability:
Metal
Finally, there’s Metal. Metal is the underlying graphics drawing framework behind the lifelike virtual 3D objects you see in the Apple AR world.
As an underlying graphics framework released in 2014, Metal has successfully become the choice for underlying graphics on the iOS platform (replacing OpenGL ES, which has been deprecated on the Apple platform), as well as SceneKit and RealityKit, which we introduced earlier, and CoreImage, which iOS developers are familiar with, and even game engines like Unity. SceneKit and RealityKit, as well as CoreImage for iOS developers, and even game engines like Unity, are all based on Metal to manipulate the GPU.

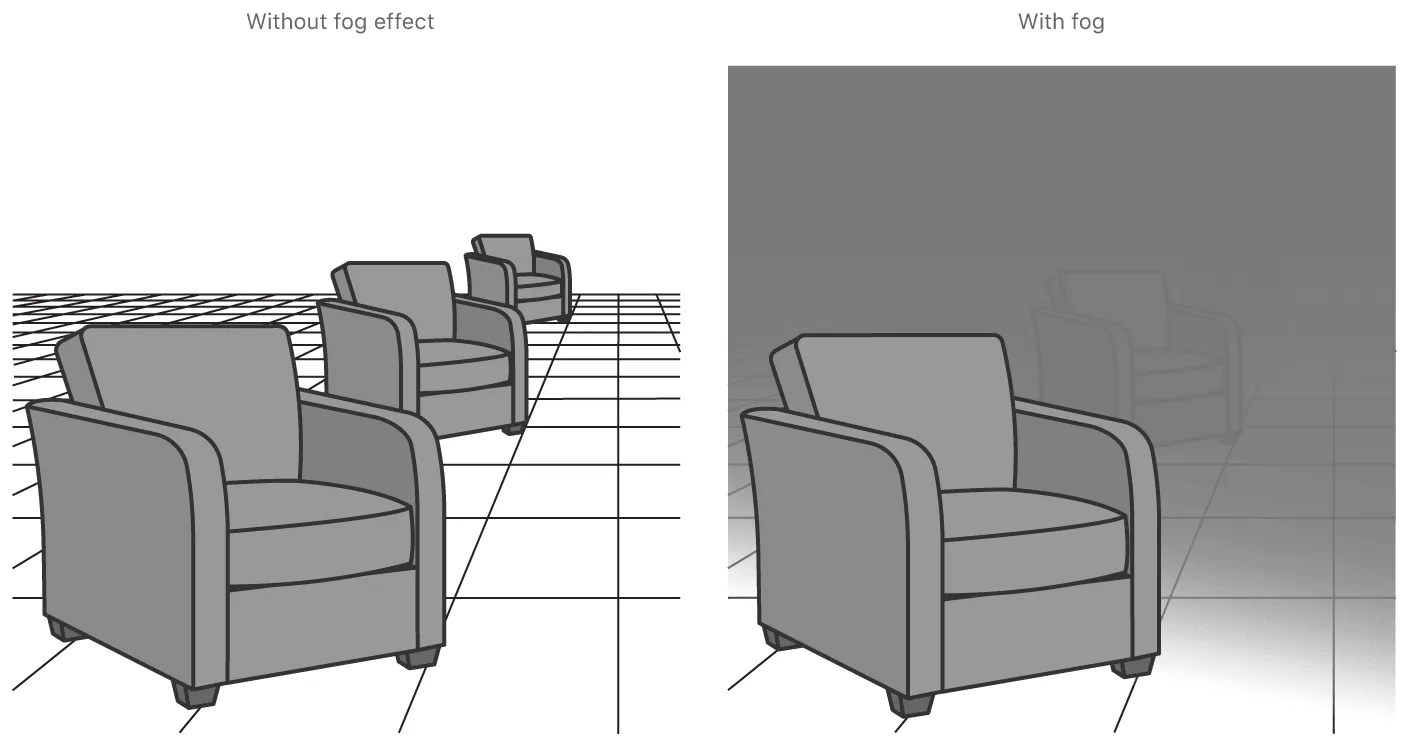
So when your AR App needs to achieve some more efficient or customized rendering, you can use Metal to do it. For example, in Apple’s Sample Code - Creating a Fog Effect Using Scene Depth creating_a_fog_effect_using_scene_depth), for example, implements a very efficient fog effect based on Metal:
In practice, in addition to using Metal directly, you can also choose to use MetalKit (provides a lot of convenient tools and functions), [MPS](https://developer. apple.com/documentation/metalperformanceshaders) (Metal Performance Shader, which provides a range of high-performance computation and rendering shaders) and [MetalFX](https://developer.apple. com/documentation/metalfx) (which upscale low-resolution frames to high-resolution frames for better rendering performance) are three frameworks for rapid development.
In addition to drawing, Metal is also widely used in machine learning thanks to the powerful parallel computing capabilities of GPUs, and the underlying layers of CoreML && Vision also use MPS to accelerate computation:
MPS is also used in the underlying layers of CoreML && Vision to accelerate computation: 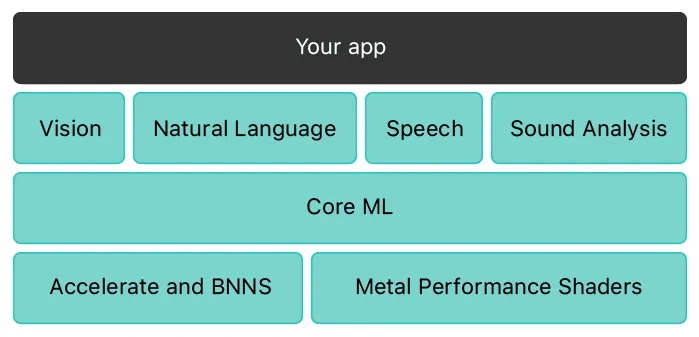
In the Heart of It: Recommended Materials for Learning Apple AR
Well, at this point, I believe we’ve achieved what we set out to do in the first place: become colleagues with Apple AR and work with it further.
In order to help you get started as smoothly as possible, the developers at XRealityZone have prepared some recommended materials to get you started:
- AR Quick Look: Play Quickly First
- Simple glance: Quick Look Gallery
- Discover more fun model files: Sketchfab
- Getting Started in 3D
- [Website B video - 10,000 words: How far has today’s gaming technology advanced?] (https://www.bilibili.com/video/BV1HB4y1W7pC/?vd_source=0c8b6b53f7610c8582489e14f36952d2)
- YouTube: What is mesh
- Actual hands-on: Spline
- RealityComposer
- RealityKit
- Overall concept: WWDC 19: Introducing RealityKit and Reality Composer
- Code example: Building Apps with RealityKit
- Actual project: Creating a Game with Reality Composer composer)
After you have studied the above information, the concepts will be clearer to you, but then you need to try to write some concrete code to practice. Find some demos from Sample Code that you are interested in and try them out. Make some changes to it and get your hands on it.
Recommended Reading
- If you are a developer of Apple Vision Pro, then you must pay attention to these points
- How to Quickly Create an MR Application on PICO 4 Ultra with AI? - Using Cursor to Speed Up Development
- Beginner's guide to AR: Exploring Augmented Reality With Apple AR Tools
- Breaking down the details of Meta Quest 3's upgrades to MR technology
- Advanced Spatial Video Shooting Tips
- Solving Nested Transparent Objects in RealityKit with Rendering Ordering - Part 2
- What Is Spatial Video On iPhone 15 Pro And Vision Pro