How to Use MPS and CIFilter to Achieve Special Visual Effects on visionOS
Introduction
In visionOS development, visual effects have always been a challenging aspect of development. Although Apple introduced ShaderGraph to simplify Shader development, and I open-sourced the RealityShaderExtension framework to help lower the barriers to Shader development, in actual development, we still face two problems:
- The mathematical and geometric knowledge requirements are too high, making it difficult to develop satisfactory effects
- Certain effects like
Gaussian BlurorHistogramare difficult to write purely with ShaderGraph and have poor performance
Apple’s solution to ShaderGraph’s insufficient functionality is to use LowLevelTexture + Compute Shader to more flexibly implement various algorithm functions. However, writing Metal Compute Shader code by hand is still very difficult.
Fortunately, Apple has a highly optimized Compute Shader framework: Metal Performance Shaders, which we can use directly with LowLevelTexture.
At the same time, through research, the CIFilter image processing framework commonly used in UIKit can also be used together with LowLevelTexture, eliminating the need to manually write various algorithm code.
Additionally, not only can images be processed, but videos can also continue to use AVPlayer for playback while adding MPS/CIFilter processing.
Image Processing
When processing images, the basic steps for MPS and CIFilter are the same:
- Processing workflow: MPS/CIFilter -> LowLevelTexture -> TextureResource -> UnlitMaterial
Image(MPS)
When using MPS for processing:
- Simply obtain the target texture
outTexturefrom LowLevelTexture throughcommandBuffer - Pass the source texture and target texture to the MPS filter
Key code is as follows:
func populateMPS(inTexture: MTLTexture, lowLevelTexture: LowLevelTexture, device: MTLDevice) {

    // Set up the Metal command queue and compute command encoder,
    .....

    // Create a MPS filter.
    let blur = MPSImageGaussianBlur(device: device, sigma: model.blurRadius)

    // set input output
    let outTexture = lowLevelTexture.replace(using: commandBuffer)
    blur.encode(commandBuffer: commandBuffer, sourceTexture: inTexture, destinationTexture: outTexture)


    // The usual Metal enqueue process.
    .....
}
Image(CIFilter)
When using CIFilter for processing:
- Need to create a CIRenderDestination based on
outTextureandcommandBuffer - [Optional] For better Metal collaboration, it’s best to create a GPU-Based CIContext
- [Optional] If encountering incorrect color space display, you can set
.workingColorSpaceto sRGB etc. in options - Finally call
ciContext.startTaskto write the processed image into CIRenderDestination
Key code is as follows:
let blur = CIFilter(name: "CIGaussianBlur")

func populateCIFilter(inTexture: MTLTexture, lowLevelTexture: LowLevelTexture, device: MTLDevice) {

    // Set up the Metal command queue and compute command encoder,
    .......

    // Set the CIFilter inputs
    blur?.setValue(CIImage(mtlTexture: inTexture), forKey: kCIInputImageKey)
    blur?.setValue(model.blurRadius, forKey: kCIInputRadiusKey)

    // set input output
    let outTexture = lowLevelTexture.replace(using: commandBuffer)
    let render = CIRenderDestination(mtlTexture: outTexture, commandBuffer: commandBuffer)

    // Create a Context for GPU-Based Rendering
    let ciContext = CIContext(mtlCommandQueue: commandQueue,options: [.cacheIntermediates: false, .workingColorSpace: CGColorSpace(name: CGColorSpace.sRGB)!])

    if let outImage = blur?.outputImage {
        do {
            try ciContext.startTask(toRender: outImage, to: render)
        } catch  {
            print(error)
        }
    }

    // The usual Metal enqueue process.
    ......
}
Video Processing
Video processing is slightly more complex, requiring the creation of AVMutableVideoComposition to obtain video frame information from AVPlayer for processing. The processed video continues to play directly in AVPlayer, or can be separately exported to LowLevelTexture for display.
Note: Video processing doesn’t work properly in the older version (original in Xcode 16.4) Vision Pro simulator. In the new “Apple Vision Pro 4K” simulator, colors display incorrectly after CIFilter processing. However, in actual device testing, everything works normally.
Video(CIFilter)
- Processing workflow: [ CIFilter + AVMutableVideoComposition + AVPlayerItem ] -> VideoMaterial
The good news is that Apple has a simple solution for CIFilter:
- Create a closure when creating AVMutableVideoComposition
- In the closure, obtain video frame data suitable for CIFilter processing through AVAsynchronousCIImageFilteringRequest
- Pass the source video data directly to CIFilter for processing, then write it back to AVAsynchronousCIImageFilteringRequest to play the blurred video
let asset: AVURLAsset....


let playerItem = AVPlayerItem(asset: asset)

let composition = try await AVMutableVideoComposition.videoComposition(with: asset) { request in
    populateCIFilter(request: request)
}
playerItem.videoComposition = composition


// Create a material that uses the VideoMaterial
let player = AVPlayer(playerItem: playerItem)
let videoMaterial = VideoMaterial(avPlayer: player)
The actual processing code is also very simple - just write the CIFilter output back to the request:
let ciFilter = CIFilter(name: "CIGaussianBlur")

func populateCIFilter(request: AVAsynchronousCIImageFilteringRequest) {
    let source = request.sourceImage
    ciFilter?.setValue(source, forKey: kCIInputImageKey)
    ciFilter?.setValue(model.blurRadius, forKey: kCIInputRadiusKey)

    if let output = ciFilter?.outputImage {
        request.finish(with: output, context: ciContext)
    } else {
        request.finish(with: FilterError.failedToProduceOutputImage)
    }
}
Video(MPS)
- Processing workflow: [ MPS + AVMutableVideoComposition + AVPlayerItem ] -> LowLevelTexture -> TextureResource -> UnlitMaterial
Processing video through MPS is more complex:
- We need to create a custom
customVideoCompositorClassand assign it to AVMutableVideoComposition - Implement its protocol methods to specify input and output pixel formats
- In startRequest(), obtain video frames and convert them to MTLTexture for MPS processing
- [Optional] Write the source video back so it can continue playing in AVPlayer
Create a custom SampleCustomCompositor and assign it to composition.customVideoCompositorClass:
let composition = try await AVMutableVideoComposition.videoComposition(withPropertiesOf: asset)
composition.customVideoCompositorClass = SampleCustomCompositor.self

let playerItem = AVPlayerItem(asset: asset)
playerItem.videoComposition = composition
In SampleCustomCompositor, we need to specify the video frame pixel format we need, then we can obtain the corresponding format video frames in startRequest() for blur processing:
class SampleCustomCompositor: NSObject, AVVideoCompositing {
    .....
    // Specify the video frame format we need. Must set kCVPixelBufferMetalCompatibilityKey, otherwise compatibility issues with Metal will occur, causing black screen etc.
    var sourcePixelBufferAttributes: [String: any Sendable]? = [
        String(kCVPixelBufferPixelFormatTypeKey): [kCVPixelFormatType_32BGRA],
        String(kCVPixelBufferMetalCompatibilityKey): true // Critical! Very important
    ]
    // The video frame format we return after processing
    var requiredPixelBufferAttributesForRenderContext: [String: any Sendable] = [
        String(kCVPixelBufferPixelFormatTypeKey):[kCVPixelFormatType_32BGRA],
        String(kCVPixelBufferMetalCompatibilityKey): true
    ]

    ....


    func startRequest(_ request: AVAsynchronousVideoCompositionRequest) {

        .....

        let requiredTrackIDs = request.videoCompositionInstruction.requiredSourceTrackIDs
        let sourceID = requiredTrackIDs[0]
        let sourceBuffer = request.sourceFrame(byTrackID: sourceID.value(of: Int32.self)!)!


        Task {@MainActor in
            // Output the blurred video to LowLevelTexture
            populateMPS(sourceBuffer: sourceBuffer, lowLevelTexture: SampleCustomCompositor.llt!, device: SampleCustomCompositor.mtlDevice!)
        }
        // Keep the original video output
        request.finish(withComposedVideoFrame: sourceBuffer)
    }


    @MainActor func populateMPS(sourceBuffer: CVPixelBuffer, lowLevelTexture: LowLevelTexture, device: MTLDevice) {

        .....

        // Now sourceBuffer should already be in BGRA format, create Metal texture directly
        var mtlTextureCache: CVMetalTextureCache? = nil
        CVMetalTextureCacheCreate(kCFAllocatorDefault, nil, device, nil, &mtlTextureCache)

        let width = CVPixelBufferGetWidth(sourceBuffer)
        let height = CVPixelBufferGetHeight(sourceBuffer)
        var cvTexture: CVMetalTexture?
        let result = CVMetalTextureCacheCreateTextureFromImage(
            kCFAllocatorDefault,
            mtlTextureCache!,
            sourceBuffer,
            nil,
            .bgra8Unorm,
            width,
            height,
            0,
            &cvTexture
        )
        let bgraTexture = CVMetalTextureGetTexture(cvTexture)

        // Create a MPS filter with dynamic blur radius
        let blur = MPSImageGaussianBlur(device: device, sigma: Self.blurRadius)

        // set input output
        let outTexture = lowLevelTexture.replace(using: commandBuffer)
        blur.encode(commandBuffer: commandBuffer, sourceTexture: bgraTexture, destinationTexture: outTexture)

        // The usual Metal enqueue process.
        ....
    }
}
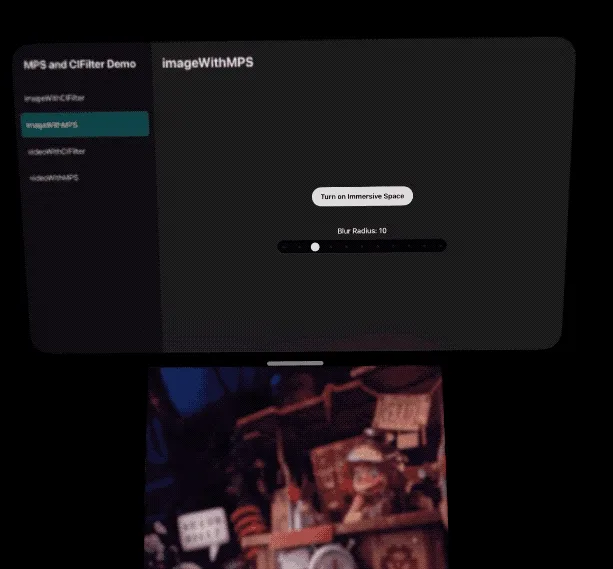
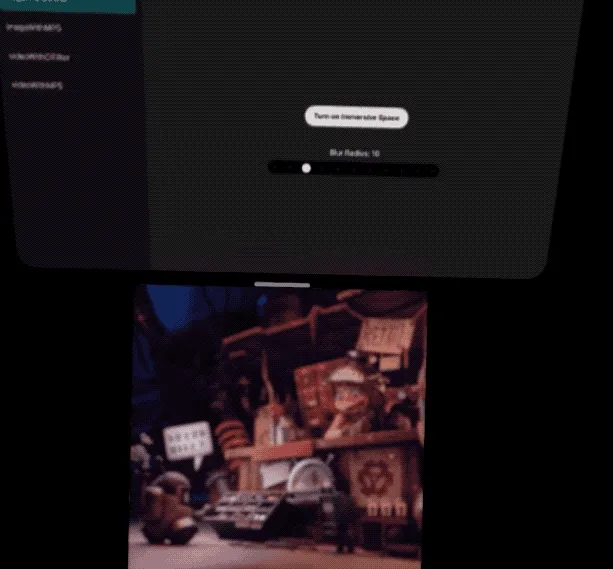
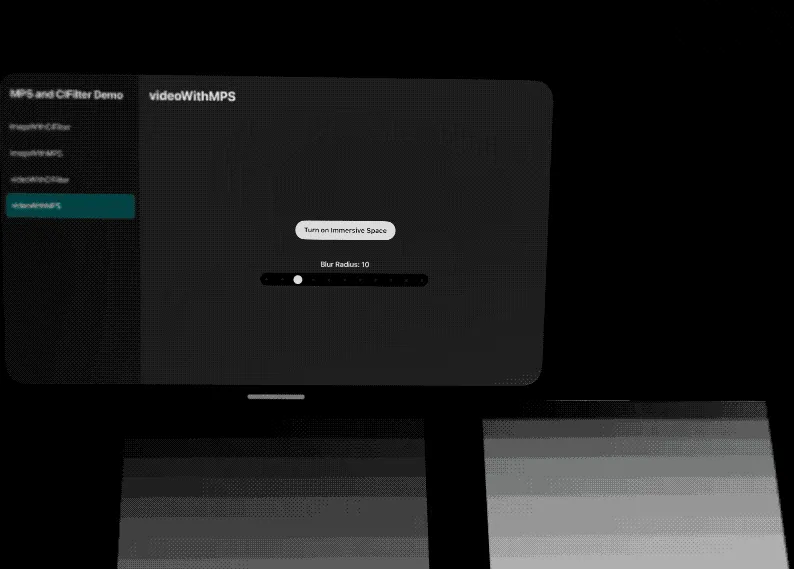
Using customVideoCompositorClass + MPS, you can output the source video in AVPlayer (left image below) while simultaneously outputting the blurred video in LowLevelTexture (right image below):
References
Complete project example: https://github.com/XanderXu/MPSAndCIFilterOnVisionOS
Reference materials:
- ShaderGraph
- RealityShaderExtension
- Metal Performance Shaders
- Core Image Programming Guide
- Creating a dynamic height and normal map with low-level texture
- Editing and Playing HDR Video
- Debugging AVFoundation audio mixes, compositions, and video compositions
Author

Recommended Reading
- A 3D Stroke Effect: Getting Started with Shader Graph Effects on visionOS - Master Shader Graph Basics and Practical Skills
- If you are a developer of Apple Vision Pro, then you must pay attention to these points
- Advanced Spatial Video Shooting Tips
- Open Source Framework RealityShaderExtension: Transfer Shaders from Unity and Unreal to visionOS - Writing Shaders on visionOS Made Easy
- Magical! Using Opaque Objects in RealityKit Looks More Like Glass? - Quickly Implement Glass Effects in visionOS
- What Is Spatial Video On iPhone 15 Pro And Vision Pro
- Far More Than Games: Review the Exciting MR Capabilities in PICO 4 Ultra