Advanced Spatial Video Shooting Tips
XRealityZone is a community of creators focused on the XR space, and our goal is to make XR development easier!
If you are familiar with English, you can find us in the following ways: Official Website(EN), X(twitter), Medium.
The video version of this article, “Don’t Miss These Spatial Video Shooting Tips,” has been released. Everyone is welcome to visit Bilibili and support with a like, comment, and share.

I believe many of you have shot some spatial videos through various devices. Although they can now be watched on some MR devices via decoding, some friends have reported that the effect is not so stunning. So, is spatial video just a gimmick? Or do we need some specific techniques?
The answer is, of course, the latter. Currently, if your spatial video doesn’t look very stunning, it’s likely due to one of the following two reasons:
- The MR devices available for purchase now have a certain gap in screen clarity, audio system, and content presentation algorithms compared to Vision Pro. A good spatial video watching experience relies on the combined effect of vision and hearing.
- Although Apple’s introduction of spatial video on the iPhone might suggest it’s easy to shoot, to achieve a good viewing experience, some know-how is required for spatial video shooting.
In this article, we will discuss in detail the tricks to master for shooting good spatial videos.
First, the conclusion: if you want to shoot spatial videos with a strong sense of depth, you need to:
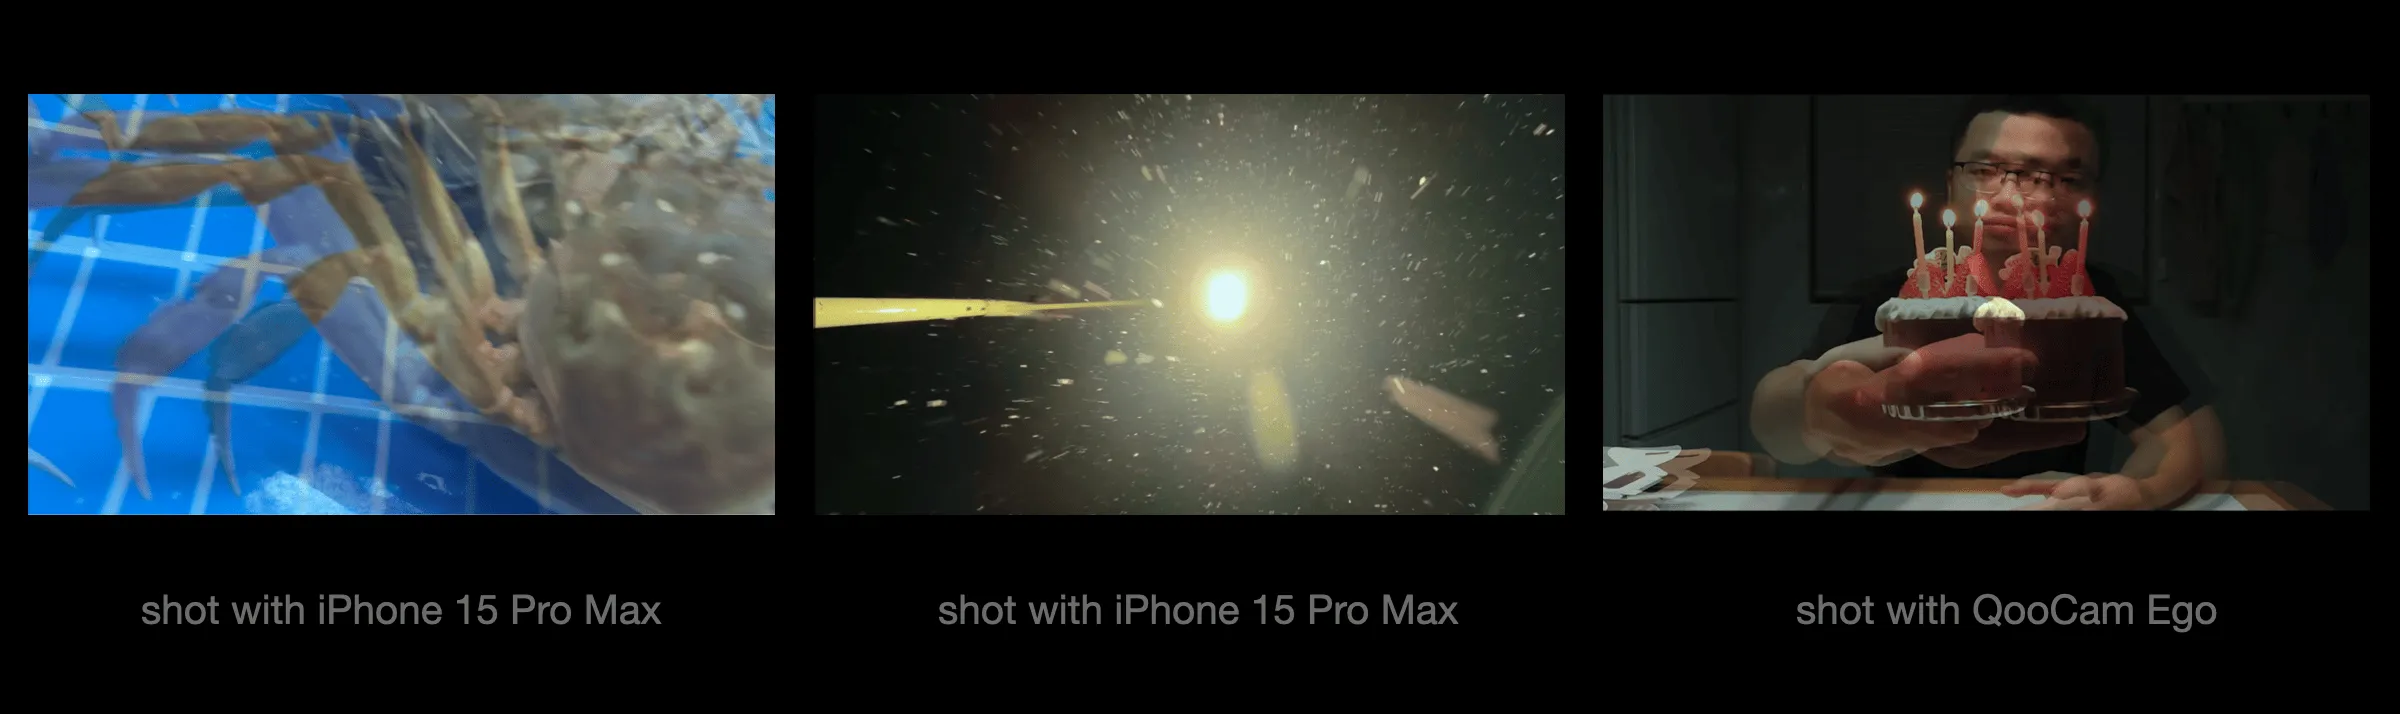
Place the shooting subject at a distance of 5-10cm from the camera lens in some key scenes
So, why does this technique work well for shooting spatial videos? To answer this question, we need to start with the principle of spatial video.
The three-dimensionality of spatial video is created using binocular disparity. Humans are inherently capable of perceiving depth and distance, a skill that is extremely complex in principle (and even debated academically). Simply put, Apple Vision Pro transmits slightly different images to each eye to mimic the imaging process of human eyes: combining two-dimensional images from the retinas of both eyes to perceive the three-dimensional information of the world.
Science Corner: Why Can We Perceive Depth?
In fact, our visual system infers depth by using various complex cues processed by the brain. Usually, if we feel a lack of depth in spatial videos, it’s likely because the content of the video provides monocular depth cues rather than binocular depth cues. So what are monocular depth cues, binocular depth cues, and how do our eyeballs move? Let’s find out.
Monocular Depth Cues
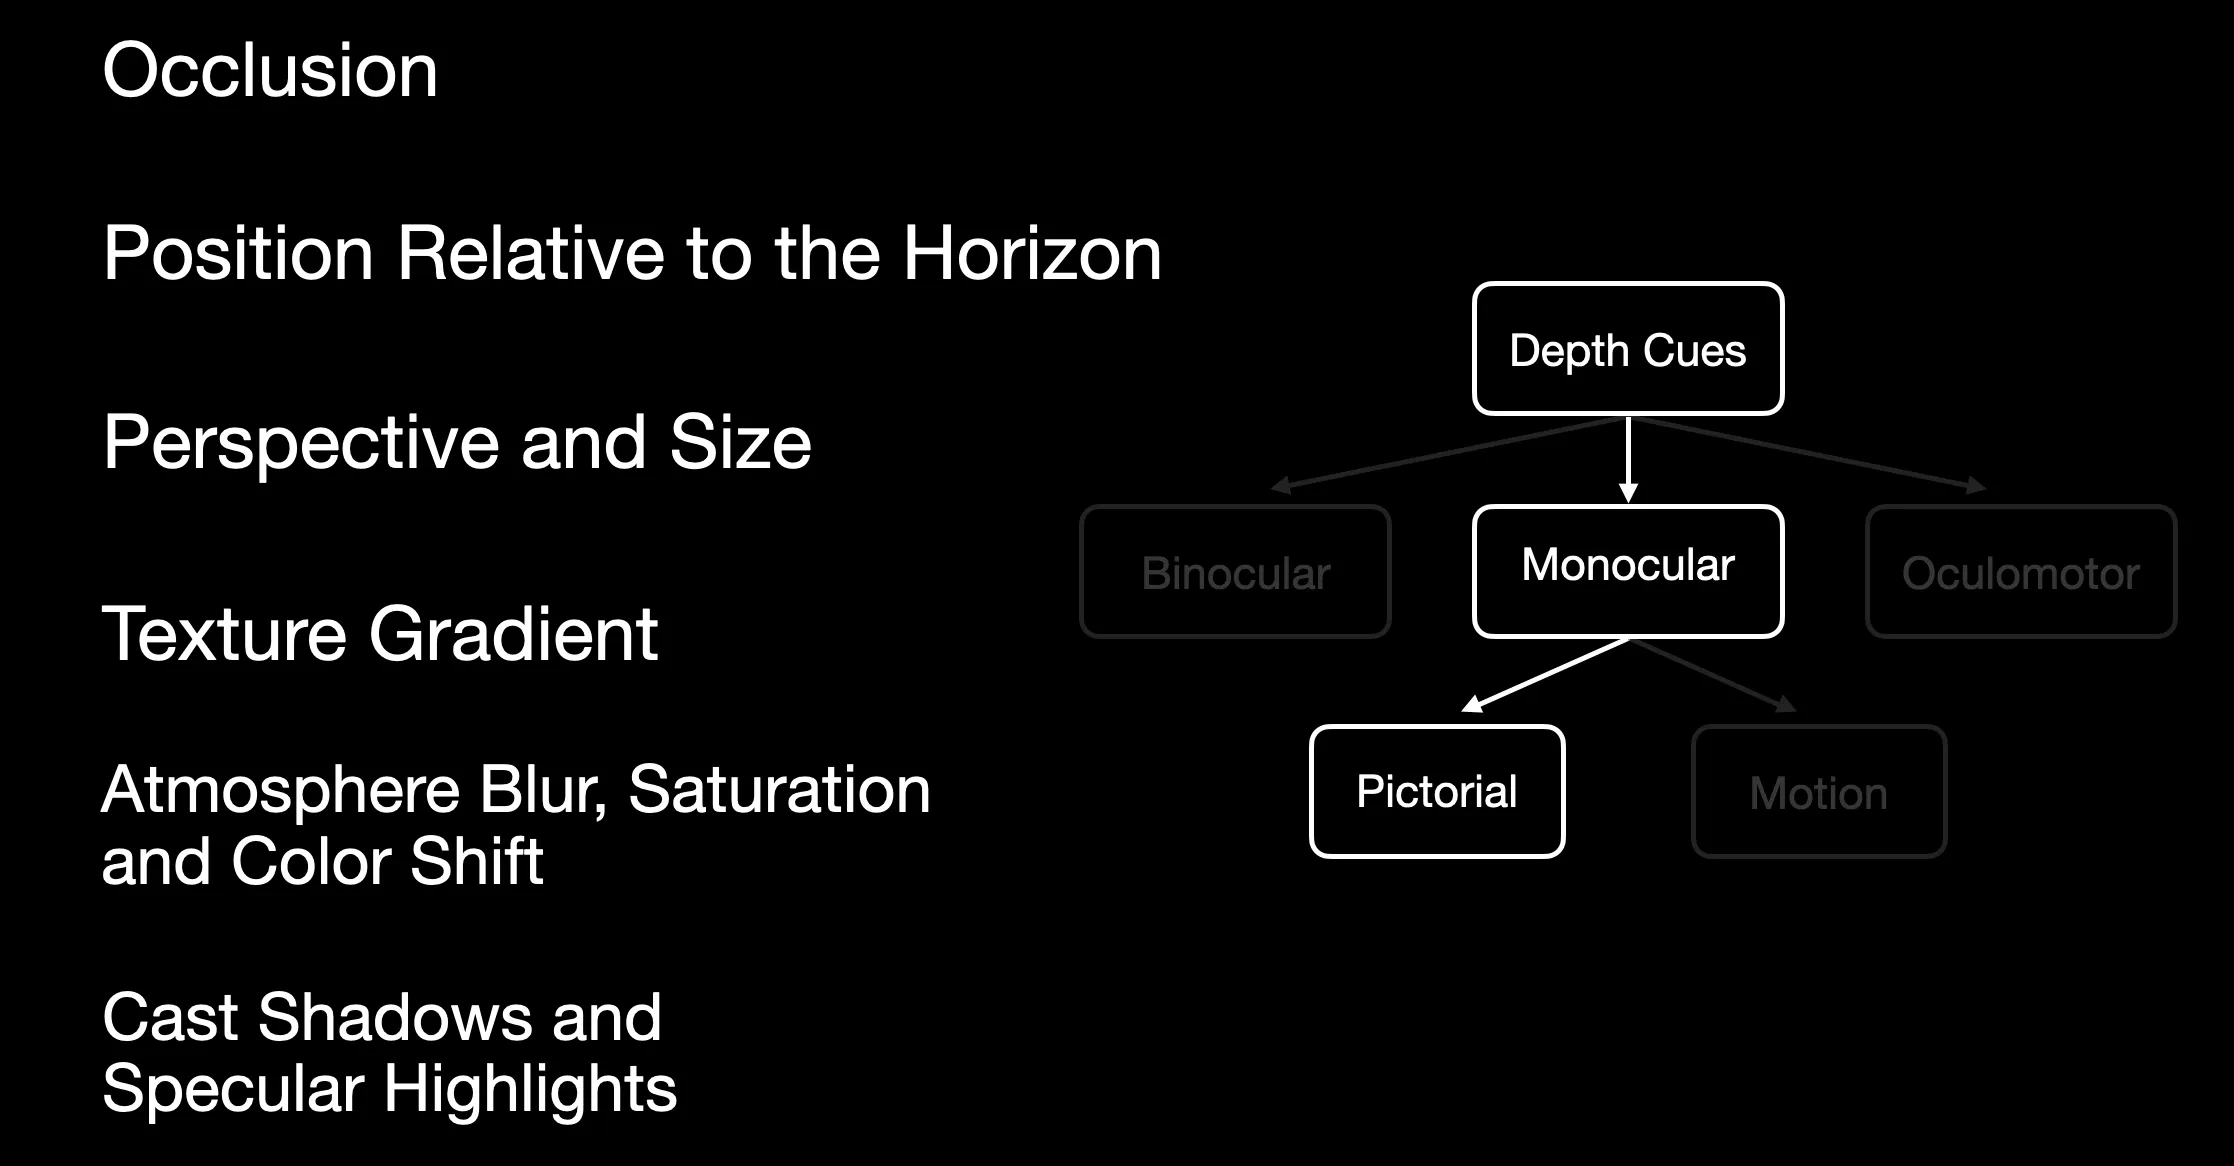
Let’s first look at some monocular depth cues widely used in painting and photography. Monocular cues refer to information obtained from one eye (from the perspective of photography, from a single lens).
In painting, these cues have been summarized and applied, such as:
- Occlusion cues. Objects that are obscured are naturally perceived by our brain as farther away, as shown in the image below, even with just one picture, we know the player wearing a black hat is farther from us.
- Horizon reference cues. If there is a horizon in the picture, the area below the horizon is closer to the observer, like the various houses shown in the image below.
- Perspective relationship cues. Correct perspective relationships help us perceive the depth relationship, including geometric and texture cues, like the houses in the image below, which appear “larger close and smaller far away,” telling us they are farther from us.

- Texture gradient size. The gradient of similar objects allows us to discern their size changes, like the tulips in the image below, where we see some are larger and others are smaller, so we can determine which tulips are closer based on these texture gradients.
- Size cues. Our life experience tells us the size of certain objects, so these absolute sizes are a reference, like the blueberries in the image below. Knowing their normal size, we can tell that the blueberries in this picture are very close to the camera. Relative size is also an important clue, for instance, if a house in the picture is obscuring a person of normal size, then that house is likely a model placed in front of the camera.

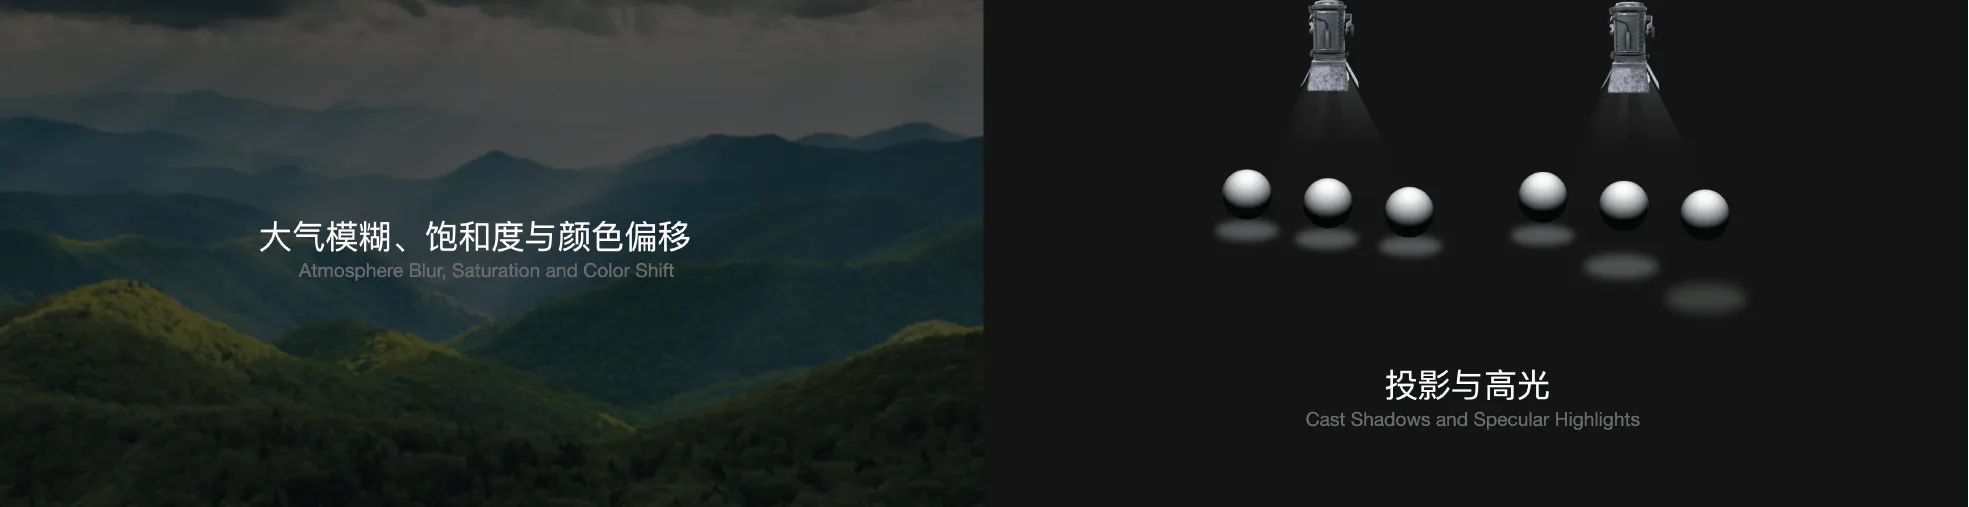
- Natural landscape cues. Some natural scenes also help us perceive depth automatically. For example, distant mountains, usually hazy, change color with distance.
- Highlights and shadows. These are also important cues for perceiving depth and are widely used in flat interfaces.
It’s important that if a scene has multiple cues, they should not conflict with each other. This is a requirement for painters. In everyday photography, we usually don’t encounter this problem.
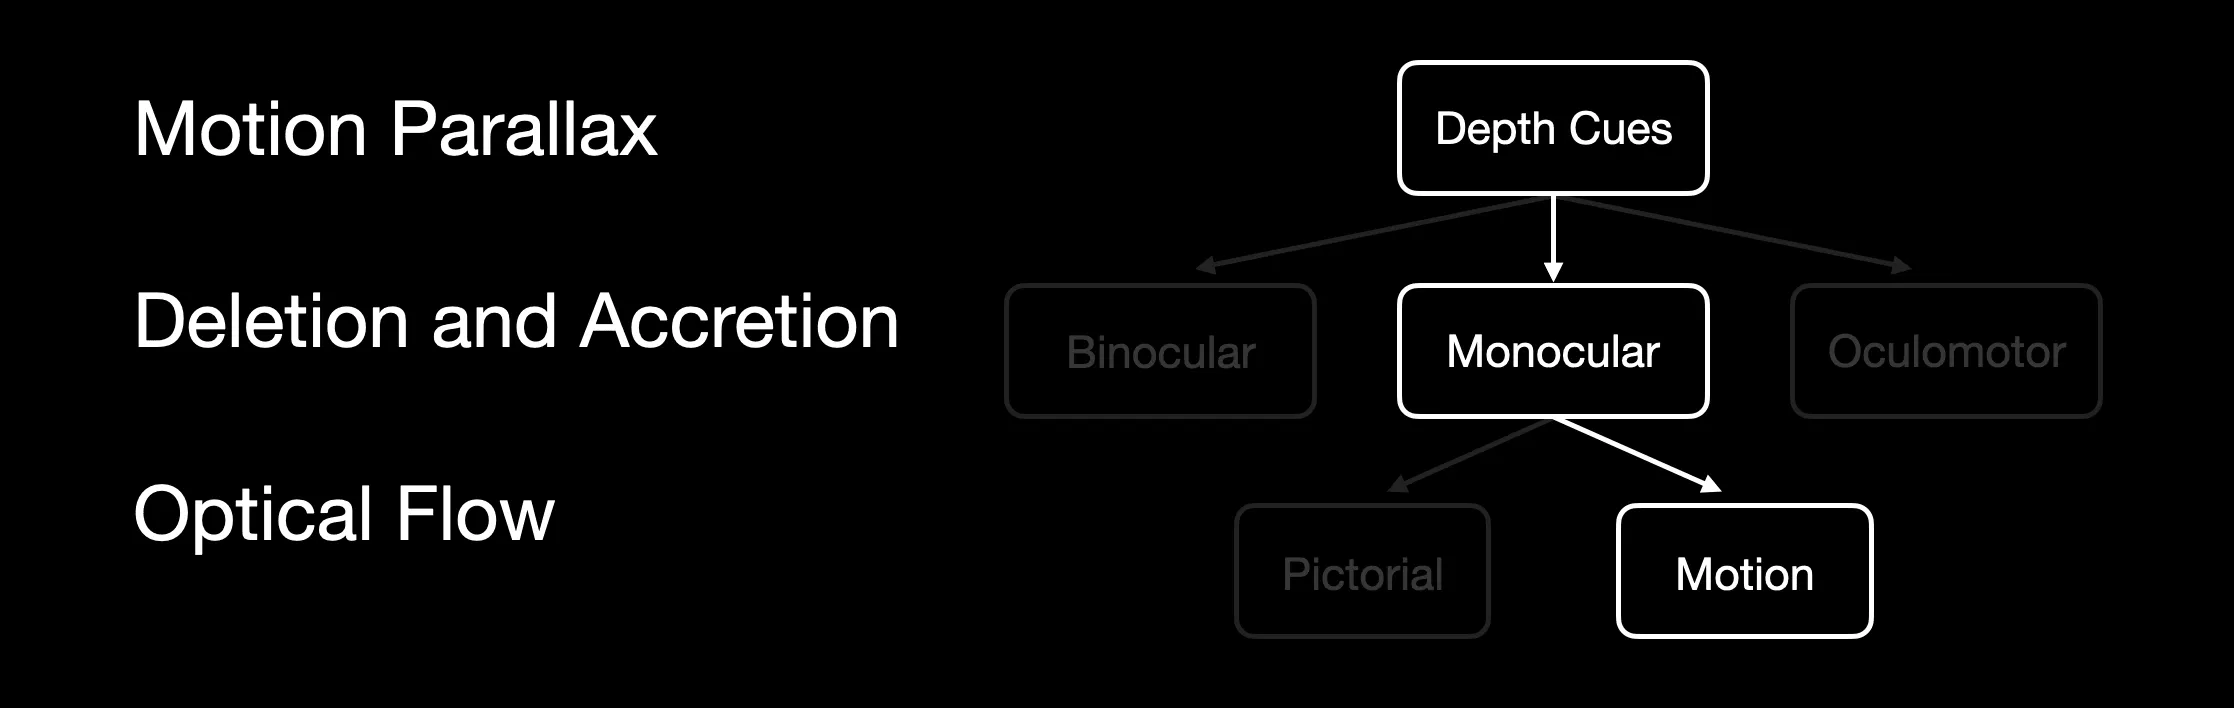
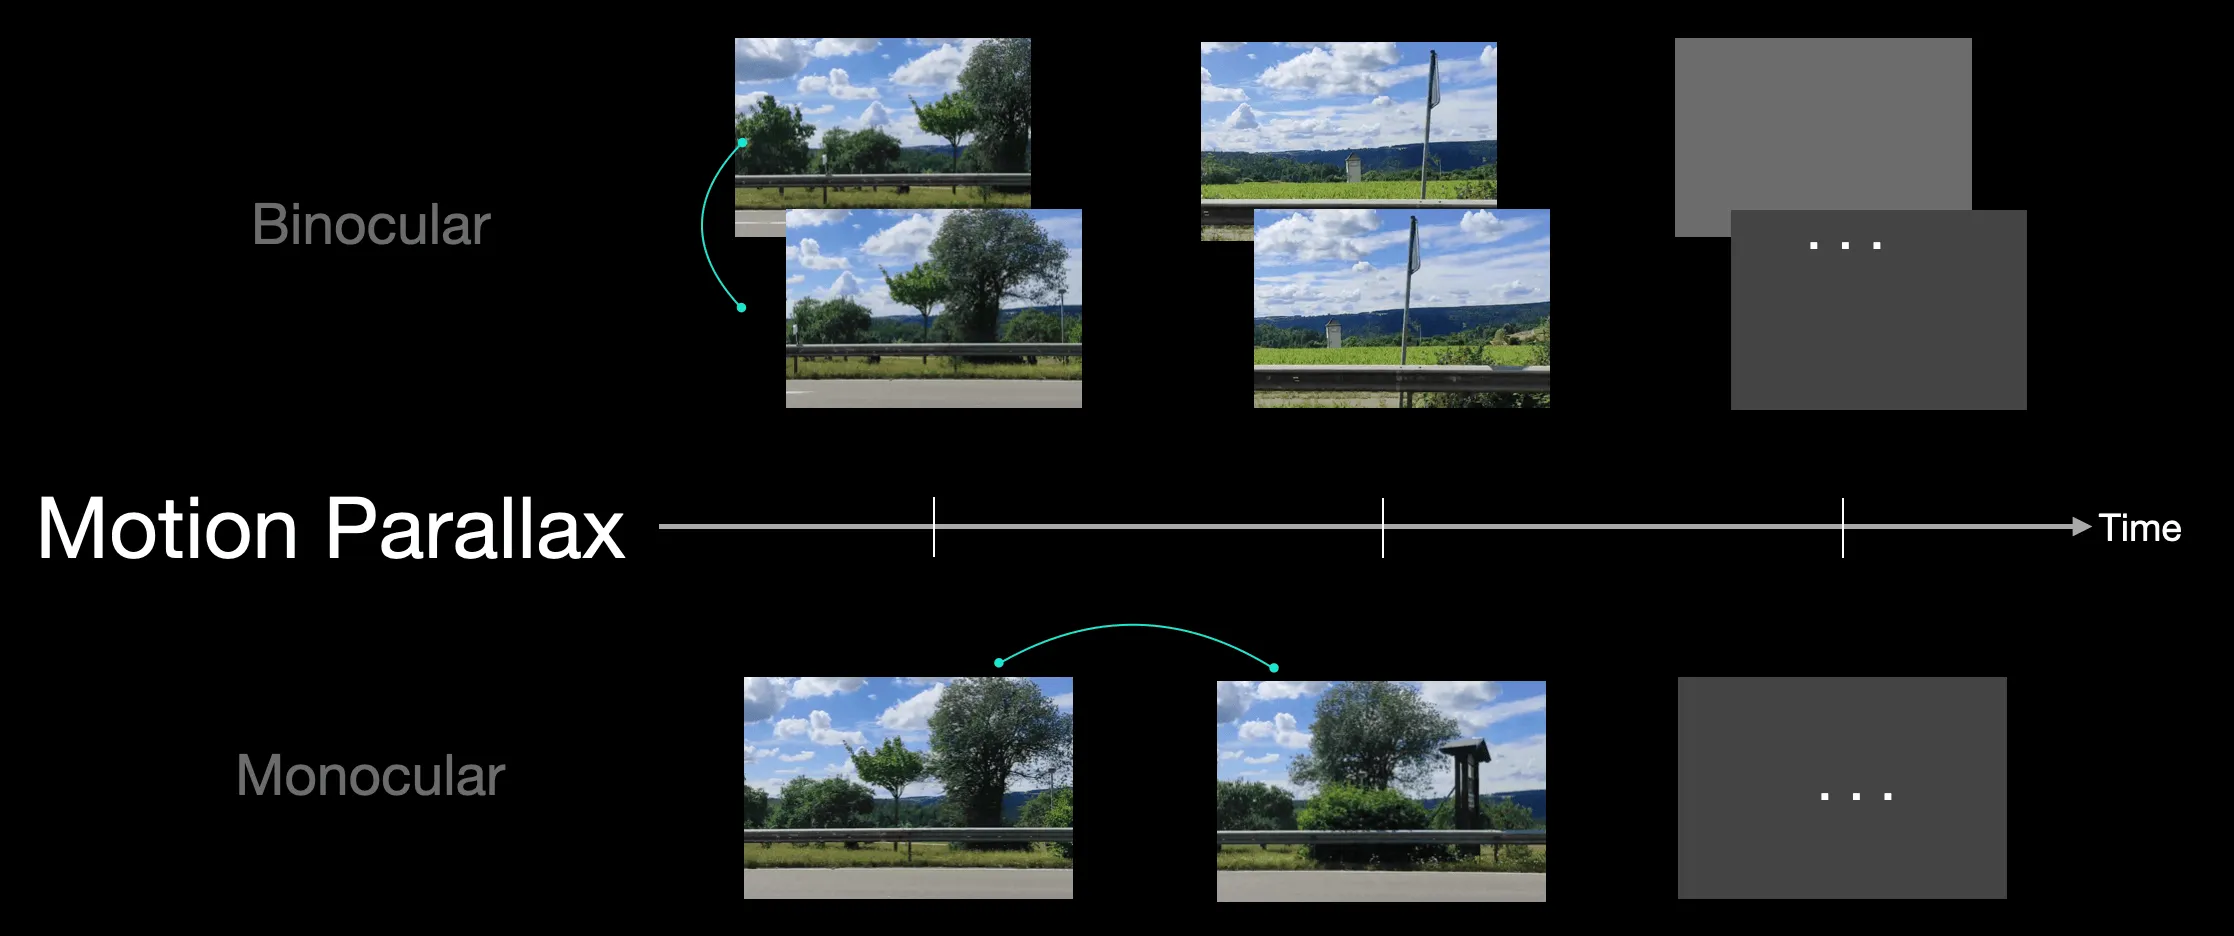
What we discussed so far is based on painting experience, dealing with static scenes. In dynamic scenes like videos, there are more dynamic-type depth cues, such as motion parallax cues. Depending on whether the camera is moving causing parallax or the object in the camera’s view is moving causing parallax, these do not affect our depth perception much, but they make a difference in shooting spatial videos.
Additionally, motion parallax, in a way, is similar to binocular parallax, but here under monocular conditions, we’re talking more about the parallax formed by comparing front and back images, whereas in binocular conditions, disparity can be judged directly based on left and right images at a given moment.
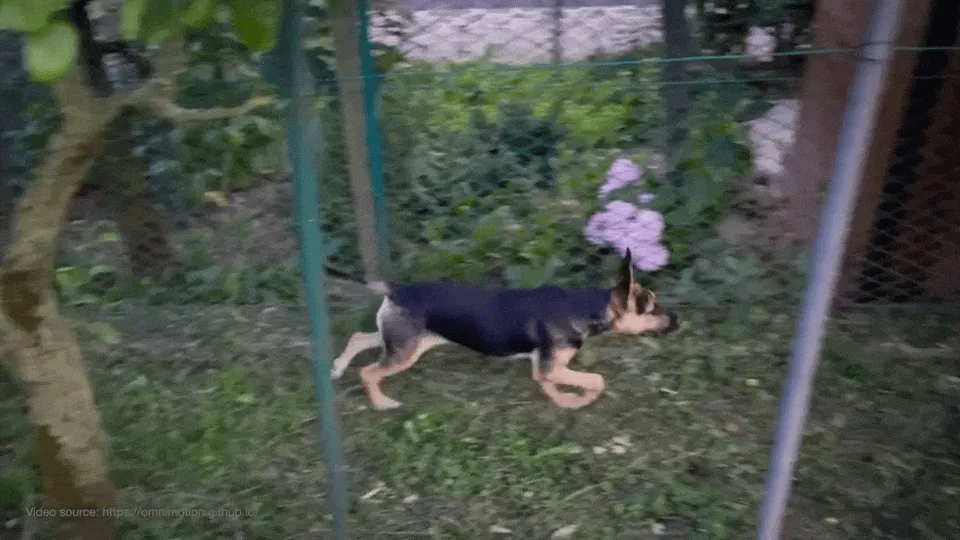
Furthermore, there’s the occlusion-then-appearance cue. This is similar to the depth cue provided by occlusion relationships we mentioned before, like a dog running behind a tree in a video, can be understood as a continuous image without incorrect depth cues.
In many car cameras, we can see optic flow cues. This phenomenon is also a clue provided by relative motion, but it emphasizes clues provided by objects moving in parallel opposite to the observer, like the scattering objects seen from the car on a highway.
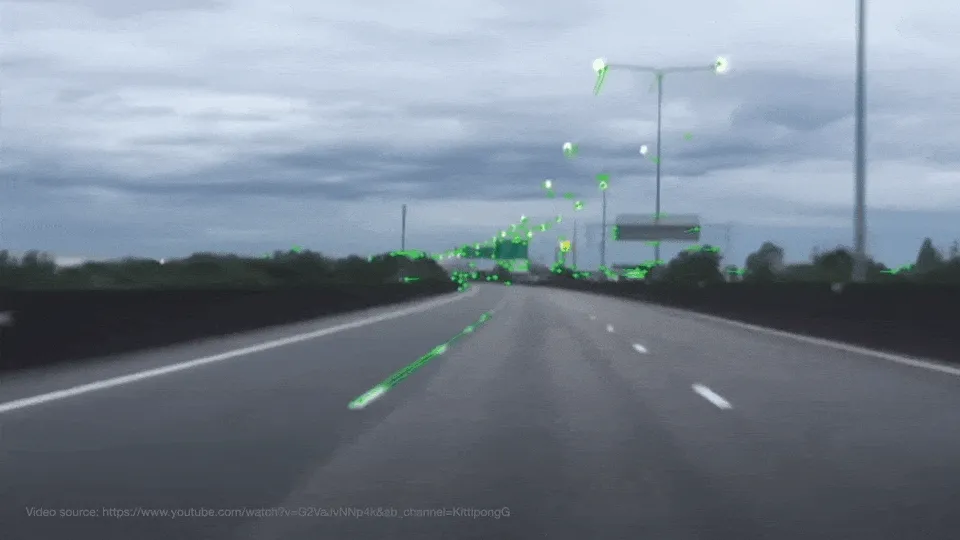
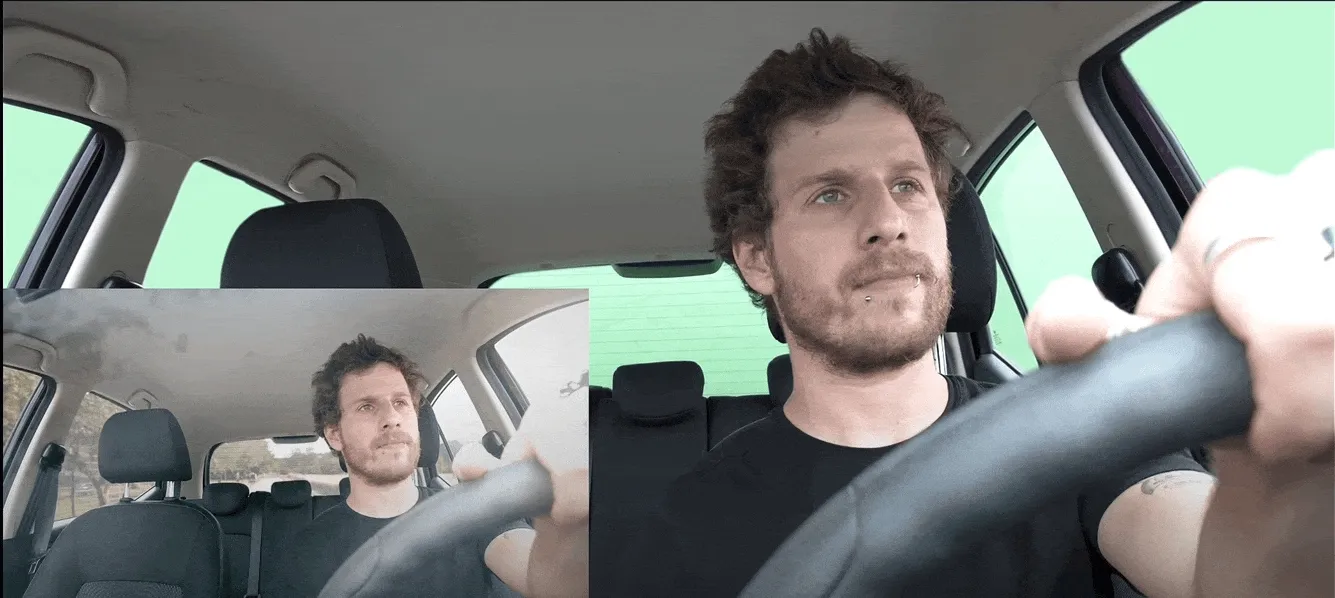
Since motion parallax provides one of the main references for our depth perception, it’s widely used in various visual effects. For example, the video below looks like it’s being shot while driving, but it’s actually filmed in a stationary car, later adding a moving background to the green screen.
So imagine, even in a one-eyed pirate’s world, there is a sense of three-dimensionality. This is why we can still perceive depth, distance, and three-dimensionality in flat media like phones, computers, and TVs. But our visual system can perceive far more cues than those mentioned above.
Eye Movement Principles
Before introducing the most important binocular cues, we need to understand the principles of eye movement.

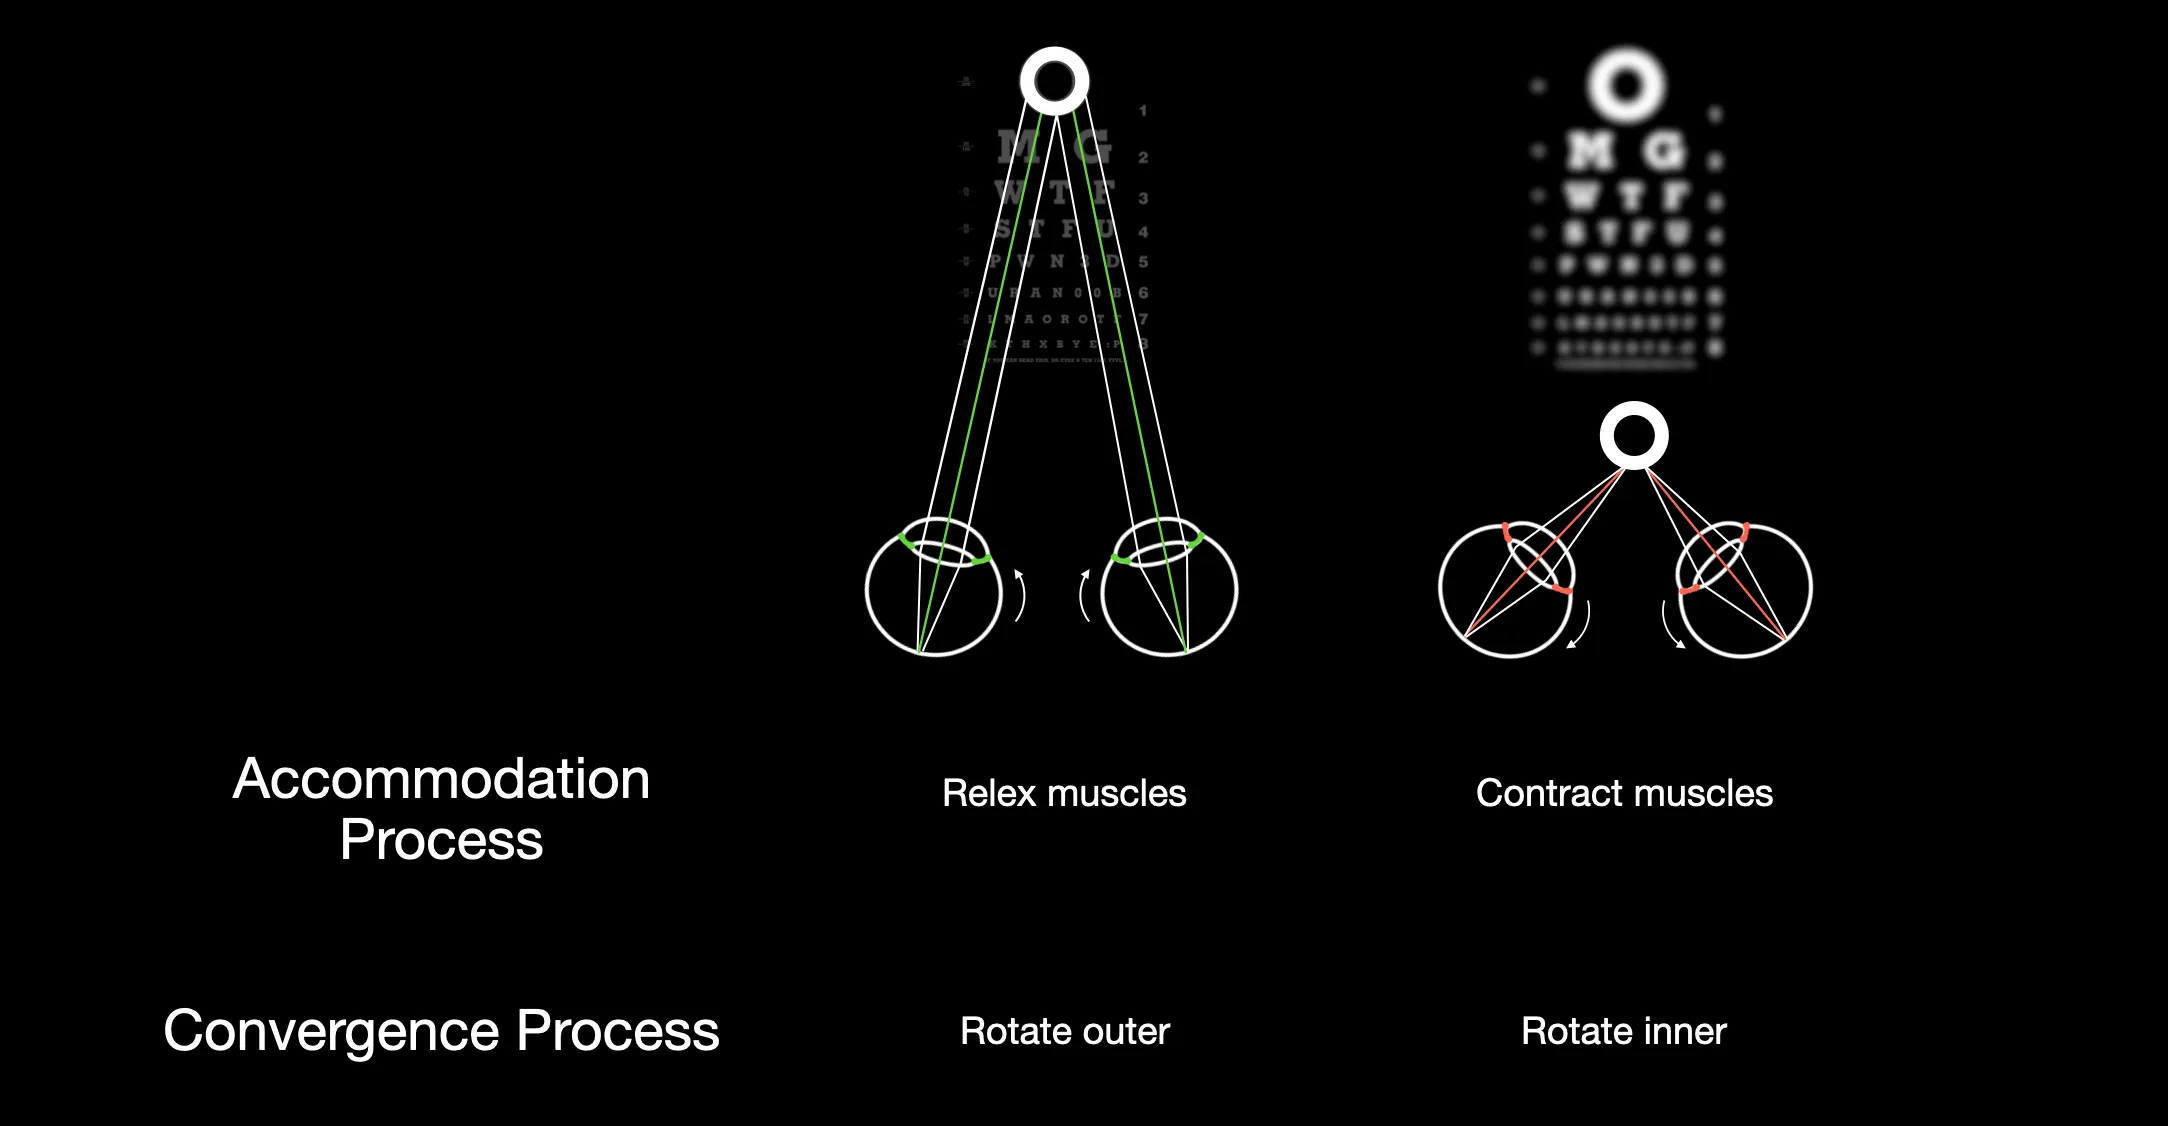
In real life, our eyes always have a focal point. When the focal point is close, the ciliary muscles of the eyes contract; when it’s far, they relax. Additionally, when viewing near and far objects, the eyeballs make additional adjustments: rotating inward and outward in conjunction with muscle contraction.
Try this experiment: extend your arm, raise one finger, and focus on it. Then slowly bring it closer to your nose. What do you notice? Do you feel the surrounding environment becoming “blurry”? In fact, during eye adjustment, the images on our retinas are no longer perfectly aligned (which can occur in two different ways, which we will discuss shortly). This is why we experience “blurriness.”
Using the principle of focal point rendering, we can also propose an effective trick to save computational resources: rendering high-definition content only at the focal point, while reducing rendering precision in other areas. However, since all MR device screens are fixed, they can only simulate the eye’s focus within a fixed distance range, which lays a foundation for the experience of spatial computing.
Binocular Depth Cues
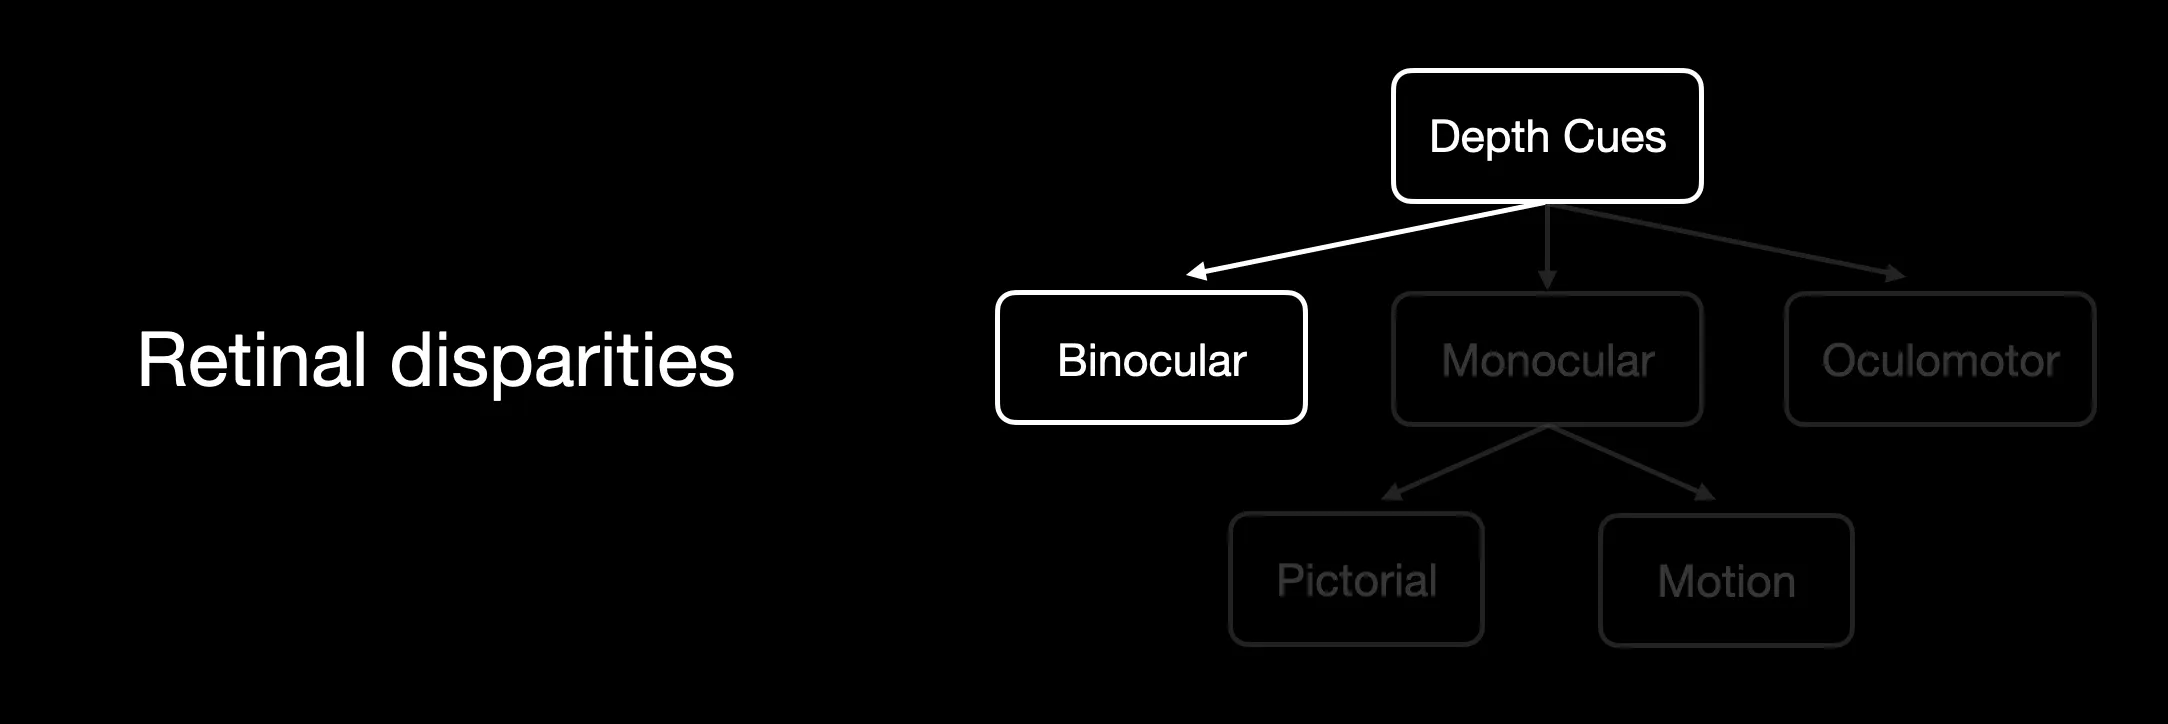
Having understood the basics of eye movement, we can now discuss the most important part: binocular cues. Human binocular depth cues are mainly provided by images with certain differences. After receiving these images, the brain automatically processes them to form depth perception.
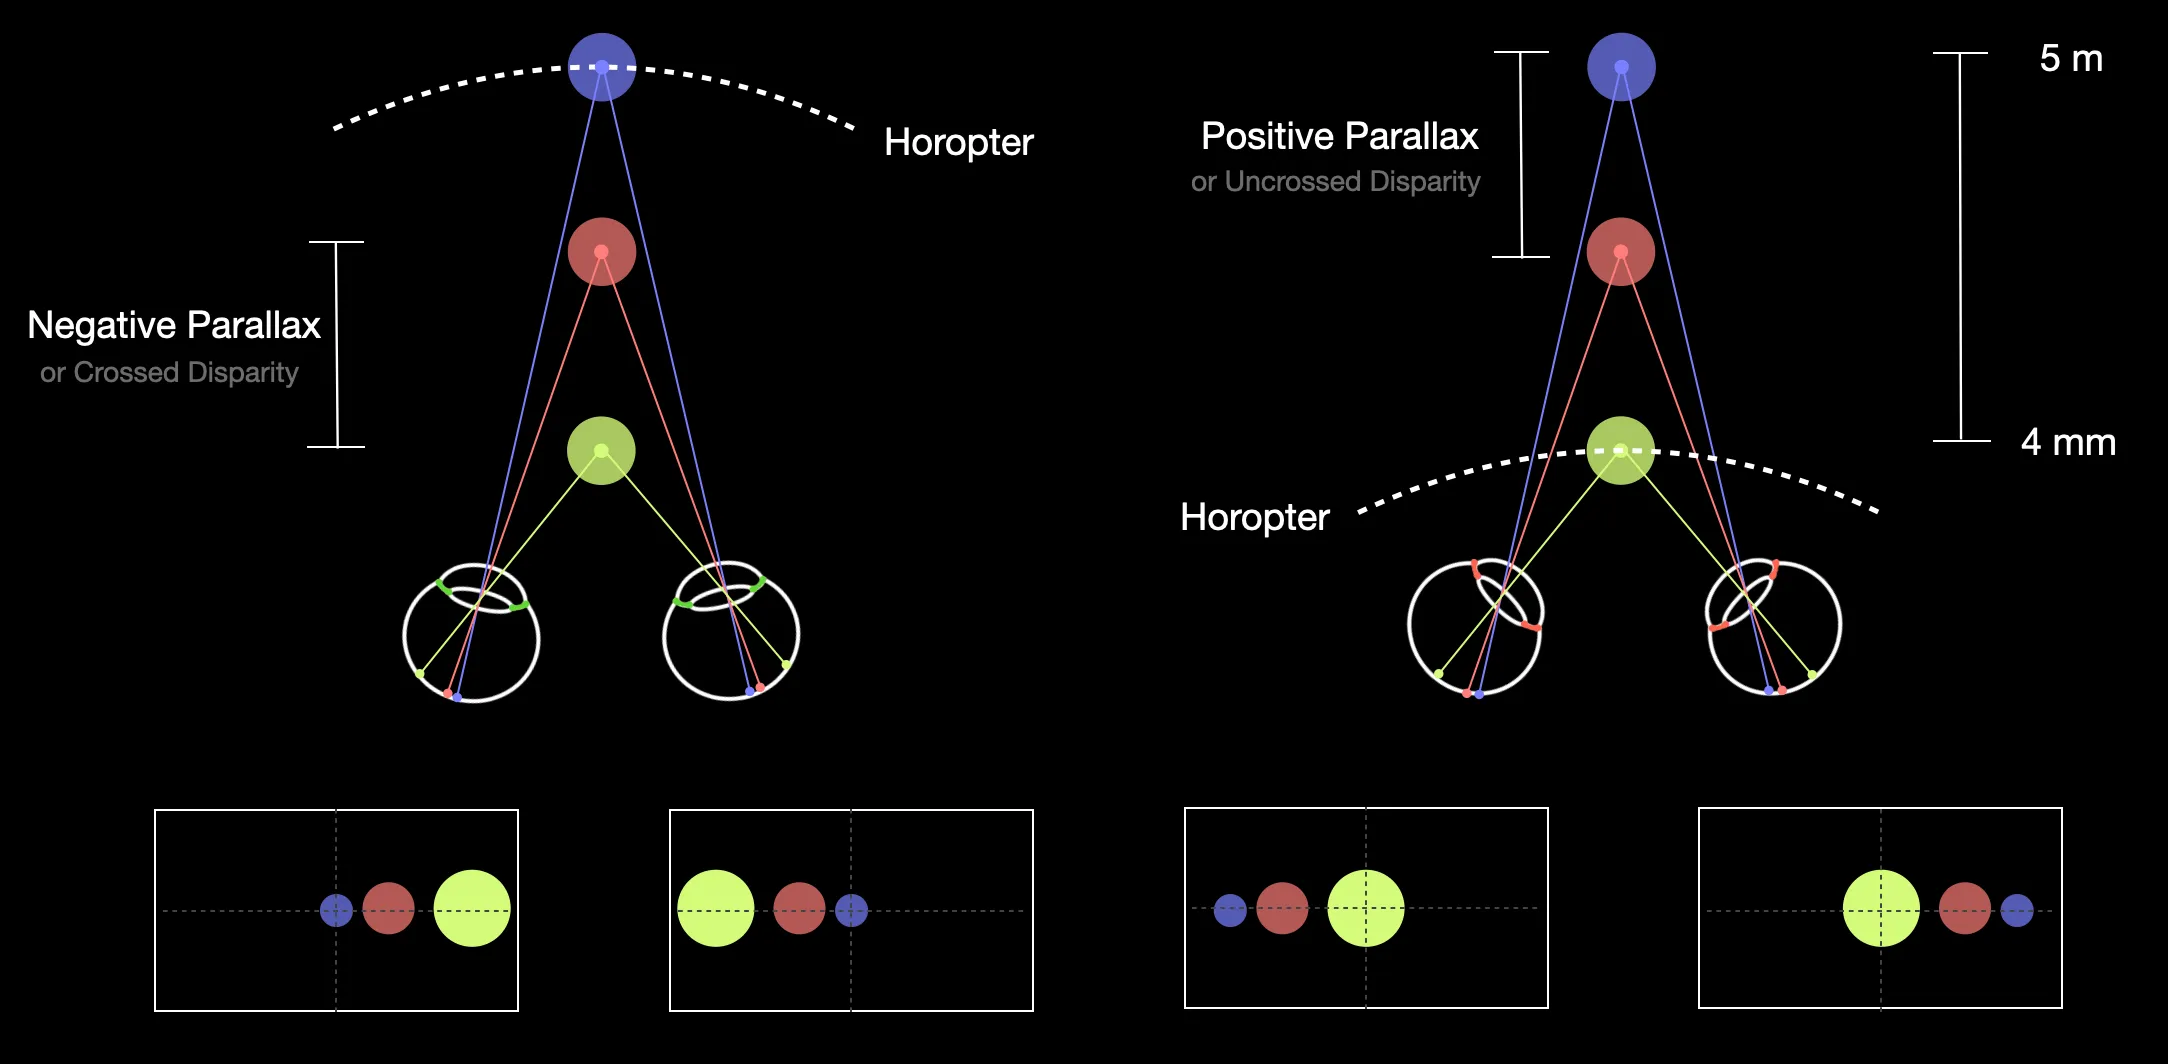
When shooting spatial videos, the camera is usually fixed-focus. Assuming it focuses on the purple ball area (the camera is at the position of the eyes), areas closer to the camera than the binocular circle, such as the yellow area, are typically called negative disparity areas (or crossed disparity areas). If it focuses on the yellow ball area, areas farther from the binocular circle (as shown on the right side of the image above) are positive disparity areas (or uncrossed disparity areas).
So, for any objects not on the focal plane, disparity will occur on the imaging plane. But does this make a difference for spatial videos? Yes. Generally, objects in the positive disparity range, although not aligned and having disparity in both eyes, can only provide monocular cues, leading to a less intense stereoscopic effect in the positive disparity area.
How to Shoot Good Spatial Videos?
Under the premise of using VST technology, when perceiving the world through a screen, and considering that MR device screens are fixed, the comfortable range for spatial video experience is limited compared to our eyes’ adjustable range. When we look at distant objects, the disparity in the images on the left and right screens can be covered, but in extreme cases, it’s like trying to focus on a finger placed right at the nose, leading to a cross-eyed effect. Therefore, spatial videos that are too close to the target object can cause this cross-eyed phenomenon.
In theory, there’s a comfortable viewing range for stereoscopic videos, corresponding to a shooting range. Generally, objects in the negative disparity area provide a direct stereoscopic effect, while those in the positive disparity area can only provide monocular depth cues.

However, not all negative disparity areas are comfortable viewing distances. If too close to the camera, it can lead to a cross-eyed effect. This is why when shooting spatial videos with the iPhone, the phone advises against getting too close to the object. We’ve also shared some spatial videos with good stereoscopic experience for reference on Bilibili.
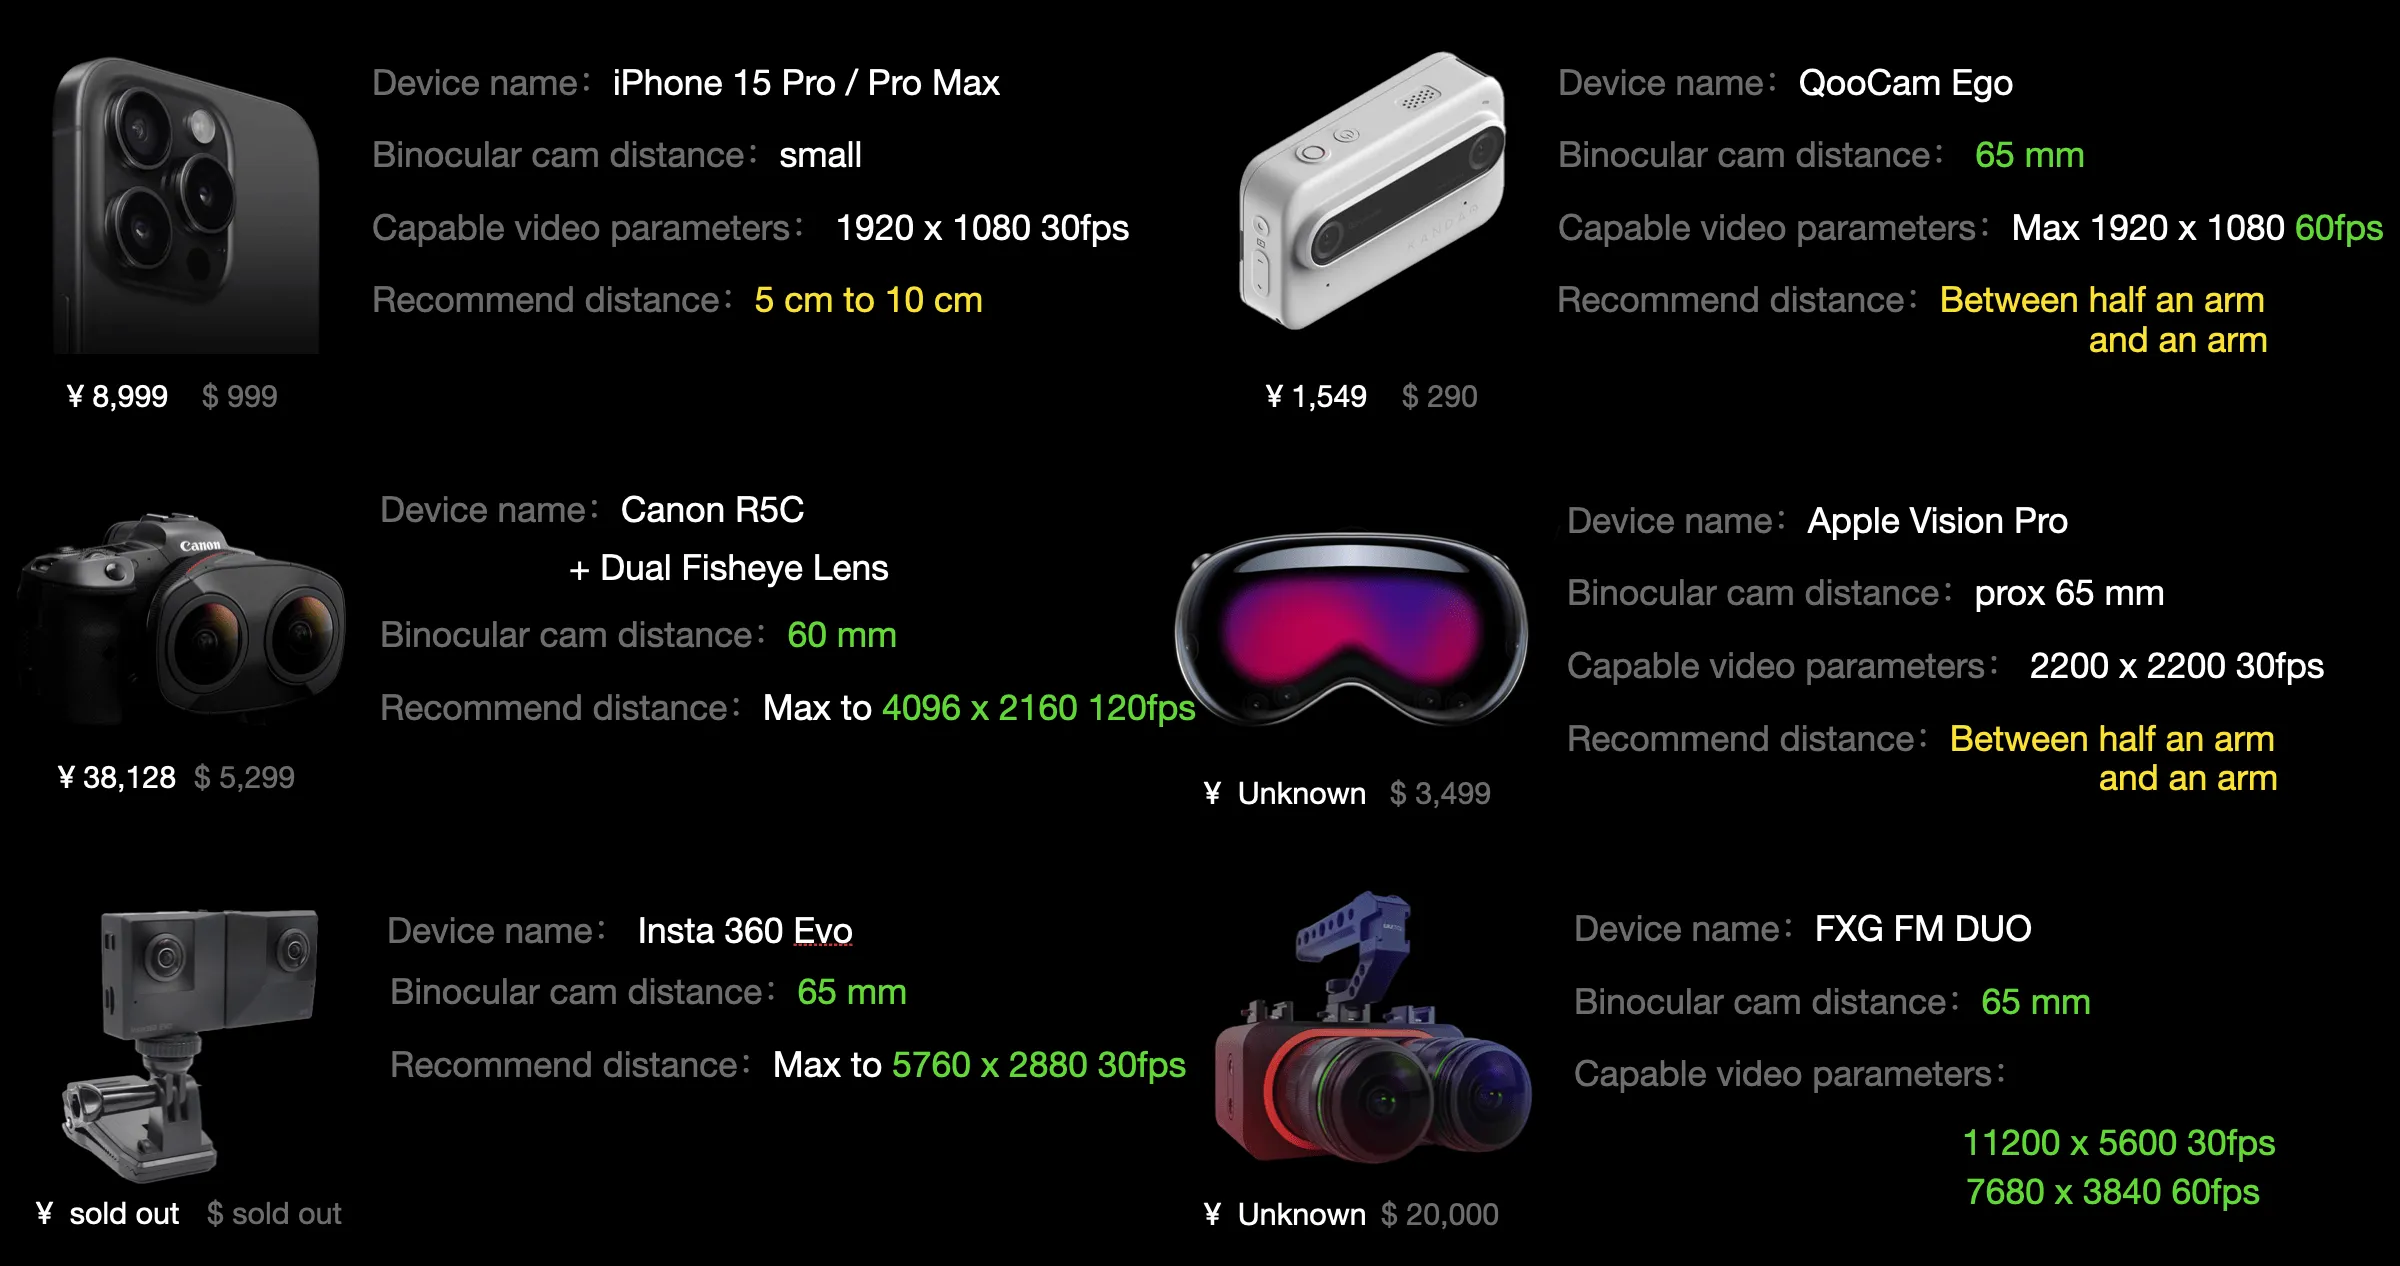
So you might ask, what is the reasonable range for negative disparity? Unfortunately, this depends on the specific device. We researched some mainstream binocular cameras used for VR video shooting and summarized the appropriate range values for some devices we’ve used, hoping to provide some reference.
Caution: Do Not Continuously Shoot Objects in Negative Disparity
When we watch flat videos, we can feel the proximity of the content, which is due to the monocular depth cues at work. This is why we say 2D videos are essentially 3D videos shot with one camera. Knowing that the object must move in the appropriate negative disparity area to get a good stereoscopic effect limits video creation.
We suggest focusing the target in the appropriate negative disparity area at key moments, such as when introducing a product or showcasing a special action. This can highlight the key points. Although the video isn’t always popping out of the screen, it can reduce the continuous high visual load during viewing.
Summary
In summary, to have a good and comfortable stereoscopic video experience, there are quite a few factors to consider. Looking back at the evolution of cinema, from the earliest black-and-white films to color films and then to sound color films, these technological advances have enhanced stimulation of a particular sense. However, stereoscopic videos have not surpassed existing sound color videos in terms of sensory stimulation. Considering that Apple’s spatial videos utilize both binocular disparity and spatial audio, it’s no surprise that they can achieve great experiences.
Additionally, it’s worth noting that a small portion of the population is less sensitive to stereoscopic perception. Therefore, keeping a level head and not having too high expectations for spatial videos will prevent disappointment from unmet expectations.

A Bit More: How to Edit Spatial Videos
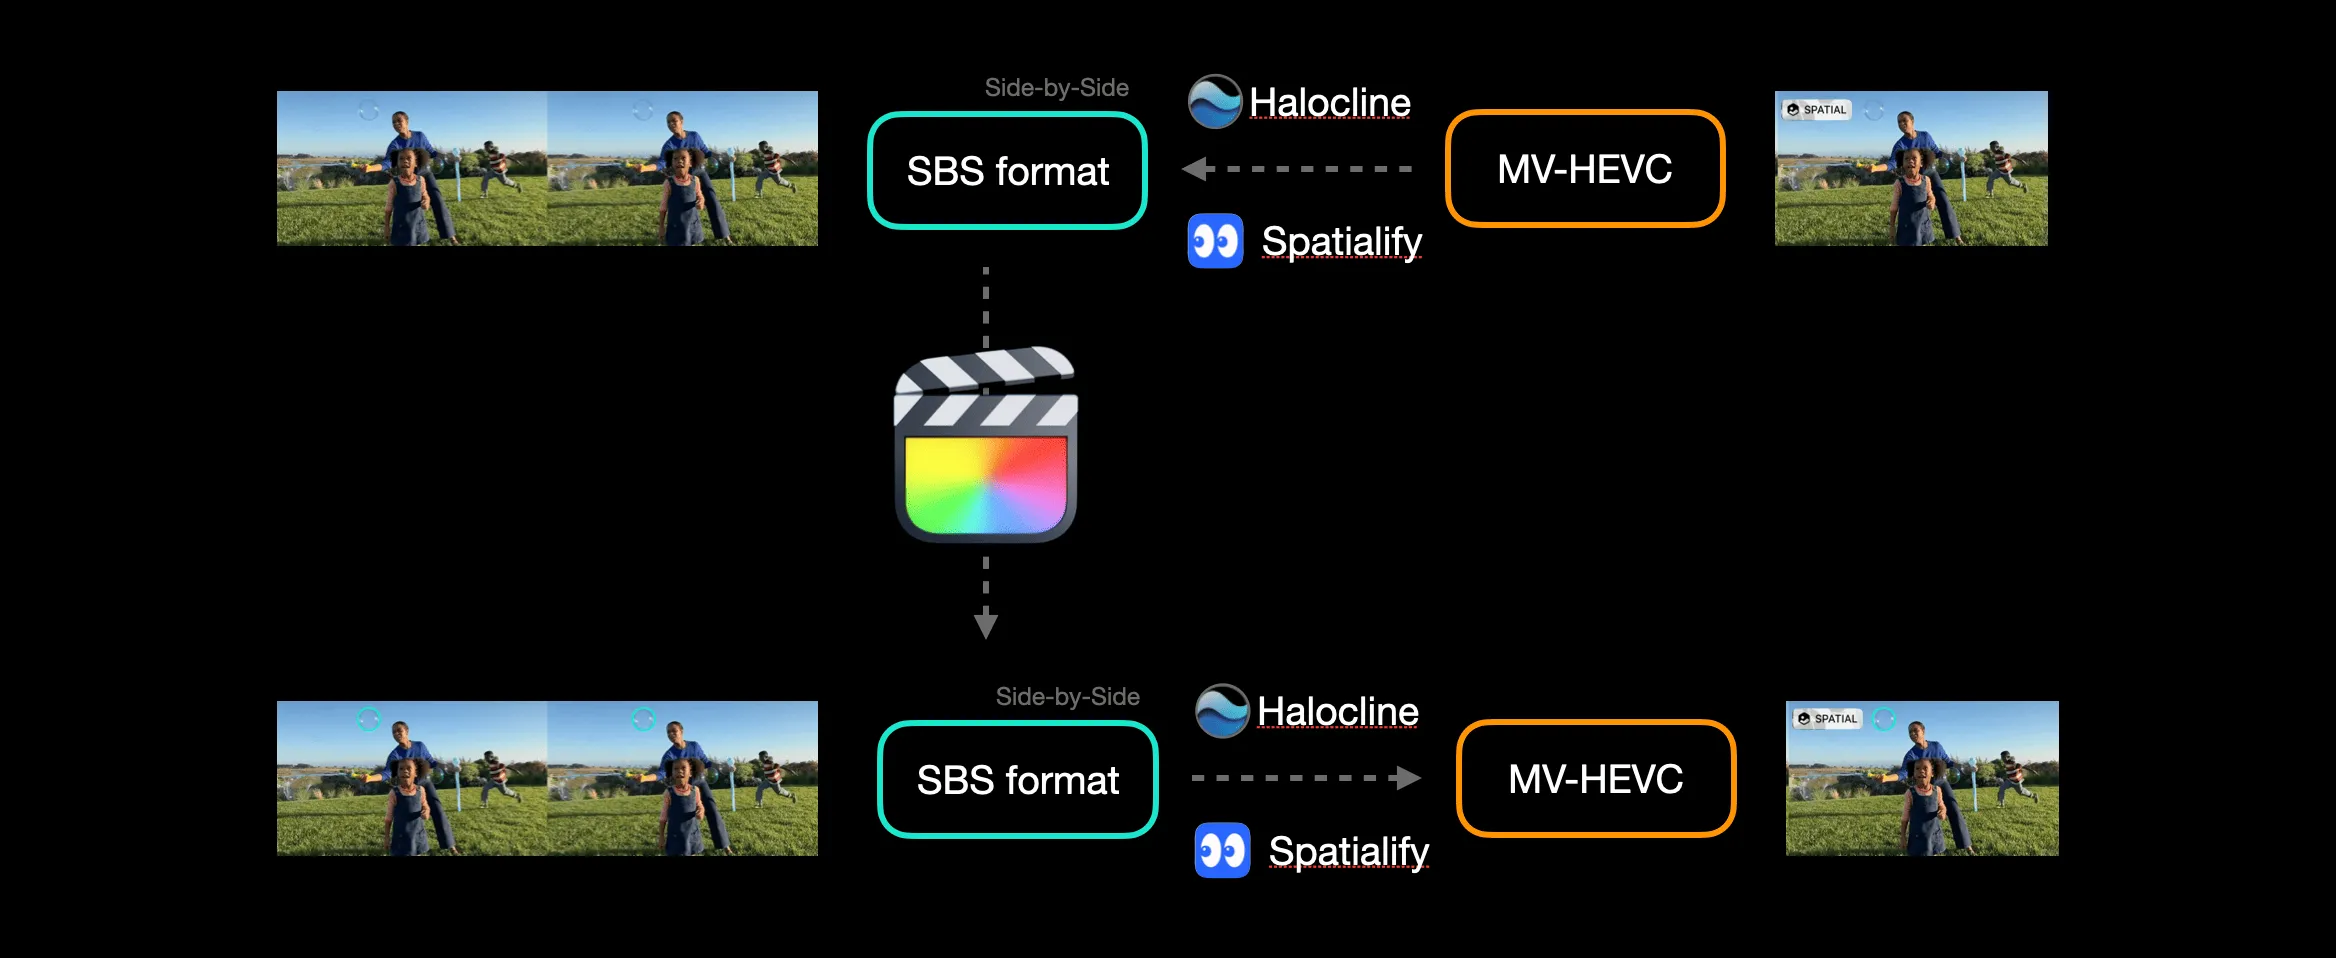
Lastly, let’s briefly discuss the issue of editing spatial videos. Currently, no software can directly edit spatial videos. Of course, we can use some tools to decode spatial videos into left and right eye formats, then edit them, and encode them back into spatial videos. Using this process, we can perform some simple operations, such as denoising and overall color grading.
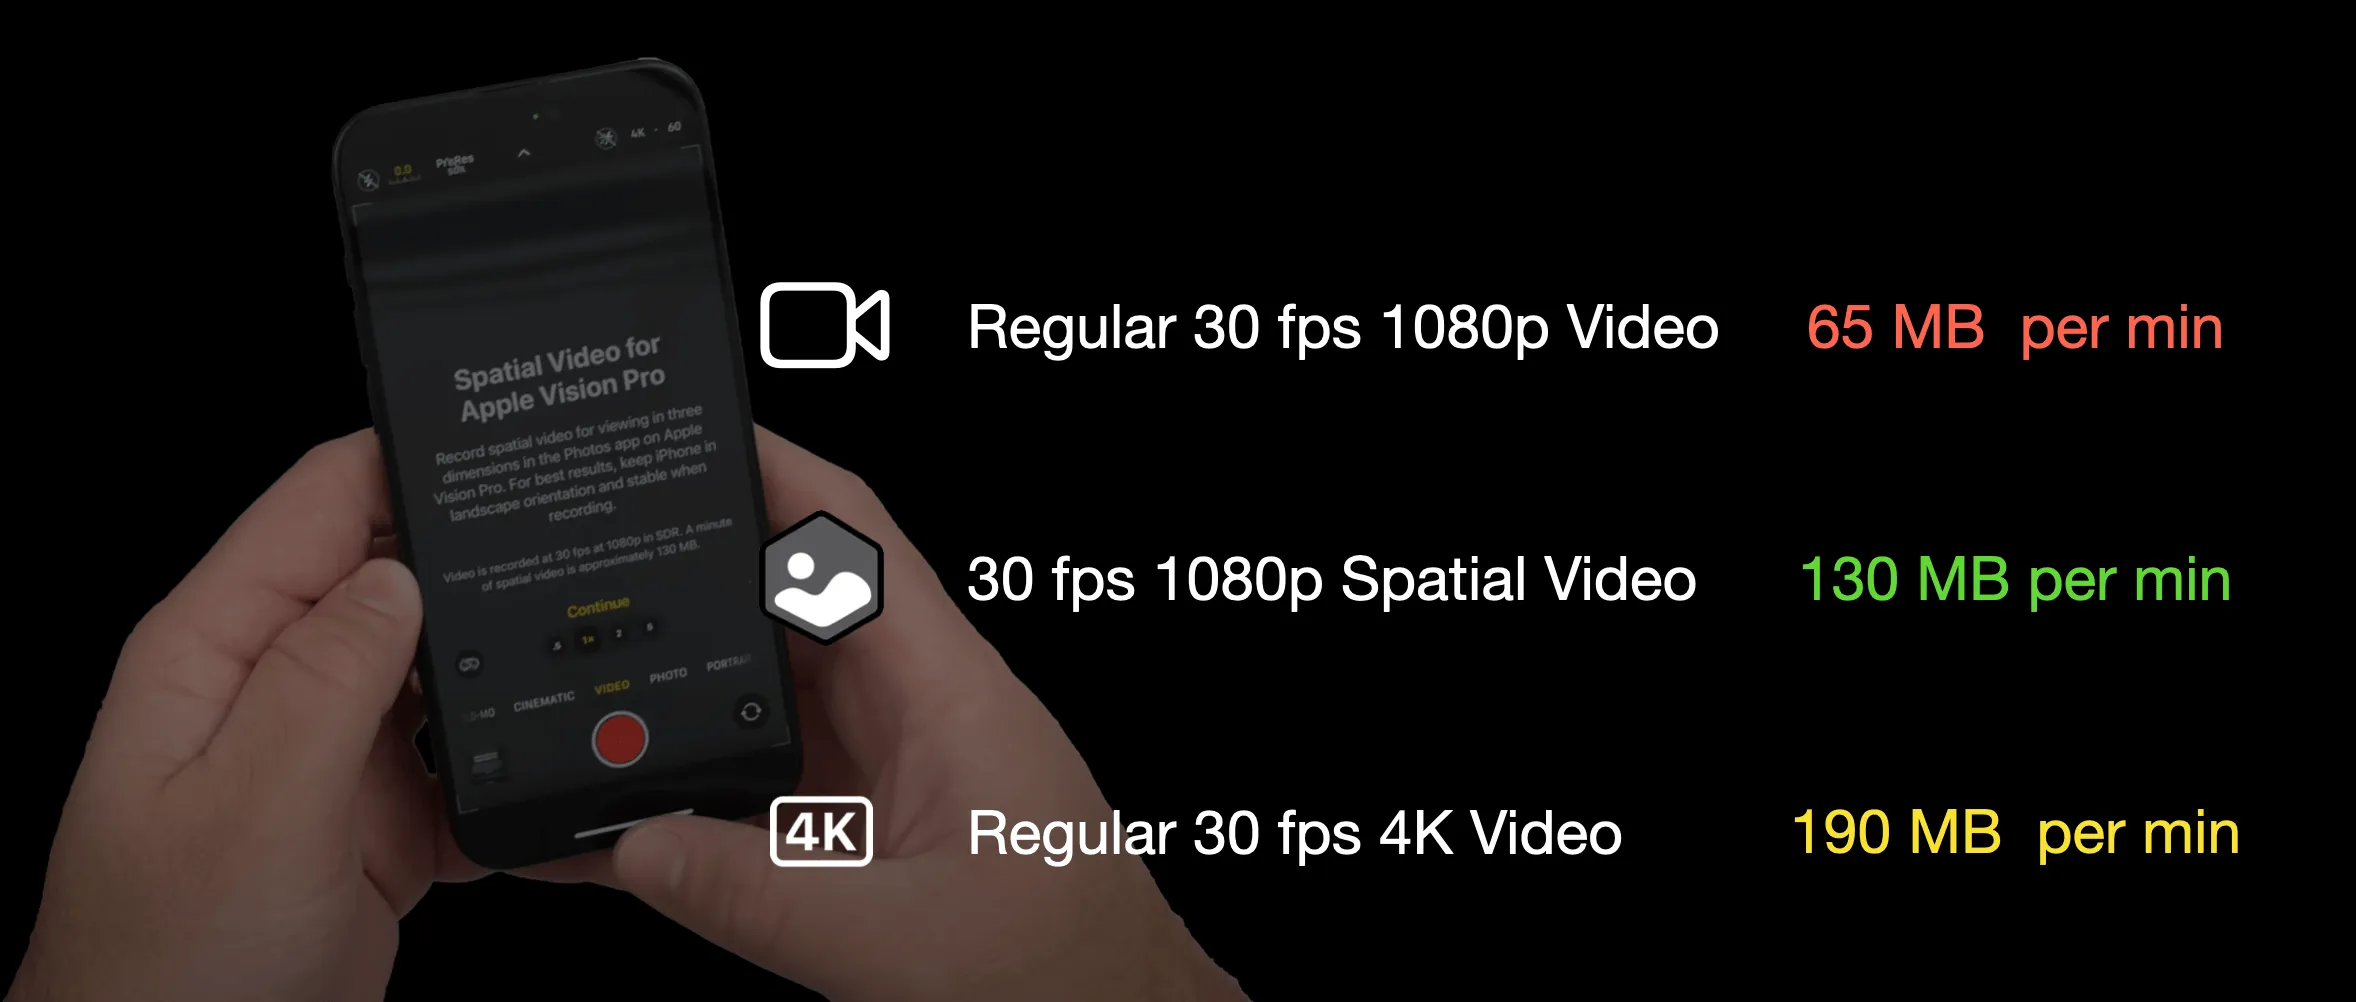
According to foreign media reports, at some point this year, Apple will add spatial video processing capabilities to Final Cut Pro. Also, according to our internal sources, there are teams in China developing editing software specifically for spatial videos, which will be released simultaneously with the launch of Apple Vision Pro. Additionally, since MV-HEVC is an efficient encoding format, shooting spatial videos of the same specifications will not significantly increase file size, so post-processing will not add much computational burden (if you update to iOS 17.3 Beta 2, the first time you open the camera, it will introduce the size of spatial video recording).
We are very much looking forward to the upcoming release of Vision Pro and hope that one day we can share and experience our own and others’ stereoscopic memories like in a Pensieve, just like in Harry Potter.
If you have further questions or ideas about spatial videos, you are welcome to follow XRealityZone’s Public Account and communicate with us via Email.
Appendix: Reference Materials
- Stereoscopic 3D - Explaining the 3D movie experience
- Demystify VR180 - parallax issues, the workflow and techniques
- Deliver video content for spatial experiences
- Design considerations for vision and motion
- Sensation & perception 2nd Edition, Chapter 7
- Foundations of Sensation and Perception 3rd Edition
- 3D Movie Making: Stereoscopic Digital Cinema from Script
Contributors to This Article
| Link | Image |
|---|---|
| Zion |  |
If you think this article is helpful for you, you are welcome to communicate with us via Email.
Recommended Reading
- Beginner's guide to AR: Exploring Augmented Reality With Apple AR Tools
- How to Quickly Create an MR Application on PICO 4 Ultra with AI? - Using Cursor to Speed Up Development
- Breaking down the details of Meta Quest 3's upgrades to MR technology
- visionOS 2 HandMatcher HandVector Update to v2 and Add New FingerShape Function - A gesture matching framework that allows you to debug visionOS hand tracking function in emulator
- If you are a developer of Apple Vision Pro, then you must pay attention to these points
- How to Use MPS and CIFilter to Achieve Special Visual Effects on visionOS
- How to Play Spatial Video On iOS 17.2