 XR 基地
XR 基地
XR World Weekly 002

Highlights
- Unity XR Interaction Toolkit Releases Version 2.3
- Wist — Don’t Just be an Audience of Memories, Step into Them
- Lens Studio — Powerful AR Creation Tool Based on Snapchat
Big News
Unity XR Interaction Toolkit Releases Version 2.3
Keywords: interaction, hand tracking, eye tracking, simulator
As a popular game engine, Unity has been the first choice platform for many creators first stepping into VR. Unity officially provides a complete tech stack to support using Unity for XR development.
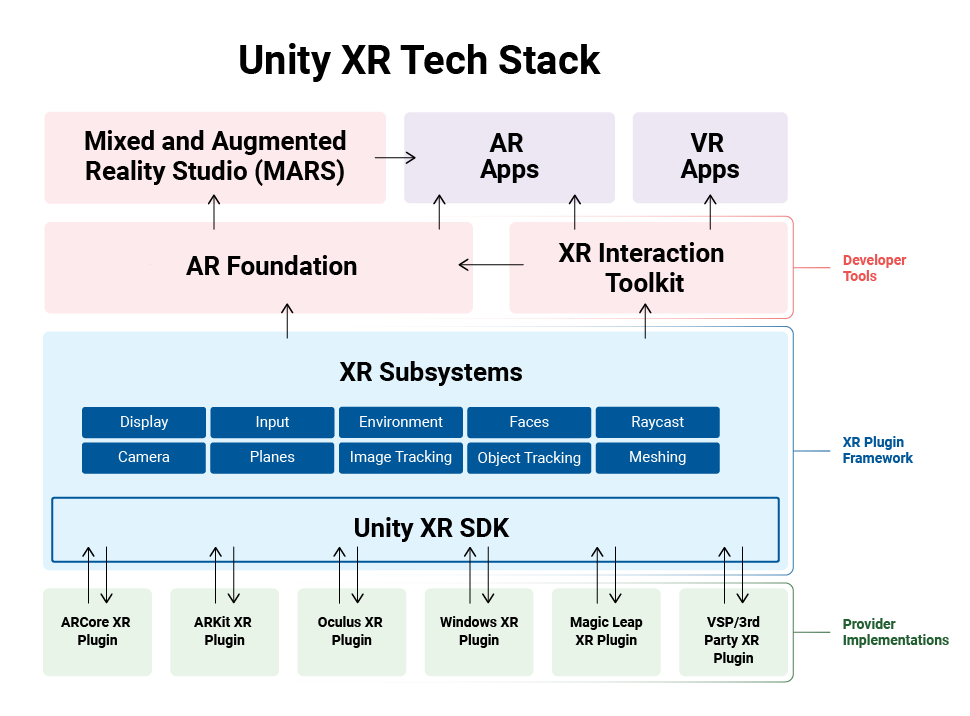
In this system, platform maintainers integrate their platform into Unity by connecting to the Unity XR SDK, while application developers on top only need to interface with AR Foundation and XR Interaction Toolkit to complete cross-platform AR and VR app logic, with support for new platforms only requiring adding the corresponding Provider Implementation.
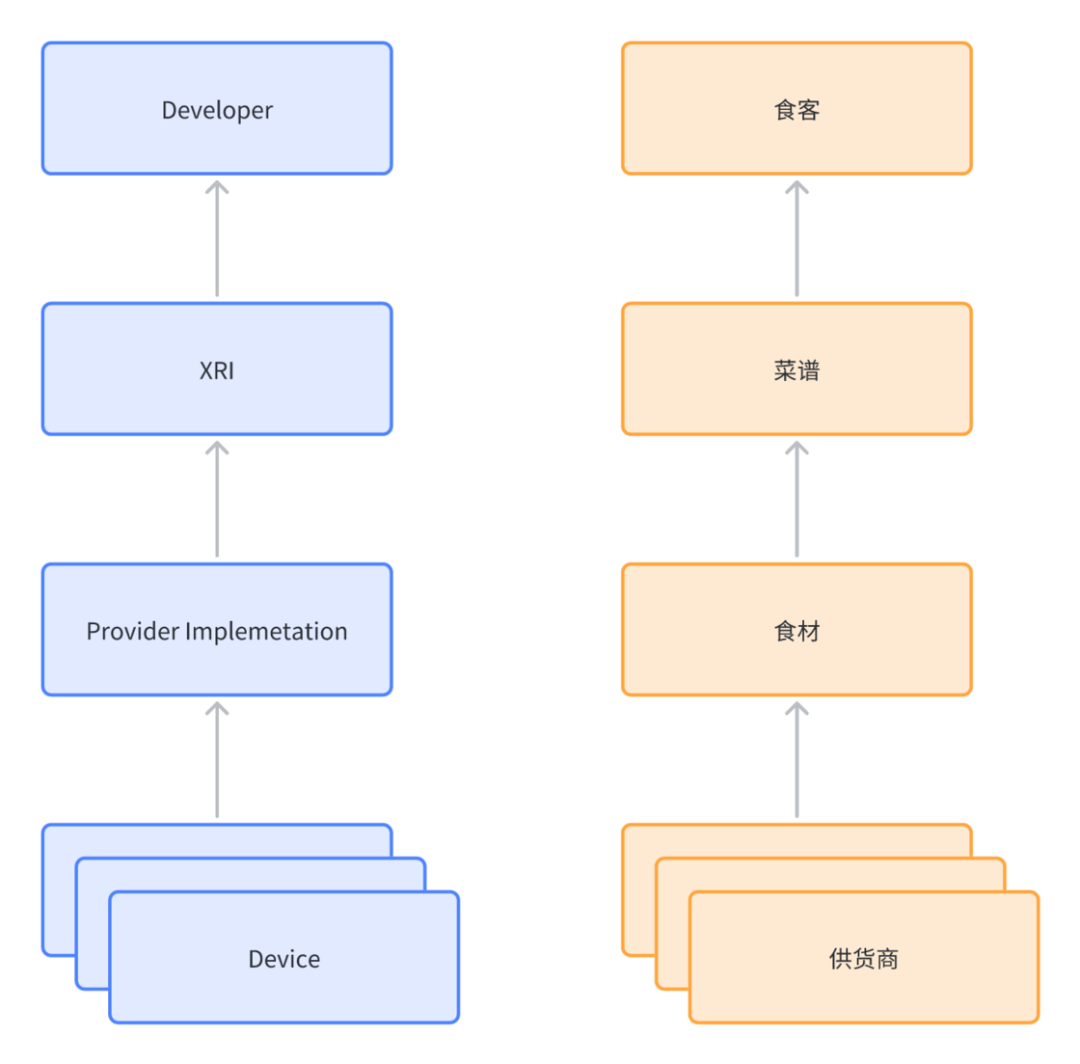
This may still sound a bit abstract. To put it in simpler terms, Provider Implementations are like ingredients for a restaurant, XR Interaction Toolkit is like the recipe, the former determines what customers can eat (similar to what device capabilities are available to developers), while the latter determines how the food is presented (similar to how developers can invoke APIs).
Since XR Interaction Toolkit (XRI) handles how developers use device capabilities, its capabilities are closely related to user interaction forms in XR scenes. Each update tends to build up some common capabilities for interactions in XR scenes.
The 2.3.0 version update of XRI mainly focuses on enhancing two common interaction capabilities:
- Hand tracking
- Eye tracking
For hand tracking, XRI mainly provides these new capabilities:
- Built-in recognition for “poking” gestures with hands, including scrolling UI lists with fingers, pressing numeric keypad, tapping dropdown menus in UI, pressing round buttons.
- Built-in recognition for two-handed collaborative gestures, supporting pinching edges with both hands to enlarge objects.

- Provides Affordance System to compensate for lack of haptic feedback with hand tracking, which developers could implement themselves in original XRI capabilities. The Affordance System mainly offers a unified way for developers to more conveniently implement and manage these effects.

Currently, only devices that fully support OpenXR or Oculus Quest 2 can use XRI interfaces to invoke hand tracking capabilities. Devices like PICO still have to use their own interfaces to access these capabilities.
For eye tracking, XRI brings these content updates:
- Built-in Gaze Interactor to support interacting with objects using eye tracking. As shown in the video below, the direction the user is looking is represented by a white leaf-shaped component. Gazed objects change color, and progress bars fill up when steadily gazed.
It should be noted that since eye tracking technology relates to user privacy, on devices like Quest Pro and Hololens 2 that support it, apps can only enable eye tracking after obtaining user authorization.
If you are interested in eye tracking tech and interaction guidelines, you can check out Eye Tracking Interaction Design from Tobii, a leading eye tracking tech provider.
In addition, XRI this time also provides developers a new XR Device Simulator. With this simulator, developers can directly simulate headset and controller movement and button controls in Unity, so for simple development you no longer need to repeatedly build and package to preview effects, but can directly view them in Unity by clicking Play.

If you are an experienced Unity developer, you can try out the updated XRI Samples yourself and carefully read What’s new in version 2.3.0 for more details.
Idea
Wist — Don’t Just be an Audience of Memories, Step into Them
Keywords: LiDAR, point cloud, panoramic modeling
Your memories — how you remember them pic.twitter.com/eRwIK6xYTF
— Wist: Immersive Memories (@WistLabs) February 21, 2023
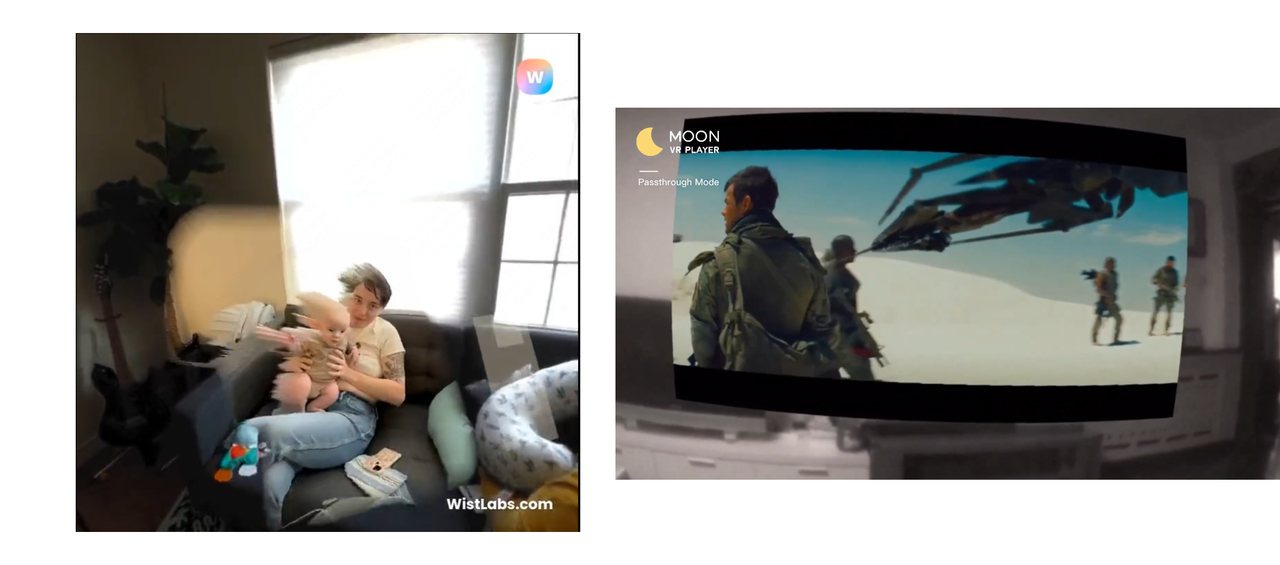
In this video, we see the user playing a previously recorded video in their living room using a VR device. Although it sounds like just playing a regular video, once you actually try it, you’ll find it’s very different! For friends who haven’t experienced XR devices, it may be hard to grasp the difference, so let’s review how most XR devices play videos currently.
Typically (right side below), playing a video in an XR device projects it onto a 2D plane floating in space. The playback is disconnected from real time, especially when you move around, you’ll notice the playback surface seems like a “paper cutout” abrupt in the air.
What makes this DEMO (left side below) special is that it integrates past video content into the environment using XR tech. No matter how you move, the video is no longer simple 2D playback, but has a holographic feel. This makes the phone footage seem almost real, truly amazing!
Although the app needs polish, I think it picks a great entry point, capturing people’s emotional needs, at low cost — just record a simple video.
Now that we’ve discussed the idea, let’s look at the team behind it and the technical principles.
This app is developed by a 2-person team Wist, Andrew R McHugh (CEO) and Michael Oder (CTO). Currently they offer beta testing on iOS and Meta Quest 2, and plan to launch a Quest Pro version soon. You can apply to test on their site.
So how does the app work? The flow has 2 steps:
- Record: Use Wist’s iPhone app to record video.
- Playback: Use Wist’s app on iPhone, Meta Quest 2 or Meta Quest Pro to play previously recorded videos.
Some may think this is simple — just record and play back. But is it really so simple? Also, using other recording apps’ footage in Wist’s playback mode won’t give the video effects! Why is that?
1. You take a video. 😺
— Wist: Immersive Memories (@WistLabs) April 26, 2022
2. @WithVivid makes it 3D. 🎁
3. Step inside your memories – on mobile and in VR. 🥾
Join the waitlist at https://t.co/SQZbO8BXse. pic.twitter.com/3u0hzwPSIW
If we dig deeper, this involves “dynamic 3D reconstruction”, also known as volumetric video or volumetric capture.
We can’t be certain of Wist’s exact implementation since the demo isn’t open source and the team hasn’t explained it in depth. But we can make some guesses about their approach.
Since Wist requires iPhone 12 Pro and above to record, we can infer they leverage the LiDAR sensor. So what is LiDAR?
LiDAR, short for light detection and ranging, is a time-of-flight sensor technology. It fires low-power, eye-safe lasers and measures the time for the laser to reflect between sensor and target. The resulting data is used to generate 3D point cloud images, providing spatial location and depth information to identify, categorize and track moving objects.
This means when recording video with Wist, the environment is also scanned with LiDAR to capture point cloud data. This data is saved, and when playing back the video, the app uses it to build a 3D model, adding texture maps etc. from the video frames, ultimately generating a complete 3D scene reconstructing the original recording location.
Perhaps what sounds most magical is how 3D models can be built from the LiDAR data! Does this seem like a scam to you?
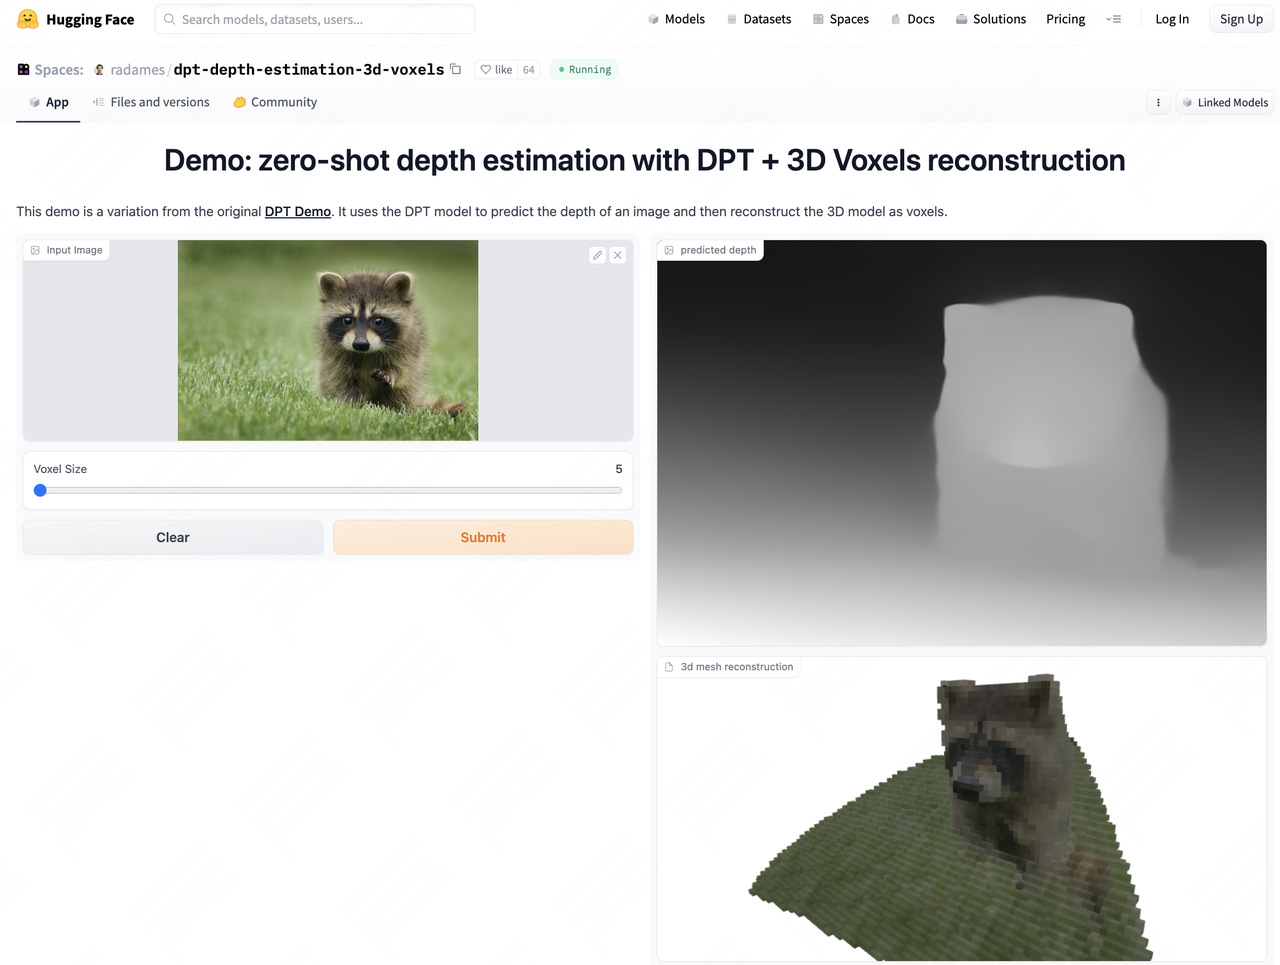
In fact with current tech, 3D models can be obtained from single images too. The principle is the same, except instead of LiDAR, an AI model provides the environmental information.
I recommend you try out Radamés Ajna’s Dense Prediction Transformer (DPT) model trained for 3D reconstruction. As described on the site: Demo: zero-shot depth estimation with DPT + 3D Voxels reconstruction. Pretty magical right?
SeeSignal — Visible WIFI Signals
Keywords: WIFI, electromagnetic waves, visualization
Remember the impressive scene in the movie Lucy where at 40% brain capacity, Lucy could directly sense the flow of information in her environment, visualized by the movie as data streams that Lucy could sift through and select to view details.
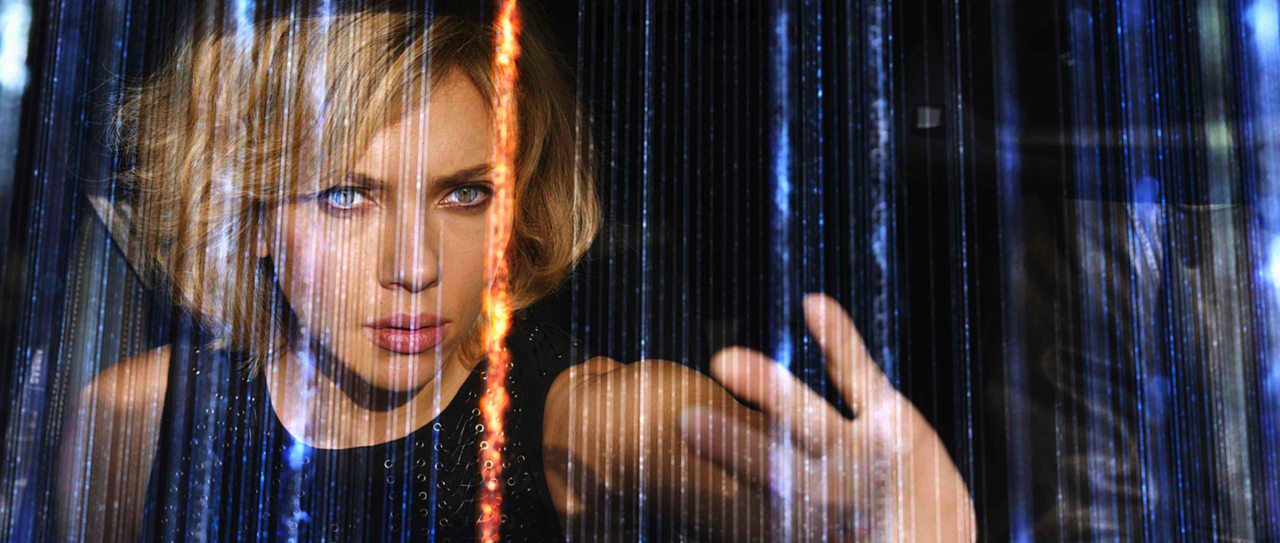
We know signals propagate as electromagnetic waves, which are waves generated by oscillating electric and magnetic fields. They can travel through vacuum and media, with propagation quality determined by the medium type. So in the movie we see the data streams pass through ground, vehicles and air. The problem is electromagnetic waves are imperceptible to the human eye, so can’t be visualized in real scenes.
But with XR headsets, things change. Using the headset cameras for video see-through (VST), we can overlay detected signal information directly, achieving signal visualization — different colors representing signal strength as shown below.
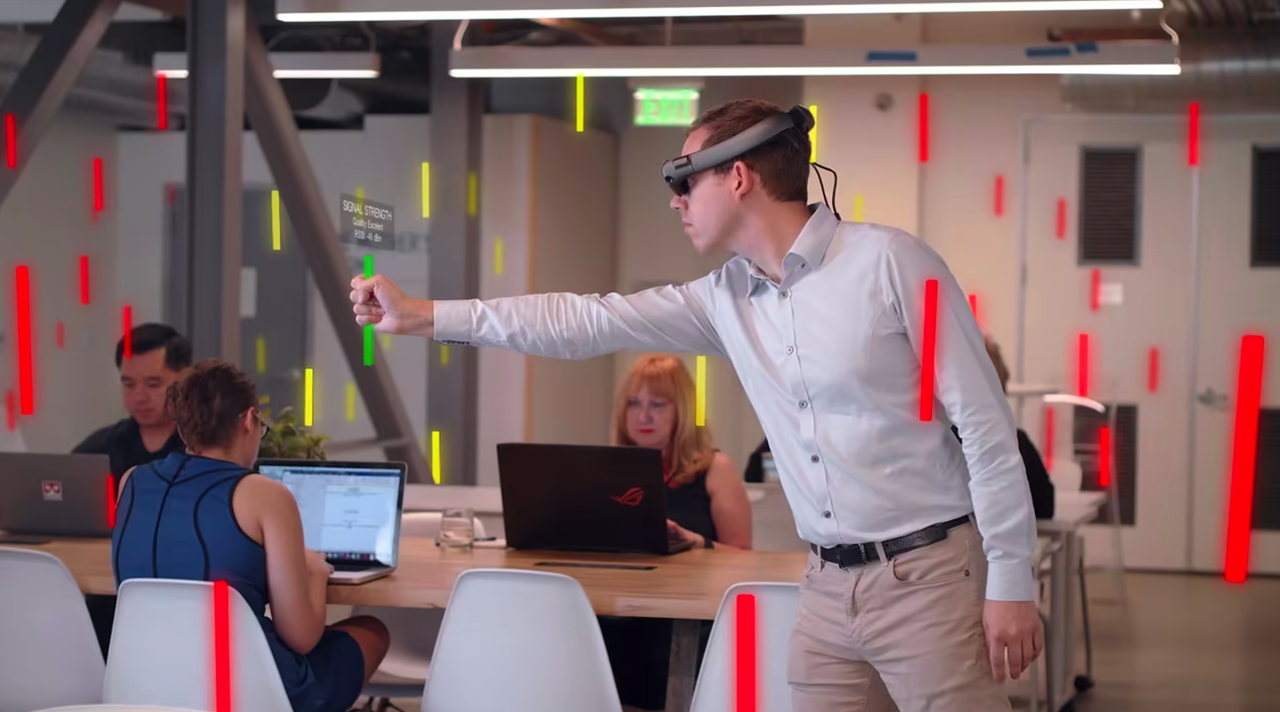
The SeeSignal app by BadVR accomplishes this. It detects signals from phones, routers, Bluetooth devices using spatialized data sampling algorithms. When the user selects a WiFi, its signal is visualized overlayed on the headset view. You can even reach out and touch signal pillars to view details.
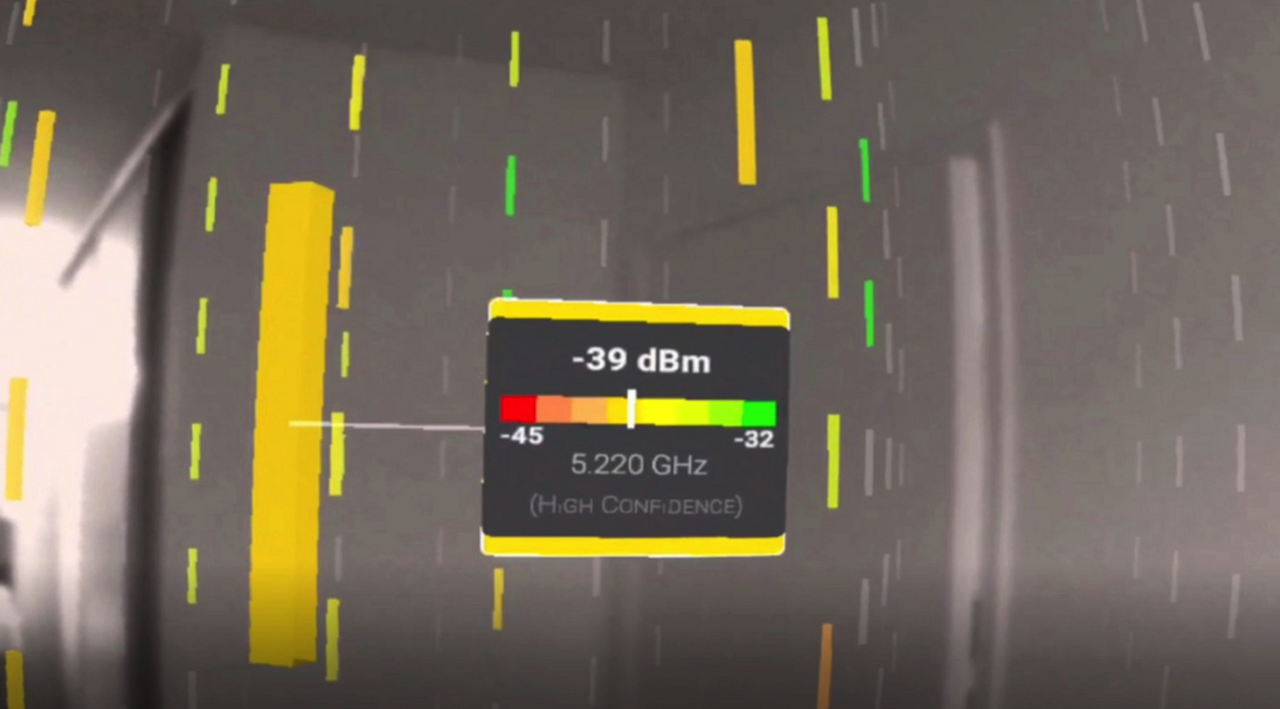
Here’s a demo video showing WiFi signals sampled by frequency, rendered as 3D models in the environment, colored by signal strength. The 3D model is also changeable, into signal spheres, cubes, etc. Clicking shows signal details.
Finally, you can literally "grab" your #wifi signal and find your #network dead spots in #mixedreality. Special thanks to the @BadVR_Inc team for putting together such a handy app. Link below 👇#technology #QuestPro pic.twitter.com/hVeMn9xsEJ
— Gabriele Romagnoli (@GabRoXR) March 3, 2023
SeeSignal is currently available on Oculus App Lab, working on Meta Quest, Quest 2, and Quest Pro.
Concept Video: AR Makes Cooking More Effortless
Keywords: cooking, AR, guidance
Remember the frantic first time you cooked on your own? Oil was hot but ingredients weren’t prepped. Forgot salt, or added too much. Dish was plated but you realized onions were missing. Following recipe apps step-by-step, but hands were full and you had to keep checking the app.
If you’ve been there, check out this video below — it may change your perspective:
See anything different? Cooking with an XR headset! Bring up recipes by gesture, see required ingredients and amounts. Like playing a game, complete prompted tasks.
Boiling soup? A countdown timer hovers over the pot. Stir occasionally, get reminded when time’s almost up. Baking dessert? The tray shows how many items and spacing. Oven displays target temperature.

Cooking this way lowers the barrier to mastering culinary arts. No more shuffling between appliances, screens and messy recipe pages. Guidance intertwined with the physical space creates an intuitive flow.
As AR advances, such “spatial recipes” could assist home cooks and even restaurant kitchens. Novice or expert, overlaid visual information relieves cognitive load. More industries should explore using AR overlays to enhance physical tasks. The possibilities are endless.
Tools
Lens Studio — Powerful AR Creation Tool Based on Snapchat [19]
Keywords: AR, Snapchat
First take a look at this video, guess what kind of visual effects software is needed to create such a body-separating video effect?
playing around with particles on mesh - the 3D body mesh in this case!
— Max van Leeuwen (@maksvanleeuwen) February 28, 2023
snaplens https://t.co/aFgTX42Aht@SnapAR pic.twitter.com/rYeZWnGdYg
Perhaps professional visual effects software like AfterEffects initially came to mind, but effects like this can actually be achieved with Snapchat’s LensStudio.
As an app centered around photos and filters, turning to AR seems like a natural choice for Snapchat — after all, many “filters” can be seen as a form of AR. And a “filter” based approach to AR requires a creator tool, to bring more creators into the “filter” or “effects” ecosystem, providing more fun “filters” and “effects” for Snapchat users.
So in late 2017, Snapchat released a new desktop tool — LensStudio, to help creators more easily build AR effects on Snapchat.
After 6 years of iteration, LensStudio is now at version 4.43. If you’re an experienced game developer, you’ll notice the interface layout is now very similar to professional game engines like Unity and Unreal.

In capabilities, LensStudio also supports many powerful AR features without complex code, by simply dragging and dropping Snapchat provided building blocks. Here are some key capabilities:
Face recognition (2D)
Snapchat can recognize faces in the camera and add some 2D textures to parts of the face, such as the eyes, nose, forehead in the image.

Face recognition (3D)
Snapchat can model the face in 3D, and allow you to apply additional 3D effects to the 3D model. For example, in the image a smooth bubble-like texture is added to the face.

Image tracking
Snapchat can continuously recognize and track a real-world image, and render a 3D model in stable relative position to the image, like the dancing creature on the image.
Body skeleton tracking
Snapchat can understand and track the human body and corresponding bone positions and orientations in the real world, and render customized models on the tracked skeleton.

Gesture tracking
Snapchat can understand and track the joints and orientations of the hands. For example, a ⭕️ is added to each joint in the image.

Real world reconstruction
On devices with LiDAR, Snapchat can model the real world and associate 3D objects stably. As in the image, through simple scanning, Snapchat can recognize the scene and locate the device, to render the 3D model in the right spot.

In addition to these AR capabilities, LensStudio can also achieve common game engine features like VFX, particle systems, physics simulation, etc. Based on these capabilities, many creators outside China have made interesting Lenses (completed AR effects in LensStudio). If Snapchat is installed on your phone, click the links below to try out some Lenses:
- Gravity Cube

- Nuclei

- VOXELIZE:
- Glowing Orbs Lens:

One More Thing: As filter-focused apps similar to Snapchat, TikTok and Instagram also have creator tools — EffectHouse and Meta Spark Studio. The positioning is similar, but LensStudio currently seems the most mature in capabilities.
Code
FocusEntity: Quickly Integrate AR Focus in iOS Apps
Keywords: AR, iOS, human-computer interaction
Placing an object at a specific location in the real world is a very basic operation in a typical AR app. In this process, since it’s hard for users to determine the final position and orientation of the object directly through device orientation, Apple’s official AR HIG (Human Interface Guidelines) also suggests developers provide clear visual guidance on object placement:
Show people when to locate a surface and place an object*. You can use the system-provided coaching view to help people find a horizontal or vertical flat surface on which to place an object. After ARKit detects a surface, your app can display a custom visual indicator to show when object placement is possible. You can help people understand how the placed object will look in the environment by aligning your indicator with the plane of the detected surface.*
With FocusEntity, you can quickly integrate a visual indicator in your app to help users understand where objects will be placed.
Video
Using ChatGPT in Unity
Keywords: ChatGPT, Unity, AI
ChatGPT’s popularity has every industry exploring ways to integrate it into workflows. In this video series, Dilmer Valecillos shows how to leverage ChatGPT in Unity using simple scripts.
At the end, two main example scenes demonstrate using ChatGPT in Unity:
ChatGPTLogger.unity: A simple scene showing generating basic cubes with ChatGPT.

ChatGPTPlayerClones: A scene showing loading a character model every 0.5 seconds from resources and making them automatically move and jump.

The code is simple overall, with the core of executing ChatGPT responses in the RoslynCodeRunner.cs file on Github.
In addition, Unity officially released the UNITY AI BETA PROGRAM, utilizing AI to simplify creator workflows. You can sign up on their site if interested.